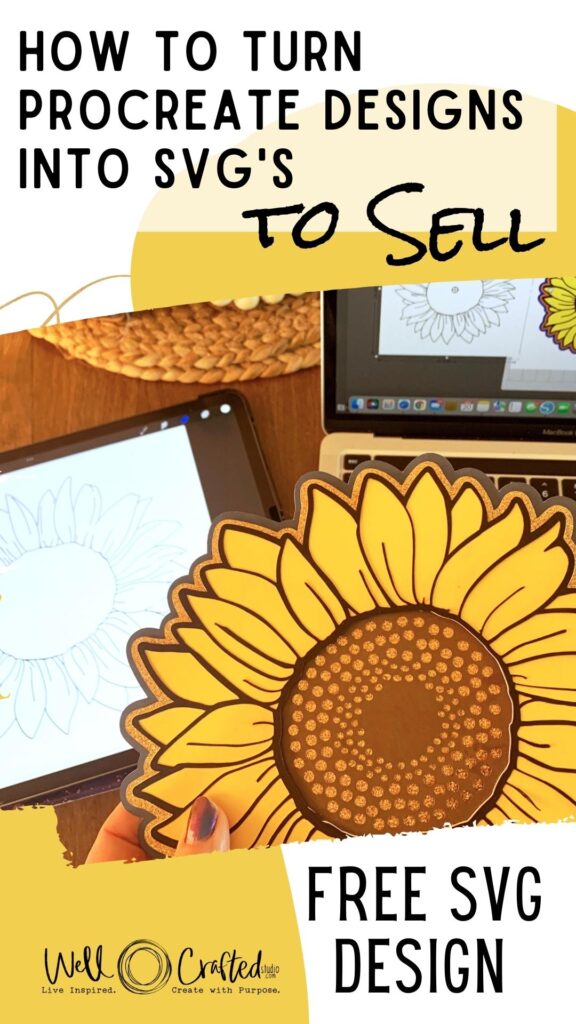
You’re making super cool art in Procreate, but wondering how to turn it into a cut image for your cutting machine. Because Procreate is a raster-based app the best way to create SVG designs from your Procreate art is to use design software. This tutorial on how to use Silhouette Studio to make SVG’s from Procreate will show you how to trace your design, work with edit points and vector shapes, and export your design as an SVG file. Perfect for creating your own designs for use in Cricut Design Space!
- Introducing Silhouette Studio for Beginners
- What's the Difference Between the Different Versions of Silhouette Studio?
- Other Ways to Convert Your Procreate Designs to SVG's
- Get My Free Silhouette Studio Work in Progress .Studio File And Follow Along with this Tutorial!
- How to Use Silhouette Studio to Make SVG's from Procreate Designs – Tutorial
- Step One: Export Your Procreate Design
- Step Two: Download Silhouette Studio to Your Desktop
- Step Three: Upload Your Procreate Art into Silhouette Studio and Size
- Step Four: Trace Your Design
- Step Five: Change Your LIne Color (optional)
- Step Six: Release Compound Path to Break Your Design into Shapes
- Step Seven: Using Edit Points
- Step Eight : Working with Bezier Curves to Get a Fluid Line
- Step Nine: Using Shapes in Silhouette Studio
- Step Ten: Using Freehand Draw, Erase, and Knife Tool
- Step Eleven: Seperating Shapes for Layers
- Step Twelve : Use Shapes with Offset
- Step Thirteen: Grouping Shapes and the Replicate Panel
- Step Fourteen: Making Your Shape a Compound Path and Filling it with Color
- Step Fifteen: Aligning Your Layers to Prepare to Export
- Step Sixteen: Grouping Your Layers and Saving Your Design
- Step Seventeen: Exporting Your Design as a .Studio file or .SVG file
- For More Inspiration
- Love this Post on Using Silhouette Studio to Make SVG's from Procreate Designs? Share it!
Introducing Silhouette Studio for Beginners
Silhouette Studio is the software for Silhouette America’s brand of electronic cutting machines, the Silhouette Cameo and the Silhouette Portrait.
Silhouette Studio is comparable to Cricut’s Design Space, in that they were both designed to be the operating systems for the hardware. But the Silhouette software itself does much, much more than JUST command a Silhouette machine.
And unlike pro design programs like Adobe Illustrator, Silhouette Studio was created for crafters.
The main reason to use it is to do things like creating curved design templates for tumblers, designing patterns with rhinestones, and making sketches and fills for foiling and engraving. This software was literally designed to craft with.
There are also other design software programs like Affinity Designer, and Adobe Illustrator that are similar to Silhouette Studio. But Illustrator is a subscription, and neither was created expressly for crafters + makers.
What’s the Difference Between the Different Versions of Silhouette Studio?
Not a Silhouette user? Silhouette Studio has a Basic Edition that’s free, as well as three upgrades you can purchase. Designer Edition, Designer Plus Edition, and Business Edition.
Tip: I would recommend you download the free Basic Edition and then follow the tutorial below to see if it’s something you think you’ll like to learn how to use.
My best advice is that if you decide you do like Silhouette Studio, buy the Business Edition. If you check my affiliate link for the Silhouette Studio Business Edition you’ll see it does go on sale occasionally at Swing Designs.
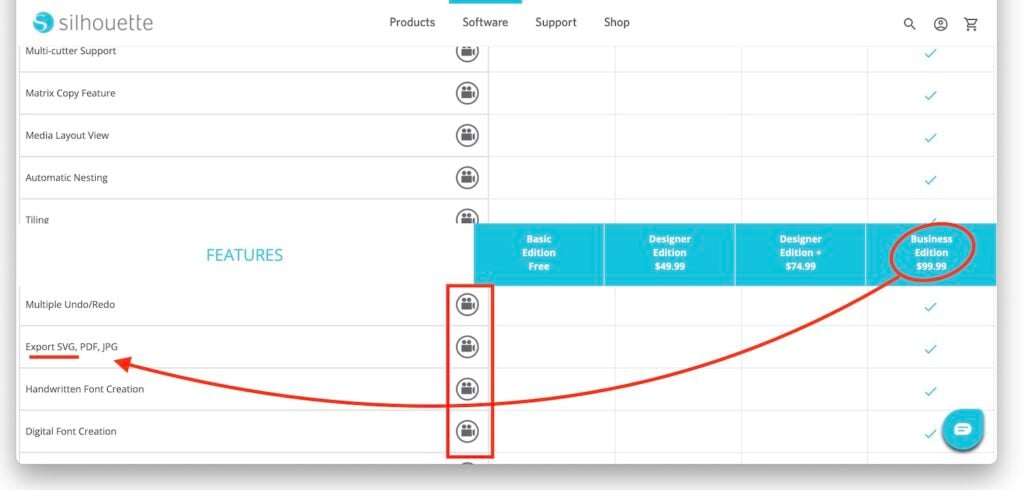
Besides other features like font design and puzzle making, the truly important thing is that only the Business Edition gives you the opportunity to save your designs as an SVG. And if you ever decide you want to sell your designs as cut files (or even just share with other crafters outside of Design Space) you’ll need this capability. That alone makes the extra cost worth it for many crafters.
Other Ways to Convert Your Procreate Designs to SVG’s
There are other ways to convert your Procreate designs (a raster image) into vector art.
If you only want to convert your art into SVG files (and don’t want to be able to control the points or use the other editing tools in the design software) then you may want to try a free online converter first.
I give you some of the best apps and websites in my article on How to Make SVG Files from Procreate Designs. Including my favorite app for this, Adobe Capture.
Tip: Use the camera links on the Software Comparision Chart to see short videos of all the different features. Even if you’ve already purchased the software this is a great resource for understanding what everything does.
Get My Free Silhouette Studio Work in Progress .Studio File And Follow Along with this Tutorial!
The step-by- step guide below walks you through tracing and editing a design I created in Procreate and saved it as a JPEG and uploaded into Silhouette Studio.
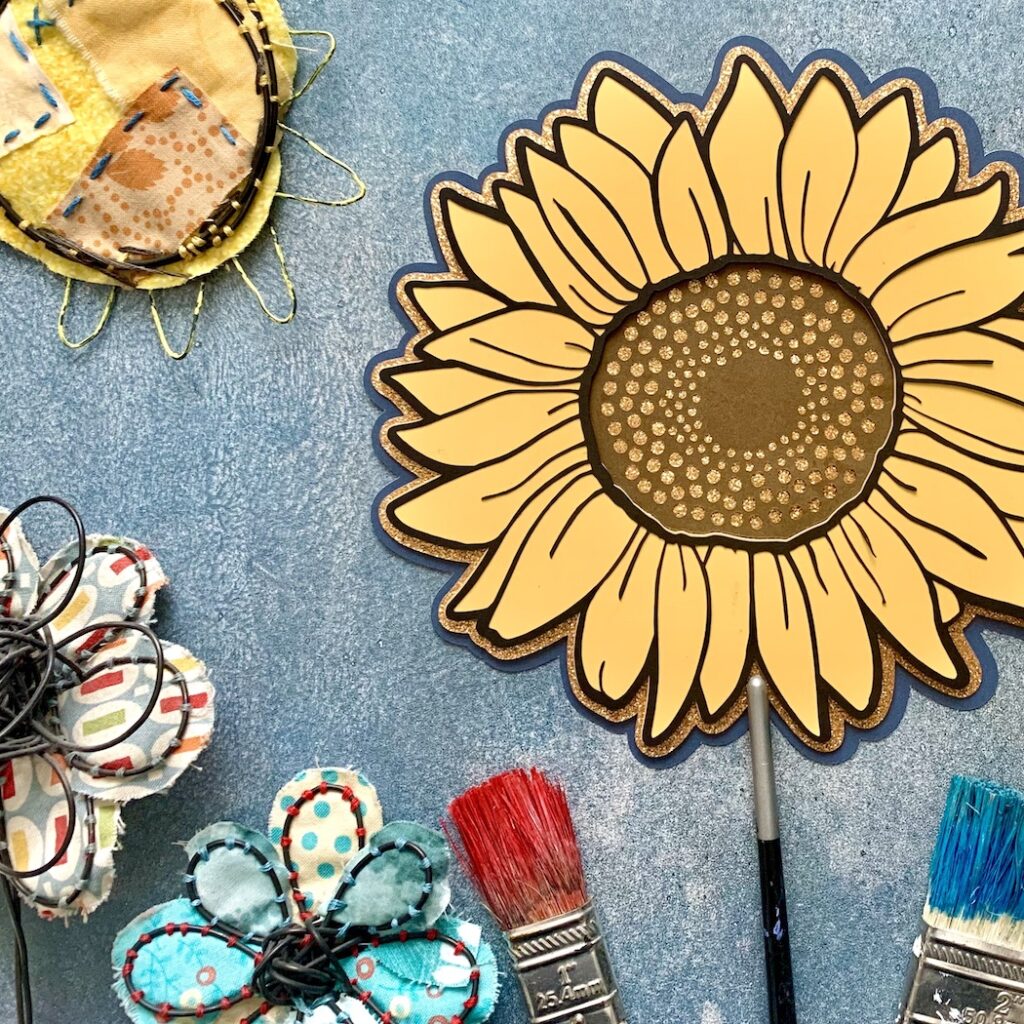
For your convenience, I’ve saved the JPEG for this design as well as the finished Layered Sunflower as a .studio file that you can download from my Free Library. It will ONLY open in Silhouette Studio so you need to have that downloaded.
AND as a bonus, I have the finished Layered Sunflower SVG in my Free Library too!
Need the password? Just sign up for my email list, and you’ll get the password emailed directly to you!
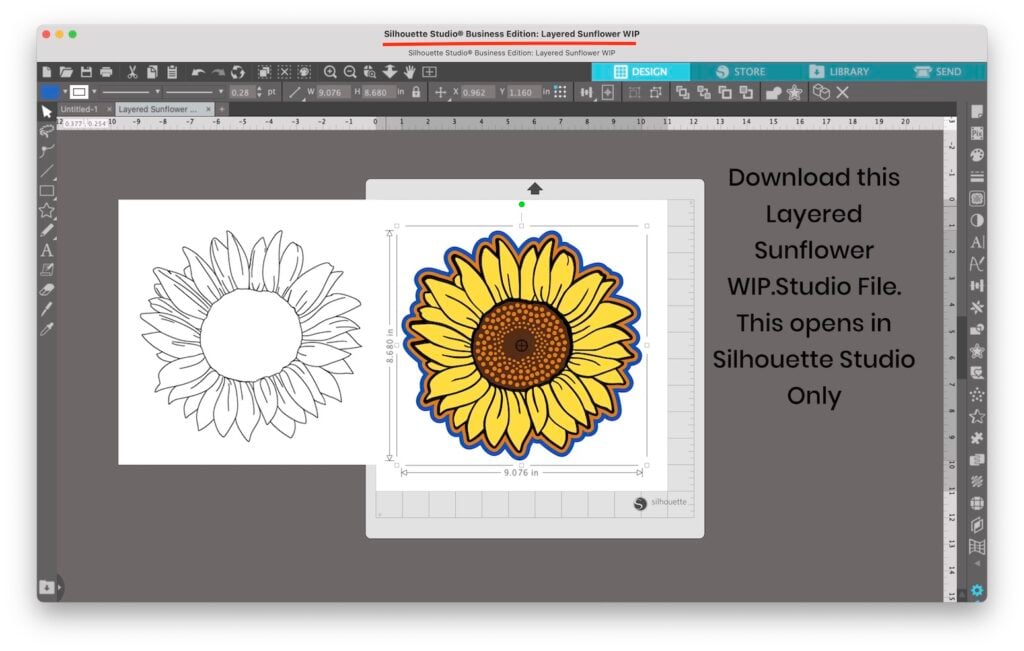
How to Use Silhouette Studio to Make SVG’s from Procreate Designs – Tutorial
What You’ll Need-
- Silhouette Studio (Basic or Business Edition)
- Computer
- Procreate App
- iPad (I love my iPad pro)
- Optional Download from the Free Library– The .studio file for this tutorial
This post contains affiliate links. Thank you for supporting my small business.
Instructions for How to Use Silhouette Studio to Make SVG’s from Procreate Designs
Step One: Export Your Procreate Design
Before we can begin in Silhouette Studio, you’ll need to export your Procreate art as a JPEG.
To do this, first, open the Actions Panel (the wrench icon in the top right of the toolbar) and tap on the Share button.
Select Share as a JPEG and save the image file to your Files (a little file folder icon) on your iPad.
This saves your work to your iCloud Drive which makes it easy to grab from your desktop. Or you can save to Dropbox, Google Drive, or OneDrive too.
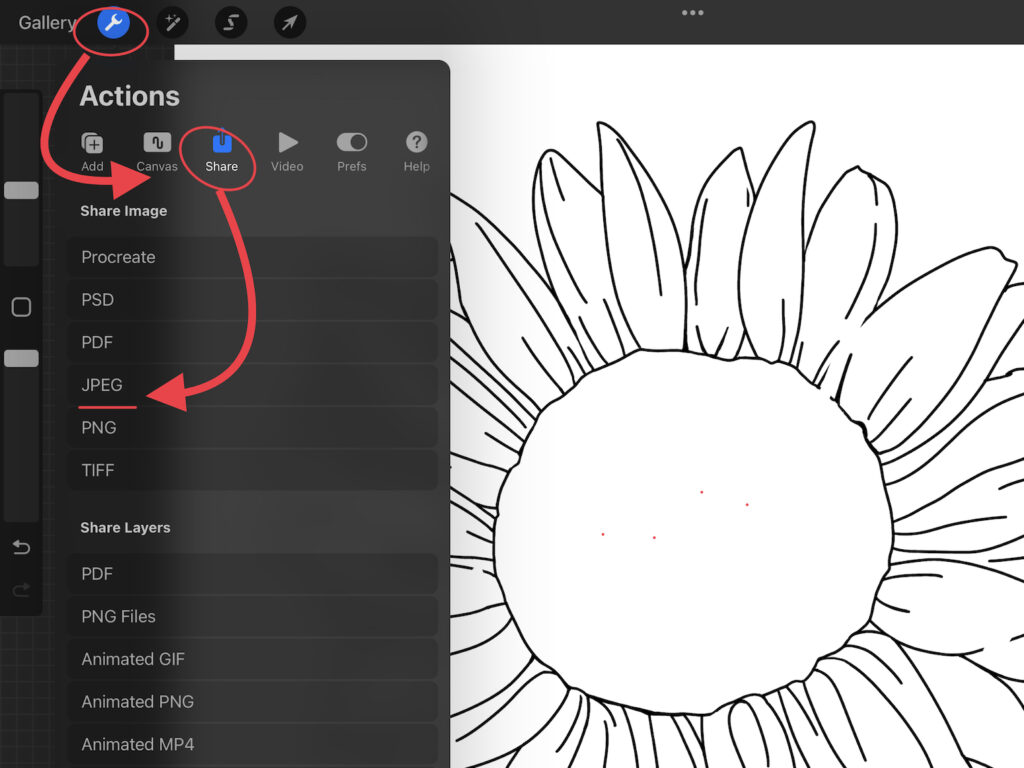
An alternative method is to Airdrop it to your computer if it’s a Mac. Then you can save it on your computer’s hard drive.
Note: I used to recommend you upload to Silhouette Studio as a PNG but with the latest version of SS they automatically trace PNG’s with a transparent background. Which sounds cool, but takes the control away from you.
Step Two: Download Silhouette Studio to Your Desktop
If you haven’t used Silhouette software before you’ll want to download it from SilhouetteAmerica.com.
Go to the Software tab at the top of the page and then click the Download link button. This is an instant download. Then, open the application download file, and install it on your computer.
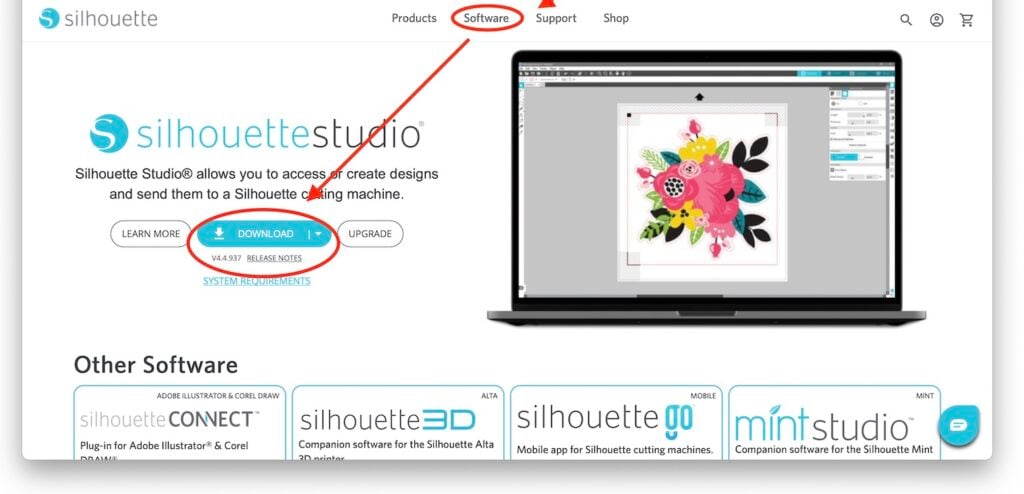
Install with a Mac- All you have to do is double-click the application. Follow the instructions. Then drag the Silhouette Application into the Applications folder. After it’s installed, delete the original download file.
Then, open Silhouette Studio and we’re ready to rock and trace!
Step Three: Upload Your Procreate Art into Silhouette Studio and Size
To open a new design in Silhouette Studio, go to the top of your screen to the File>Open. This creates a new canvas on a new tab. If you want to open your design on an existing tab then you would use the File>Merge option.
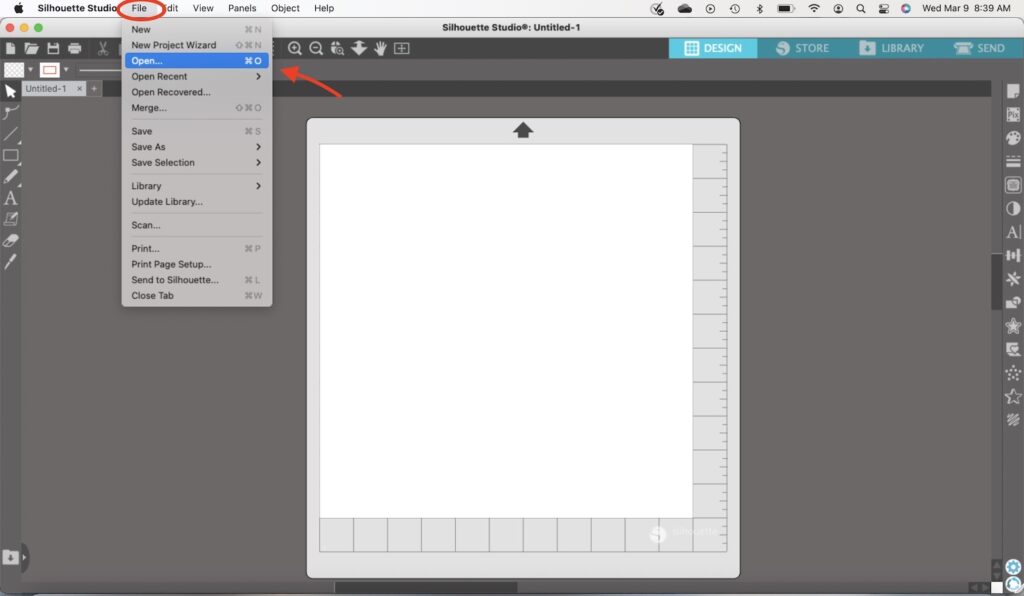
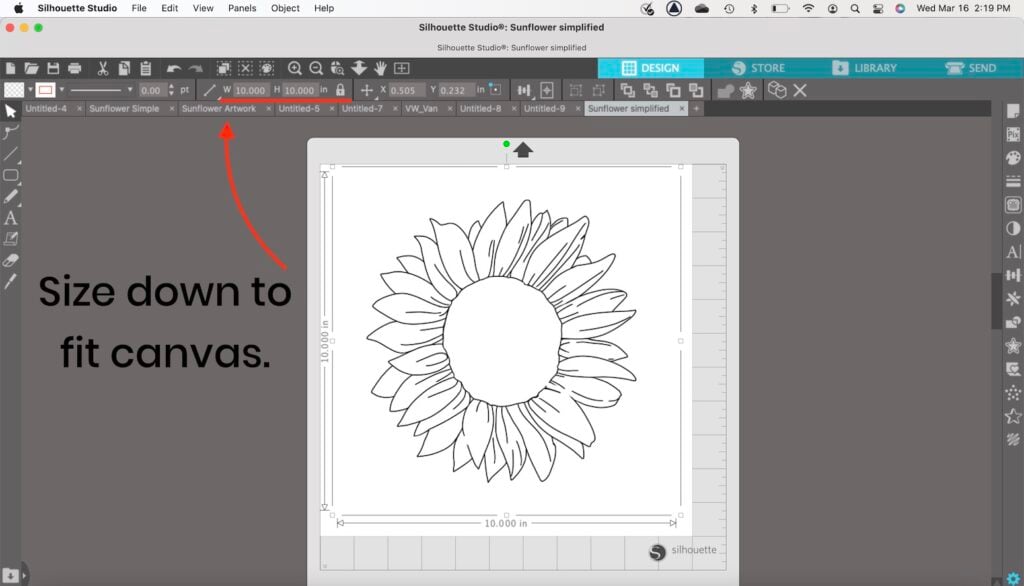
Next, you’ll probably have to size your work down. You can do that in the top toolbar in the W and H boxes. If you keep the aspect ratio locked (the little lock) then changing the height should automatically change the width to match.
Step Four: Trace Your Design
The next step is to trace your design in Silhouette Studio using the trace feature.
To do this go to the side toolbar and use the icon that looks like a piece of toast to open the Image Trace Panel.
Use the Select Trace Area button, and then click and drag a selection box across and down to cover your design.
Give it a moment, and you’ll start to see some yellow appear. When this happens, you may want to increase the Threshold to make the lines stronger and get a better trace.
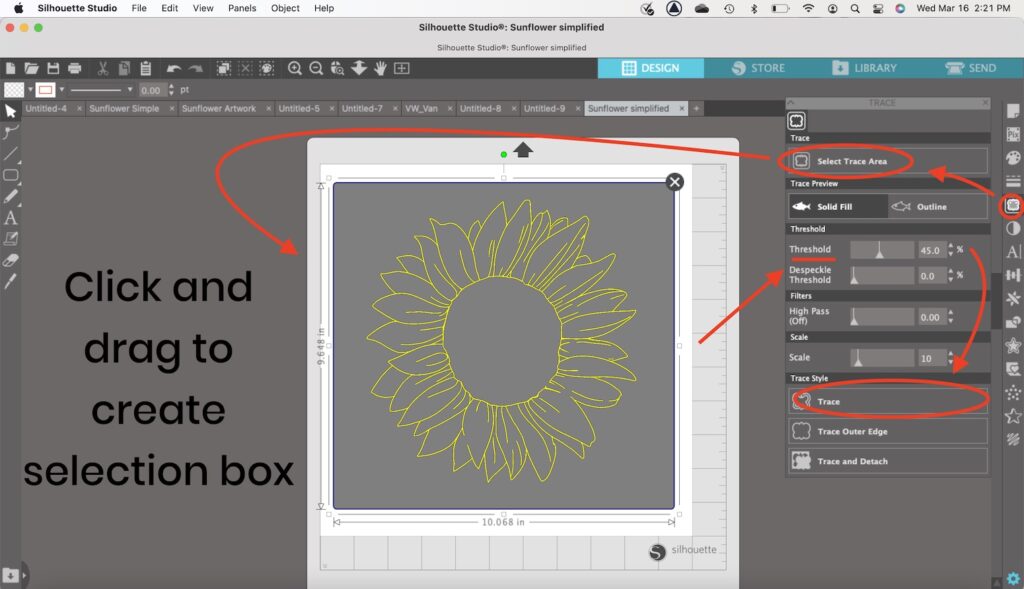
If no yellow lines appear, try using the High Pass Filter. Sometimes I just try again and it works.
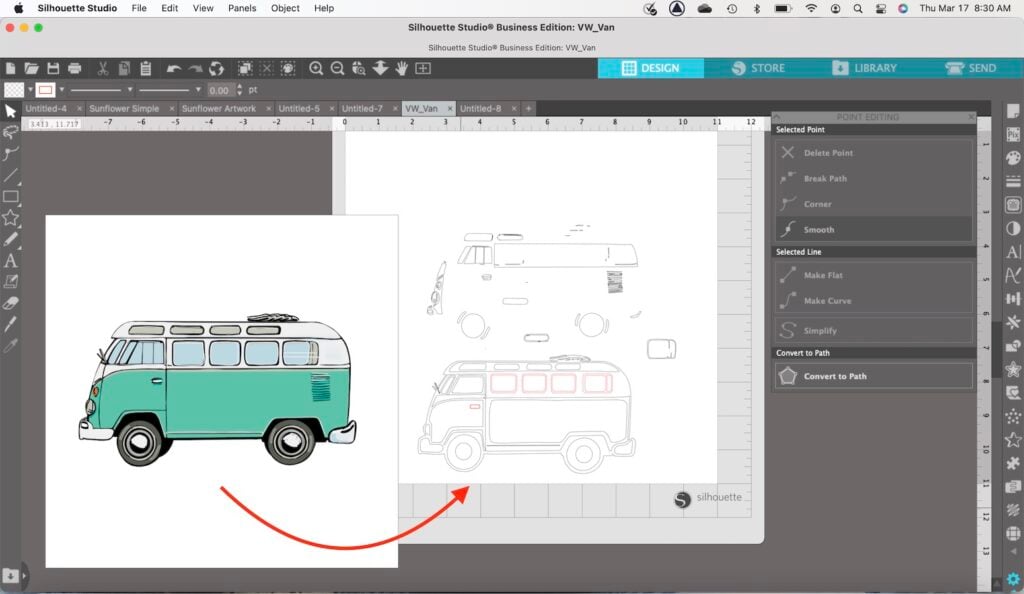
Trace can be a little finicky and it does work best when you’re using a black and white design, or if it’s a design that’s high contrast.
HOWEVER, I have used it with designs that are full color and it does work. You can see in the example below how well the trace on this Procreate design worked.
Step Five: Change Your LIne Color (optional)
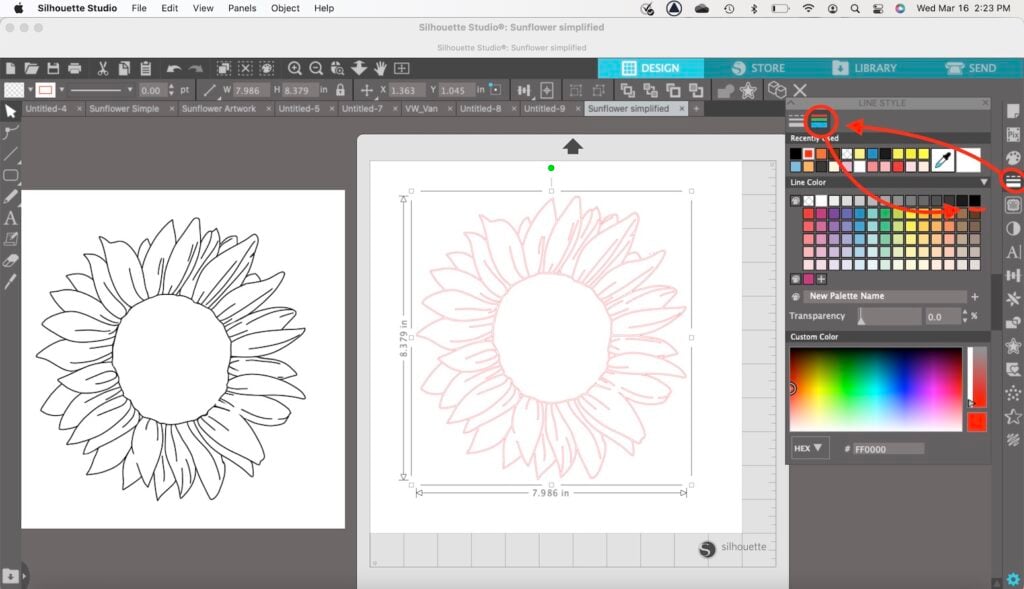
If you don’t want to work with the red lines (maybe it’s hard for you to see), you can change your line color to a different color.
Go to the side toolbar and the fourth icon down is Line Style. With this panel, you can change the size/type/and color of your lines. Click to choose the color you want to use.
Note: Keep in mind that using black lines on SVG’s that you sell is expected. So even if you don’t do this now, you’ll want to change the line color before you export as an SVG.
Step Six: Release Compound Path to Break Your Design into Shapes
The next step is to go to Object at the top of your screen and then Release Compound Path.
This essentially breaks your design down into all the shapes and lines that create it.
This is our first step to being able to edit the design and separate the layers on our design.
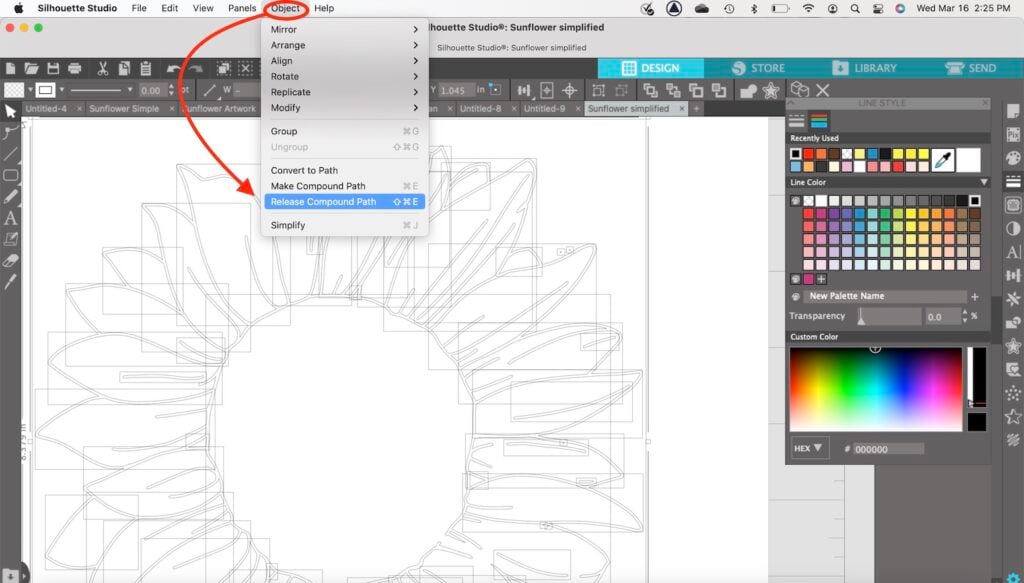
Note: Before we save it as an SVG to export you need to go back and Make a Compound Path.
Step Seven: Using Edit Points
Before we start using points a HUGE tip that I have for you is to Zoom in.
The points can look like they’re impossible to manipulate when they’re all clustered close. But if you zoom in, you can easily see each individual edit point.
Open Point Editing
To begin working with anchor points, you first need to switch to point editing. You can do that by selecting a shape and then double-clicking on it, or you can select the shape and click on the points tool in the left-side toolbar.
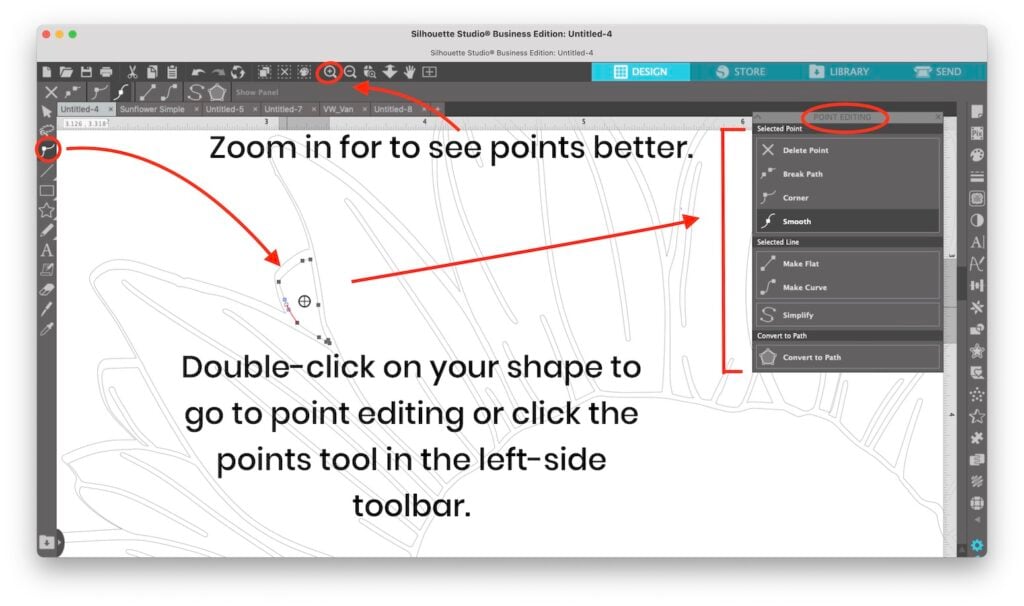
Selecting a Point or Multiple Points
To Select a single point you just click on it. To Select multiple points at once you hold down the shift key as you click on each one you want to select.
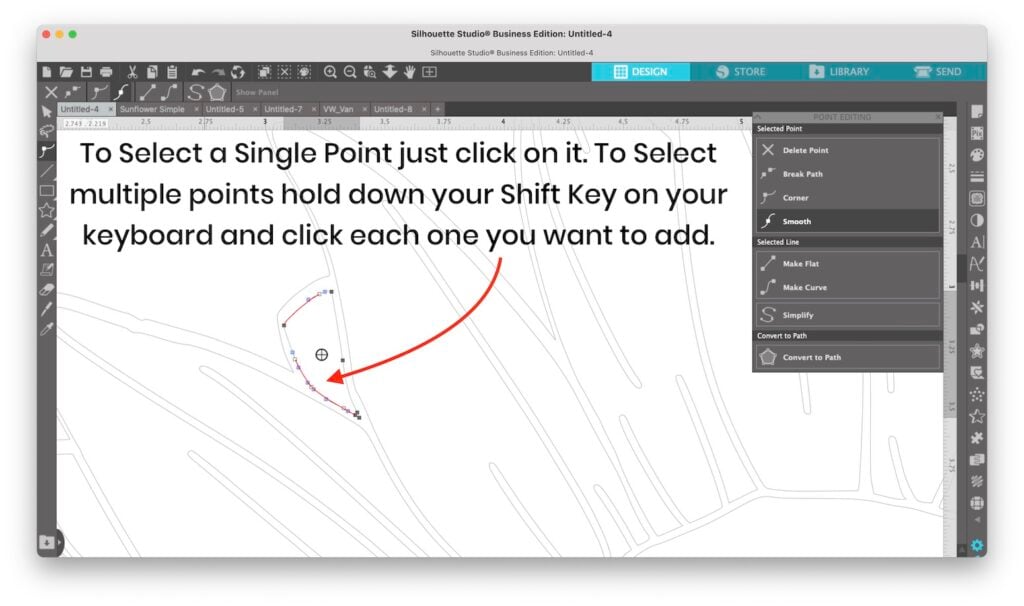
Deleting Points
To delete a point first select it. Then hit the delete key on your keyboard. You can also use the Delete Point action in the Point Editing Panel. You can delete several points as once by selecting multiple points. You can also delete points in a line by selecting one point and then continuing to hit delete.
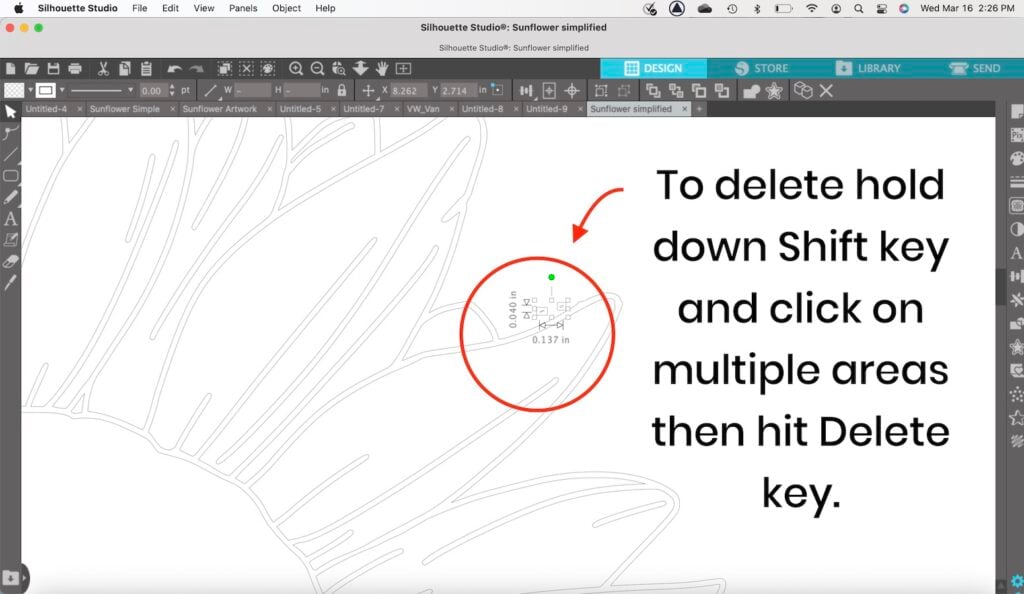
Breaking and Connecting Points
You can break up a path by clicking on an edit point to select it and then choosing the Break Path action in the Point Editing Panel. This will create a red dot which is the last point on your path.
To reconnect points, click on the point you want to connect and drag it over the red dot.
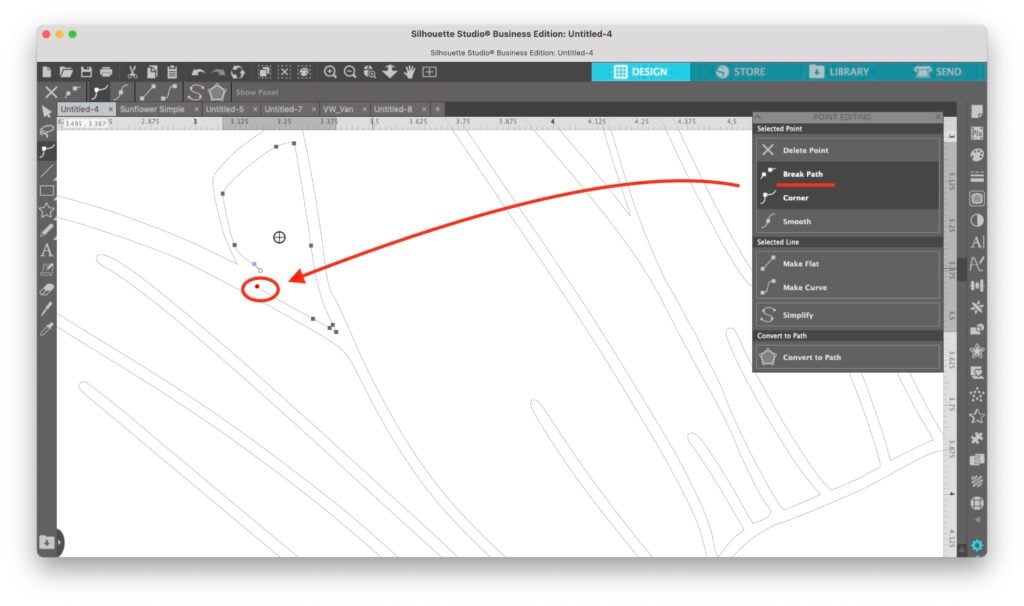
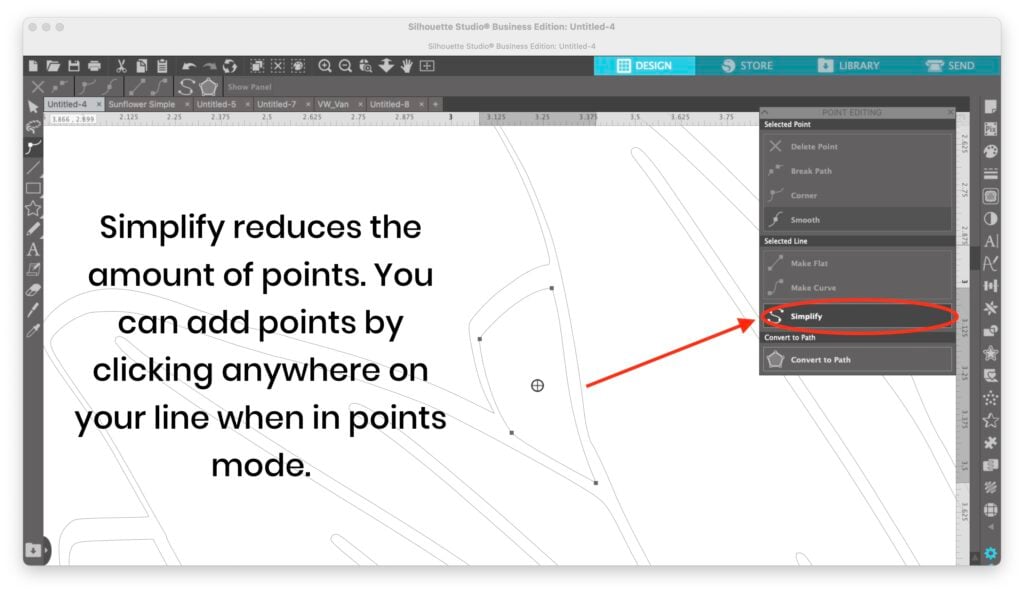
Simplifying Paths (Shapes) and Adding Points
You can remove points in your shape by clicking on the shape to select it, and then using the SImplify option in the Points Editing Panel.
Be careful when you use Simplify, as it does produce more angular shapes. This could look bad, especially if you use it on letters in a font.
To Add Points just click anywhere on the selected shapes while you’re in point editing.
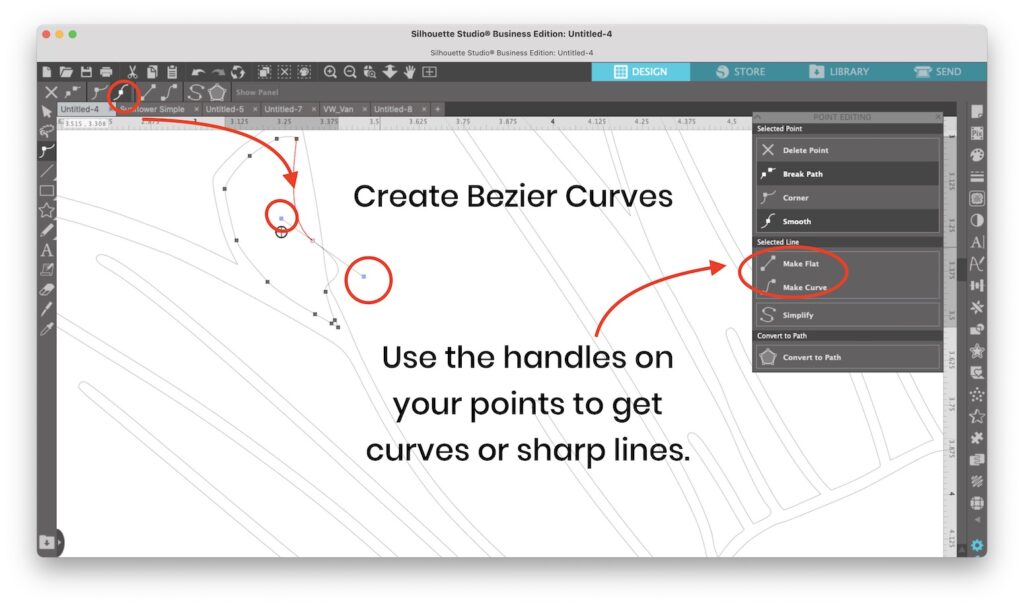
Step Eight : Working with Bezier Curves to Get a Fluid Line
Bezier Curves is the design term for fluid mathematical curves that are created using points. In Silhouette Studio these curves are made using little handles on the points that you can move out and move around.
Step Nine: Using Shapes in Silhouette Studio
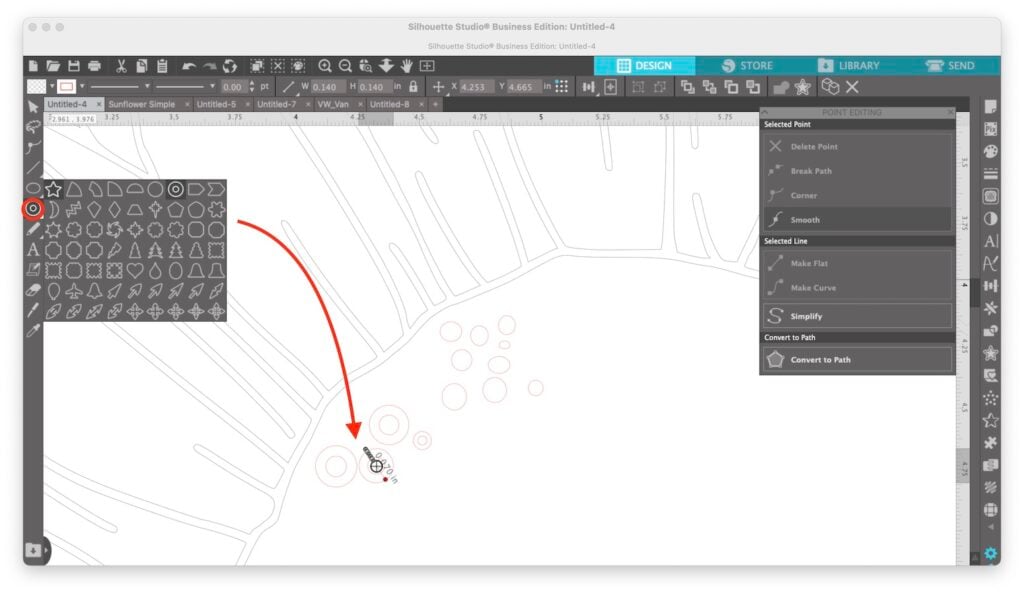
Working with Vectors means working with shapes, and besides the hand-drawn and traced shapes that we’ve been working with up until Step Nine, you can also add pre-made shapes.
There are two shapes tools. One does basic shapes like rounded rectangles, rectangles, ellipses, and polygons.
You can also hold down the shift key as you use any of these to snap them to a square or circle. (This is similar to the one-finger modifier in Procreate’s QuickShape.)
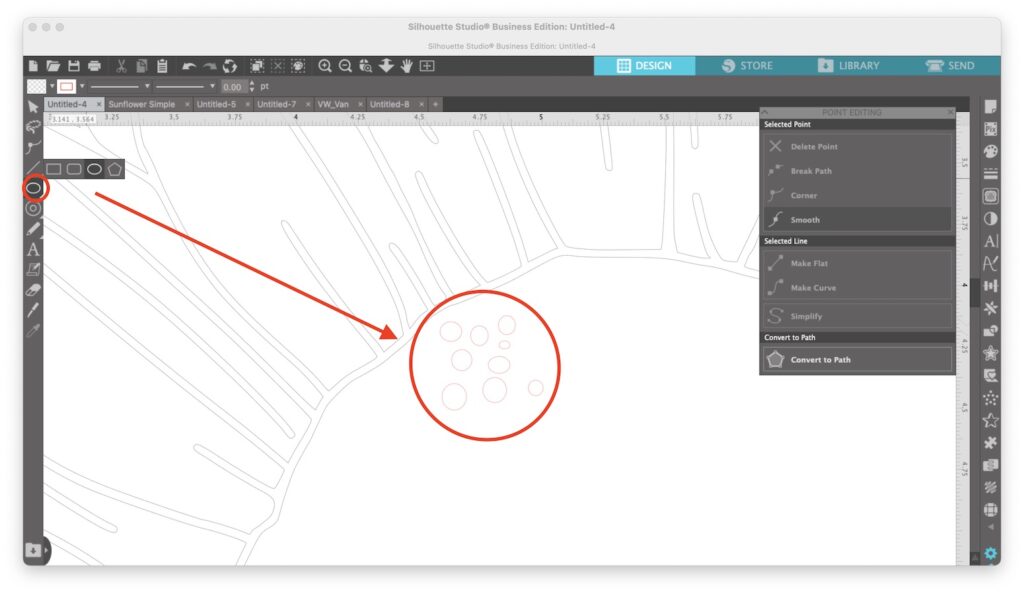
There is a second shapes tool which has a really big variety of shapes.
Each of these shapes is editable.
For instance, you can change the number of points on your star shape, or turn it into a daisy.
In the example below, I’m using the little bullet circle shape to create seeds for my sunflower.
Step Ten: Using Freehand Draw, Erase, and Knife Tool
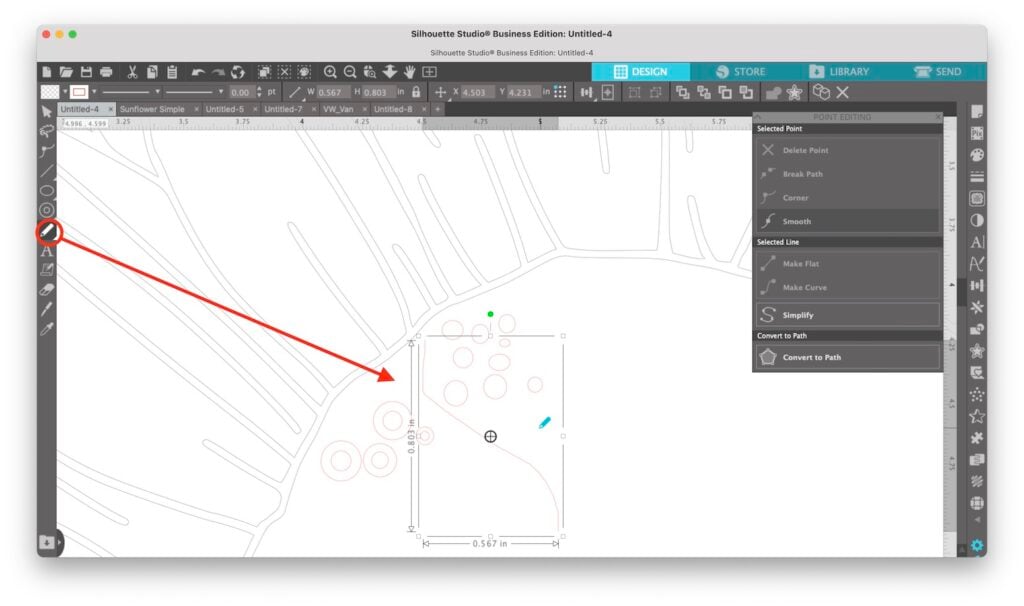
To create a simple line there is a line tool above the shapes. But for a fun, freehand line try the Freehand Pencil Tool (it looks like a pencil). Remember, you can use points editing to turn your drawn lines into smooth, fluid curves.
These are awesome tools to play with. Not only can you use the Eraser to erase lines, but you can also use it to make your shapes into their own closed shapes when you have Solid selected as an eraser option in the top toolbar.
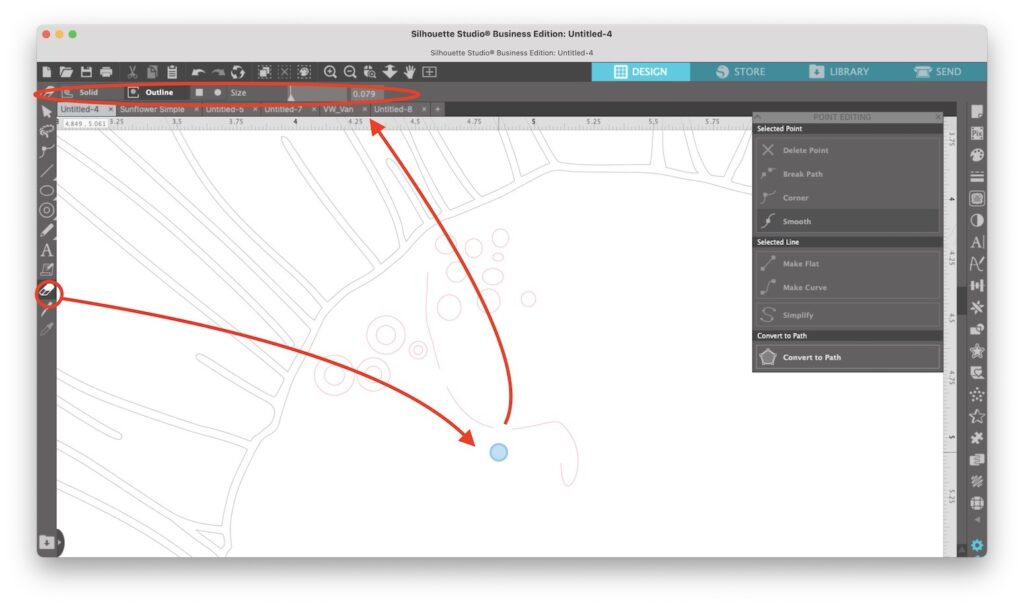
This works for the Knife tool too!
Step Eleven: Seperating Shapes for Layers
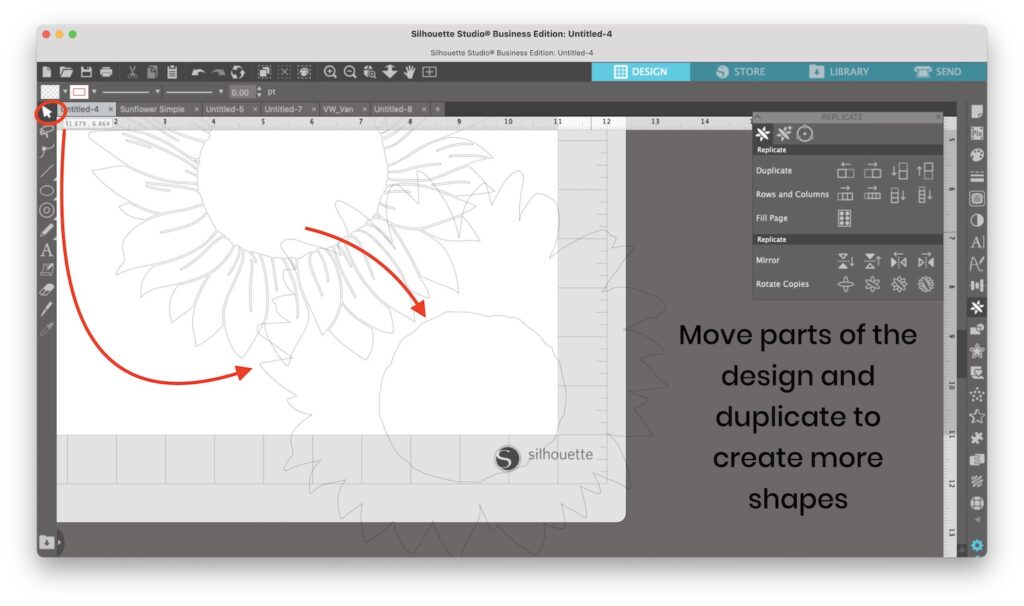
Another easy way to create Layers in your design is to simply move different sections of the design and work with just those shapes.
You can duplicate those shapes and play with them off to the side, adding fill, making compound shapes, etc.
There are more ideas for using the shapes in your drawing as well as adding extra shapes in the next steps.
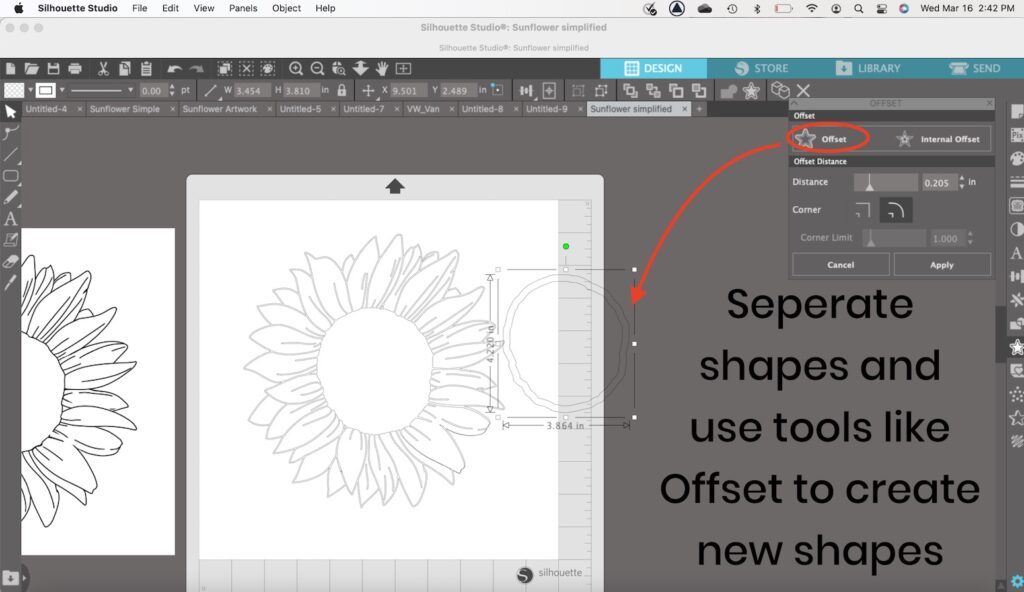
Step Twelve : Use Shapes with Offset
Once you’ve created shapes, or separated out the shapes in your design, you can use Offset to create new shapes that are slightly larger or smaller (Inset).
In the example below, I use an Offset and then grouped the two shapes and made a Compound Path to create a shape with a hole in the middle (like a donut).
Step Thirteen: Grouping Shapes and the Replicate Panel
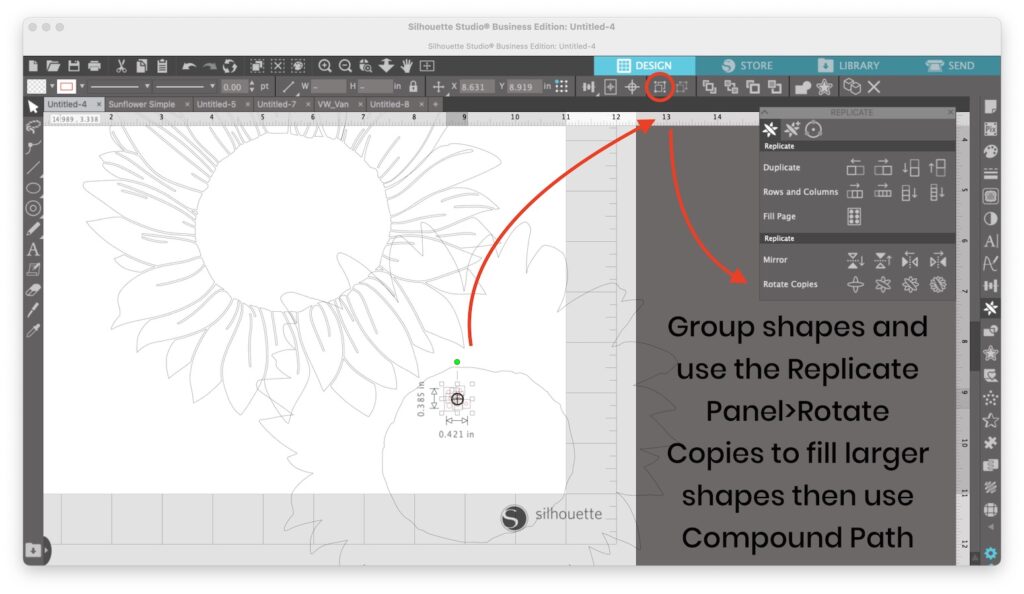
Another time-saver as you design is the Replicate Panel. Not only can you duplicate, mirror, etc. But you can rotate copies as you duplicate, or use Fill Page to cover your page with your design.
By grouping the little cluster of shapes in the top toolbar and then selecting Rotate Copies, we can quickly fill the center of our sunflower with seeds.
Step Fourteen: Making Your Shape a Compound Path and Filling it with Color
Once you have the shape and selected all of it, you can make it a Compound Path. Go to Object at the top of your screen and then, Make Compound Path.
Next, go to the Fill Panel (paint palette icon) in the right-side toolbar and fill your shape with color. This is a good way to visualize what the compound path does to your shape.
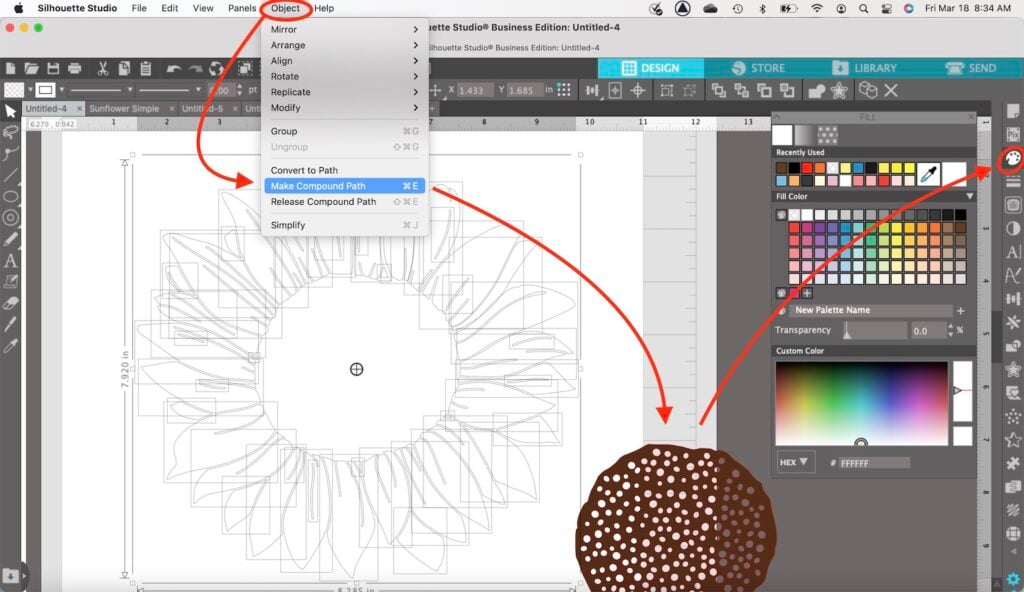
Note: In the image above, I’m using the sunflower to demo what it looks like when you Select All before you Make a Compound Path.
Step Fifteen: Aligning Your Layers to Prepare to Export
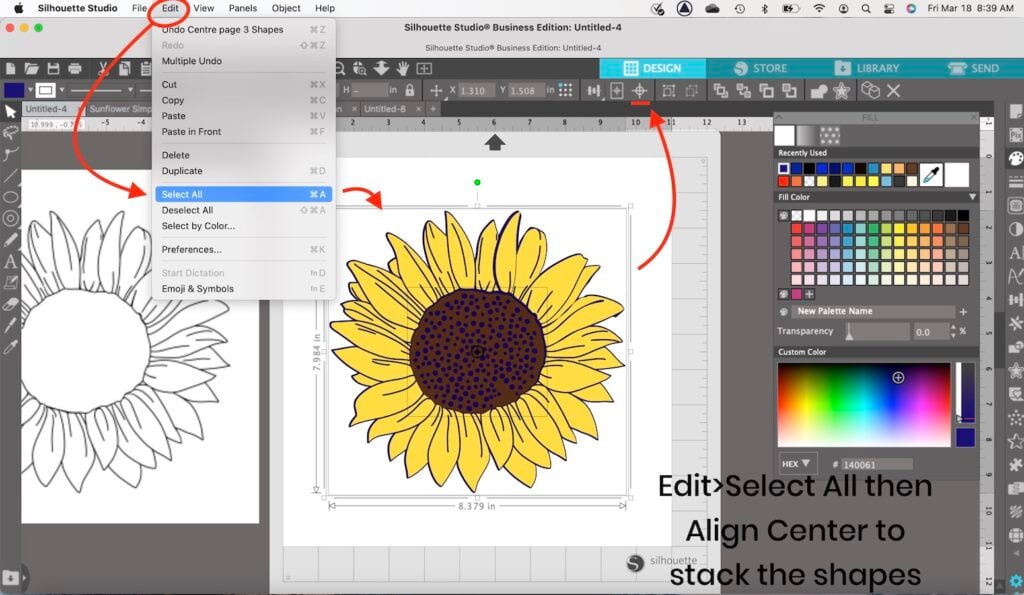
Before you align your design, you’ll want to make sure each layer is a Compound Path and has a Color Fill applied.
Then, go to Edit> Select All and hit the Align Center button in the top toolbar to stack your layers.
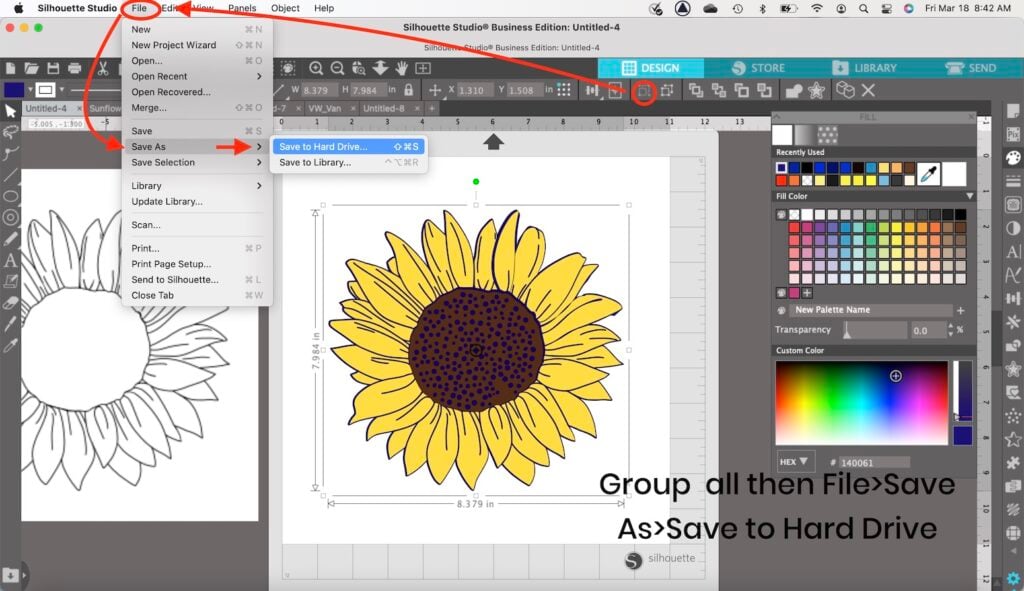
Step Sixteen: Grouping Your Layers and Saving Your Design
With everything still selected, Group your design so that the layers stay stacked together when you export them.
Next, go to File>Save As>Save to Hard Drive.
Step Seventeen: Exporting Your Design as a .Studio file or .SVG file
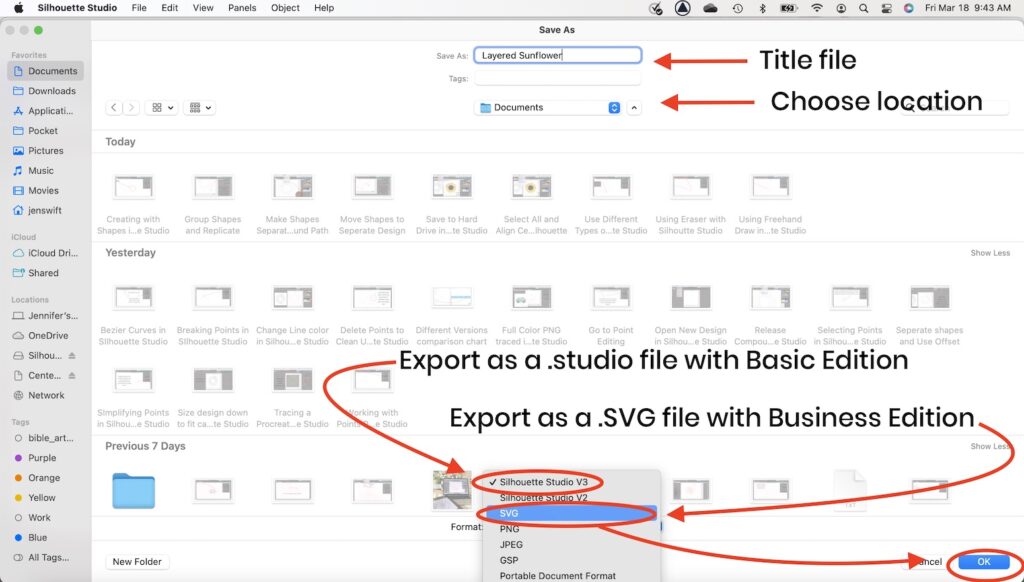
To finish exporting your design you’ll see the screen in the photo below. This has the save as options including title, location, and export file options.
Again, for Basic Edition you would save as Silhouette Studio v3 (a .studio file extension) or as an SVG if you have Business Edition.
If you do not have Business Edition, you can still use an online converter to change your .studio file into an SVG.
I have more about the different online converter options in my post, How to Turn Your Procreate Art into SVG’s.
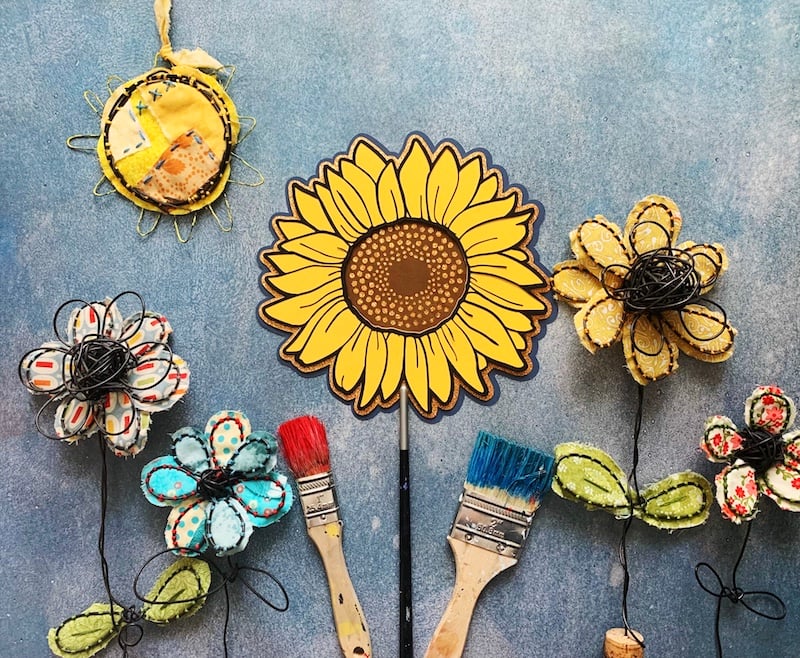
And that’s it! Now you can use Silhouette Studio to make SVG’s from Procreate Designs!
This opens up all kinds of possibilities for using, sharing, and selling your Procreate designs.
You can also use Silhouette Studio to easily turn your handwritten recipes into SVG designs, use your hand lettering, or more.
There is a learning curve, but go ahead and play with all the different features. (You’ll especially like the text editor- it makes cycling through fonts super easy!)
For More Inspiration
Wish you knew more about Procreate? I have a ton of free tutorials, including this Beginner’s Guide to Using Procreate that you’ll love. ❤️
Another fun (and popular) Procreate post is my Shortcuts and Gestures in Procreate which includes a cheat sheet for the different hand gestures that make using Procreate so much easier!
Love this Post on Using Silhouette Studio to Make SVG’s from Procreate Designs? Share it!
If you found this tutorial helpful, I’d super appreciate it if you took a minute to save one of the images to Pinterest, or share the post to social media. Thank you!
Thanks for Reading,




![How to Draw Snowflakes in Procreate [Symmetry Tool]](https://wellcraftedstudio.com/wp-content/uploads/2019/11/How-to-Draw-Snowflakes-square-1024x1024.jpg)

