
It looks like it’s finally happened! After years of hoping and wishing and fielding customer service requests, Cricut has finally reintroduced new Cricut print then cut sizes for Cricut Design Space!
This means anyone who has a Cricut cutting machine can now create larger print then cut designs. Here’s what the new print then cut sizes are, what the paper sizes are, what they meant to your projects, PLUS a hack for getting ANOTHER bonus 12″ x 12″ print then cut size option that Cricut hasn’t added.
- How to Get the New Size Options in Cricut Design Space
- What are the New Print then Cut Sizes?
- About the New Auto-Resize
- How to Change the Default Paper Size in Settings
- What You'll Need to Print then Cut with the New Sizes
- Comparing Print then Cut Size Options
- What to Do with the Image Too Large (! )Warning
- How to Print then Cut with OTHER Paper Sizes
- Tutorial: How to Print then Cut 12" x 12" Paper
- Learn to Draw A Mixed Tape in Procreate + Free Design
- New to Print then Cut? Read this!
- Love this Post on the New Cricut Print then Cut Sizes? Share it!
How to Get the New Size Options in Cricut Design Space
This is a beta-only change (as of today 2/11) which means that you do have to have your settings on Beta in Cricut Design Space.
Where to Switch to Beta in Cricut Design Space
To do that, go to the hamburger menu in the top left corner of your screen to drop down the side profile menu. Go to Settings and General. Choose Beta as your Application Experience. Then Done.

What are the New Print then Cut Sizes?
So the actual paper sizes that you can use now are varied but the Print then Cut size limitations have changed as well!
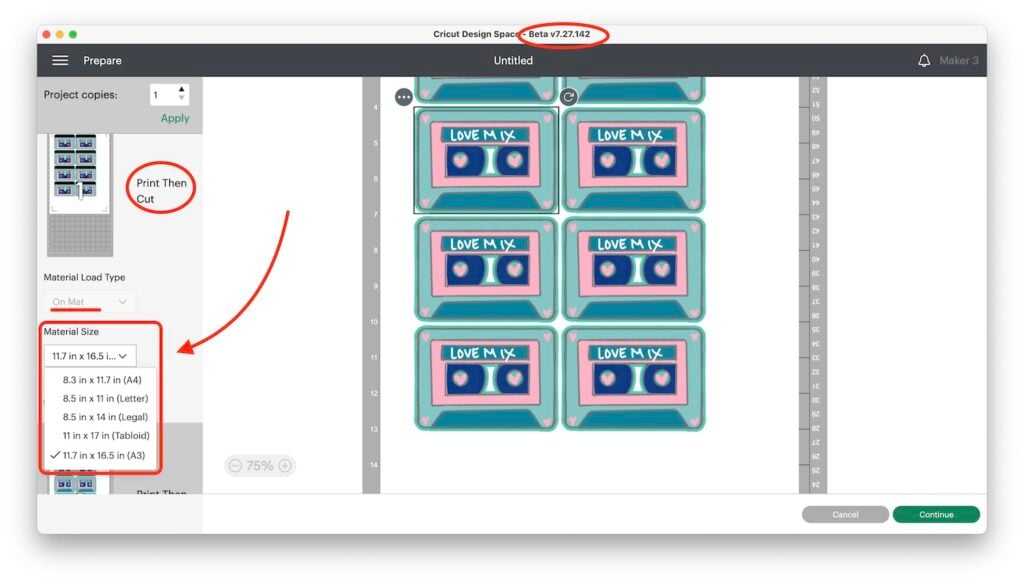
On the Mat Preview Page, we see there is now…*
- A4- 8.3″ x 11.7″+ print then cut size is 6.75″ x 8.97″
- Letter-8.5″ x 11″ print then cut size changed to 7.44″ x 9.62″
- Legal- 8.5″ x 14″ (NEW) + print then cut size is 7.44″ x 12.25″
- Tabloid- 11″ x 17″ (NEW) + print then cut size is 9.94″ x 15.36″
- A3- 11.7″ x 16.5″ (NEW) + print then cut size is 10.63″ x 15″
Important- The caveat about design size here is that you’ll see different size limits based on your image. So when I had a square image and tried to use letter size it told me the max size for my image was 7.44″ x 7.44″.
And if I had chosen “Auto-Resize” it would have changed my image to that size automatically.
*What’s missing from this list? 12″ x 12″! (More on that below)
About the New Auto-Resize
So one of the most significant changes, and one that I missed at first, is that Cricut added an Auto-Resize option. This means that when your design is too large, you’ll see the ! in the Layers panel. When you click that, you’ll see Auto-Resize as an option. This will automatically shrink your design to the largest size available for the paper size you have as your default.
How to Change the Default Paper Size in Settings
Go to Settings in the drop-down menu on far left side of screen. Then click the Load Type tab and you’ll be able to change the default print then cut paper setting there. You can also change it by accessing it through the “image too big” warning on your layer but that’s clunky.

What You’ll Need to Print then Cut with the New Sizes
A Long Cutting Mat- So because of the length of some of these sizes, you will need to either have a 12″ x 24″ cutting mat, OR you’ll have to tape together two 12″ x 12″ mats. My Maker 3 does measure the length of my mat.
A Compatible Printer- You’ll also need a printer that will print the larger sizes. Most do though, so that’s not a big deal. And you’ll need sticker paper or paper in larger sizes.
Note: For the 12″ x 12″ hack I have a Canon printer that prints 12″ x 12″ cardstock.
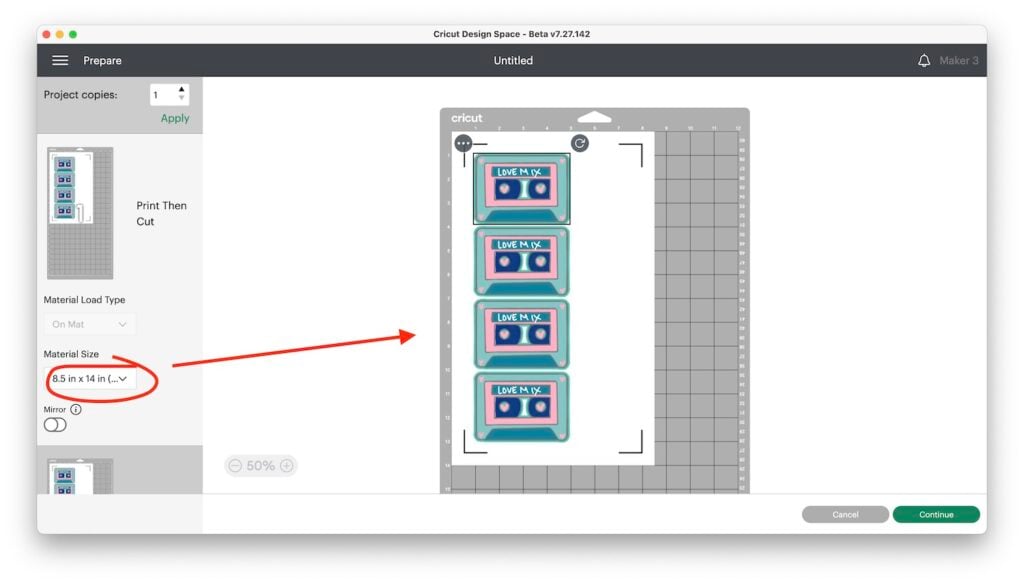
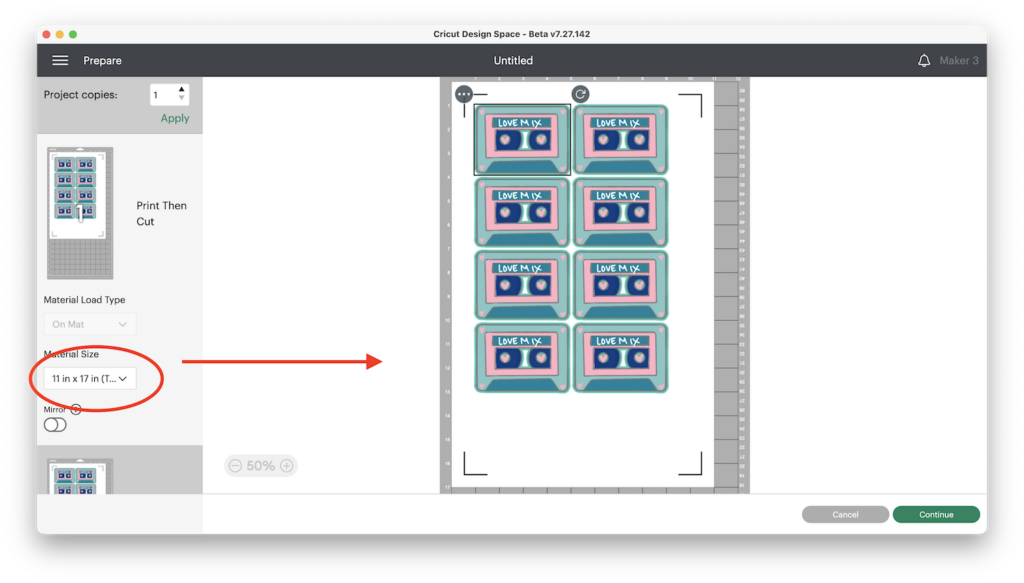
Comparing Print then Cut Size Options
To see how the different size options play out with a design, I used this small design and changed the material size so we can get a visual of how this changes your options.
#1) Letter Sized- 8.5″ x 11″
You see here we can get 3 of this design on a sheet of paper.

#2) Legal Sized- 8.5″ x 14″
With this size we’re able to get 4 of the design down, but only the 1 across.
#3) Tabloid- 11″ x 17″
Here we’re able to get a total of 8 designs on the sheet.
#4) A4- 11.7″ x 16.5″
Here’s the same eight.

What to Do with the Image Too Large (! )Warning
When you attempt to size your design on your canvas you’ll now see a red exclamation mark if your design is too large for Print then Cut. BUT, with all the new sizes, Cricut devised a way of setting the default paper size from the canvas.
Note: You can also change the paper size here, and auto-resize your image to fit the default.

So if you set your default at Letter size, even though you’re within the size limitations for Tabloid size you’ll see this error message.
That means you’ll be unable to progress to the next screen until your design is within the limits of the paper size you’ve designated. The workaround is to change the size in Settings, or using the Change Page Size option you’ll see when you tap the red exclamation mark.
How to Print then Cut with OTHER Paper Sizes
Although 12″ x 12″ isn’t a pre-selected size that you can choose, you can print 12′ x 12″ scrapbook paper and cut it out with your Cricut, IF you have a printer that can do that size.
I have the Canon Crafter’s Printer and am able to print as large as 12″ x 12″ with it. So I’ve been waiting for a Print then Cut Update that will allow me to use this larger size.
What About Cricut’s Larger Sticker Paper Sizes?
Cricut does make sticker paper that is a cardstock weight and is 13″x 13″. This is too large for my printer to print, but I could cut it down and it would work.
However, back to the elusive scrapbook size….
Tutorial: How to Print then Cut 12″ x 12″ Paper
YES! You can print then cut 12″ x 12″ scrapbook paper with your Cricut cutting machine now! To do this you have to use the System Dialog option and use your printer’s settings. I show how to do that in the step-by-step pics below!
Step One: Choose 11″ x 17″ as your Material Size
On the Mat Preview Page choose 11″ x 17″ from the sidebar’s drop-down menu.

Step Two: Select System Dialog when You Print
Once you’re on the “Go” page, you’ll see the first thing to do is to choose Print. Then, you’ll see a Print box from Cricut that has Print options. Toggle off Bleed, and toggle on the Use System Dialog. Click Done. This starts a little wheel spinning and suggests you minimize the printer window so you can see the System Dialog Window for your printer.

Step Three: Change the Paper Size to 12″ x 12″ in the System Dialog
When you minimize the Cricut screen, you’ll see the System Dialog Box appear. This is where you’re going to bypass the Cricut options and choose the 12″ x 12″ paper. You’ll also want to choose Rear Tray if that’s an option your printer gives you.
Don’t have a Rear Tray?
You don’t need one, but you will want one if you intend to cut cardstock or other heavier media. A rear tray feeds the paper through, while regular printers feed from a tray that flips
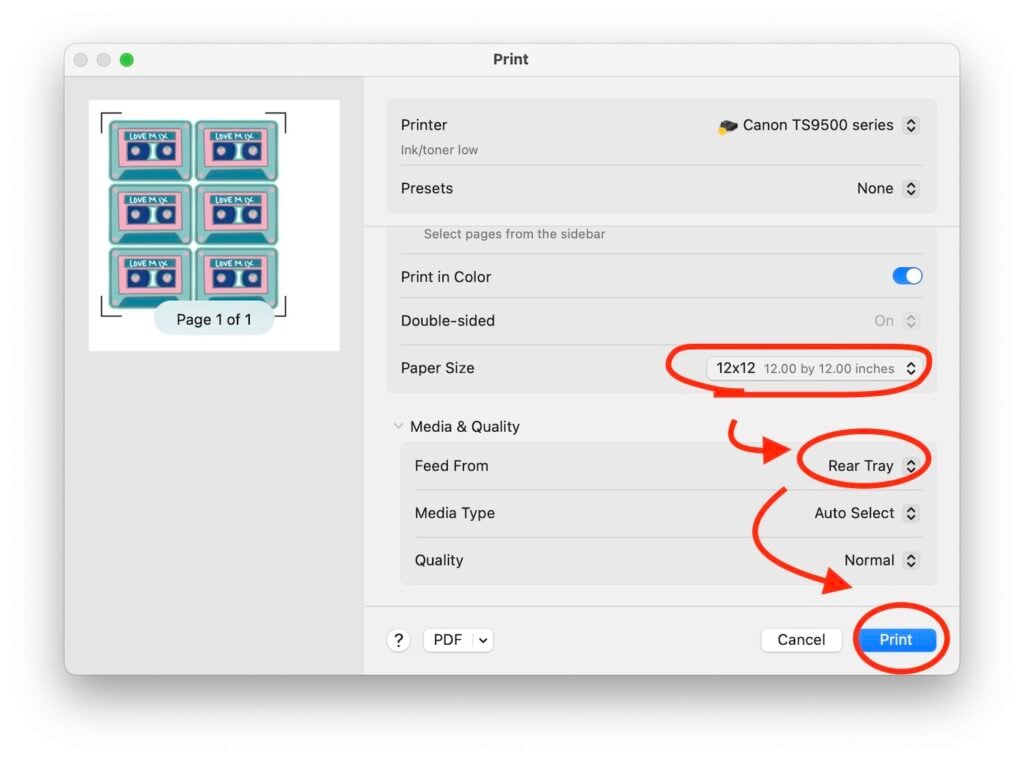
Place your 12″ x 12″ paper into the rear tray of your printer and print. Woohoo!!!
Step Four: Use a 12″ x 24″ Light Grip or Standard Grip Mat + Prep Mat
Position your printed sheet on your mat as shown on the screen. Use a Brayer to press down the paper and adhere it to the sheet. Then load it into the machine.
(Press Go when prompted and then rub your hands together with manic glee as it cuts!)

Step Five: Make it!
When prompted press Go, and then check the cut before you UNLOAD. If it looks good, unload and then flip the mat upside down and peel it back from the paper (so you don’t bend the paper.)

PS- Because of the size of my design I couldn’t max out the entire width that I had available with the new settings. That was the next experiment!

Learn to Draw A Mixed Tape in Procreate + Free Design
Want to know how to draw this design in Procreate? I have a FB Live Replay of last night’s Procreate Playdate that walks you through how to draw a mixed tape (+ other awesome tips) using Procreate on iPad. You can see by clicking on the link below!

Want to get the Free Mixed Tape Design?
You can find it in my Free Library in the Procreate PNG’s section. I have the finished art in a zip file that you can download.
Need the password? Just sign up for my email list, and you’ll get the password emailed directly to you!
New to Print then Cut? Read this!

I have a great beginner post, How to Print then Cut for Beginners that will walk you through all the different terminology (“why is it print then cut and not print and cut?”) as well as what you need to get started.
Love this Post on the New Cricut Print then Cut Sizes? Share it!
If you found this post helpful, I’d love to have you share it! You can use the social media links below.
Thanks for Reading,


I am very excited to have larger print capabilities through Cricut. Fortuitously I just last month bought a printer that prints up to 13 x 19″ paper. Yay Cricut!! Thanks for sharing Jen.
Lucky!! Okay I did NOT realize there were normal printers out there that can do more than 12″as a width. I’ll have to change that in the article! Thank you!
Were you able to do the 12X12 maxed out?? I was looking for the next experiment
I was!!! I didn’t realize I didn’t add that info. I’ll have to revisit the post. But yeah, it was super cool!
Thanks Jennifer. Were you actually able to define 12″ width for print and cut?