


- The Beginner's Quick-Start Guide to Using Procreate
- QuickStart Guide: How to Use Procreate for Total Beginners
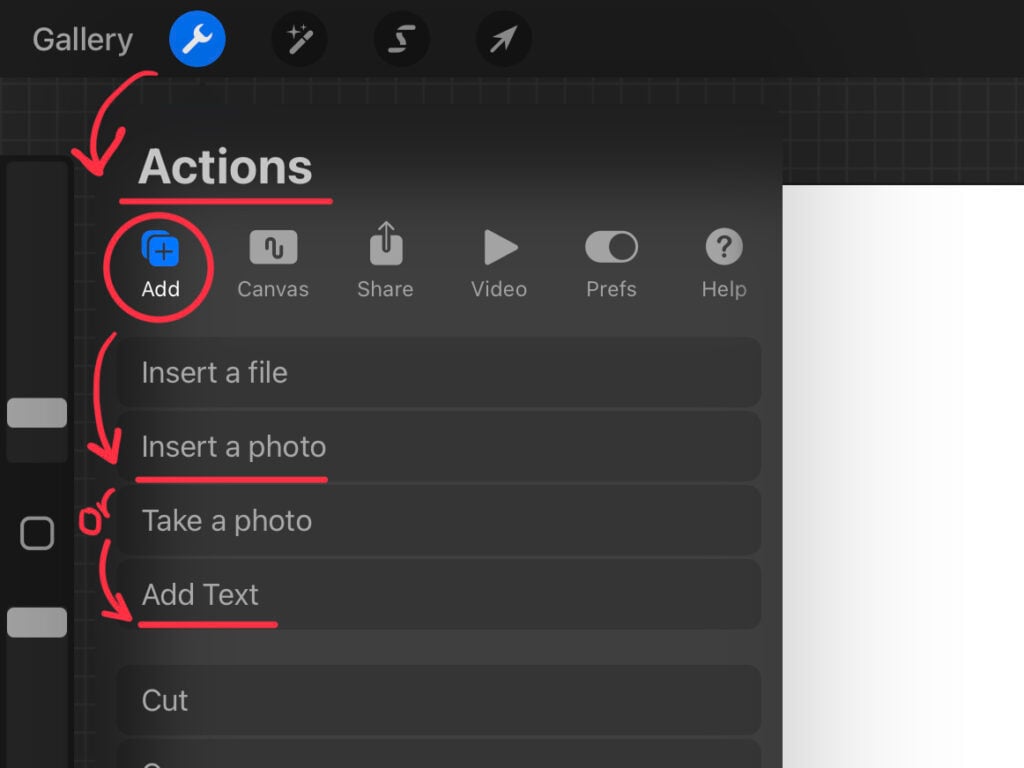
- 1. How to Open a New Canvas in Procreate and Zoom, Rotate, or Move It
- 2. Get to Know the Procreate Canvas Tools and Interface
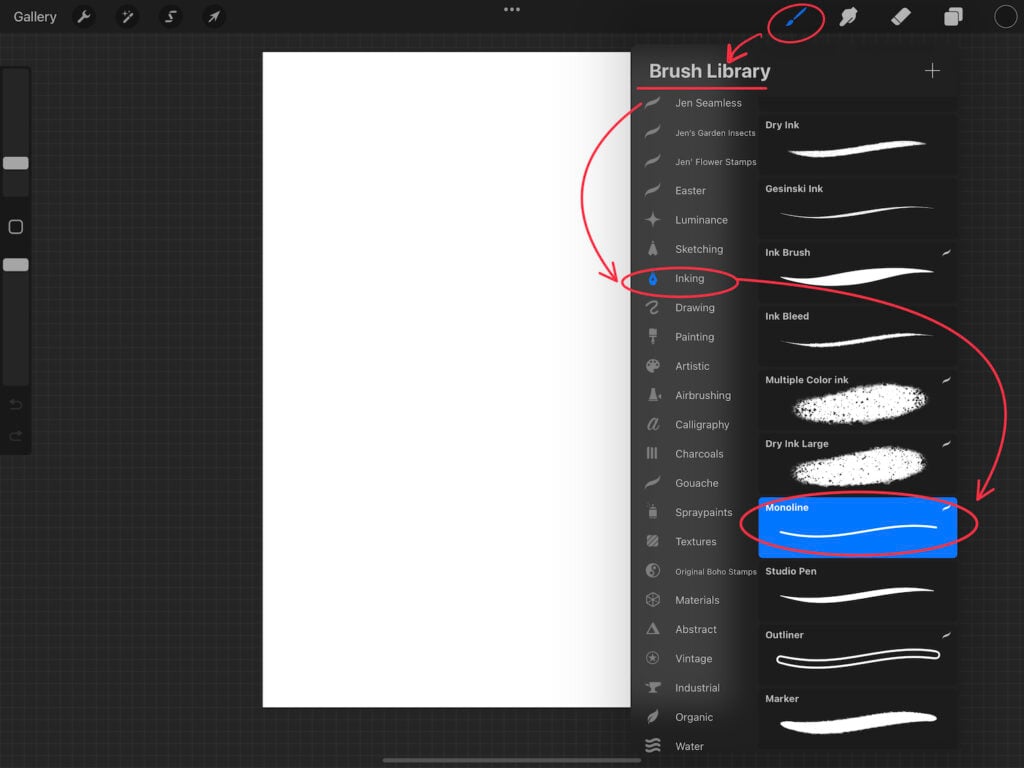
- 3. How to Open the Brush Library and Choose a Brush
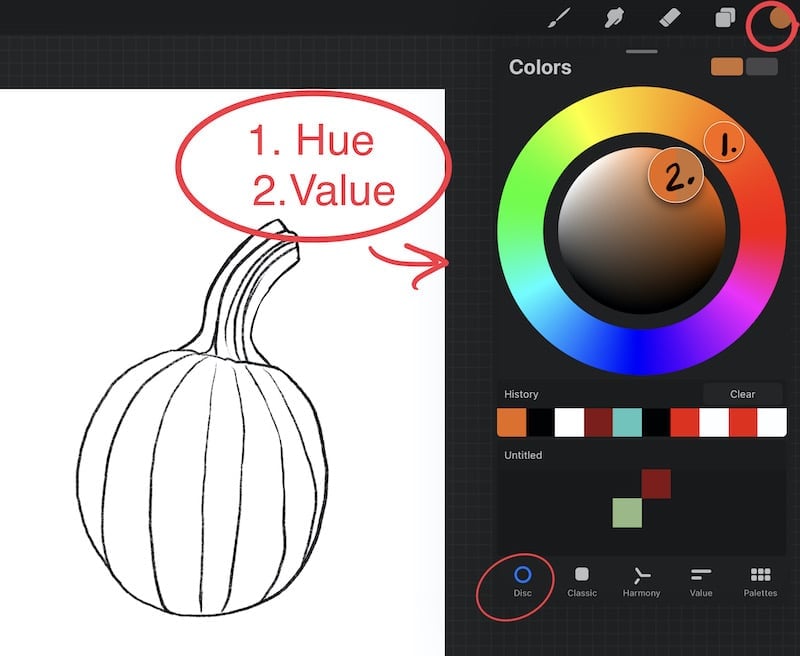
- 4. How to Change Brush Size, Brush Color, and Use Color Palettes
- 5. Start Drawing in Procreate
- 6. Use QuickShape to Make Perfect Lines and Shapes
- 7. Create a New Layer
- 8. Move Layers Up or Down
- 9. Add Color Under Your Sketch
- 10. Add Text in Procreate
- 11. Export Your Procreate Artwork
- 12. Save Your Procreate Image (So You Can Use It on Cricut or Anywhere Else)
- Answers to your Most-Asked Questions About How to Use Procreate
- What is Procreate?
- How Much Does Procreate Cost? And Are There In-App Purchases?
- What's the Best iPad for Procreate?
- Do You Need an Apple Pencil to Use Procreate?
- Can I Make SVG Designs with Procreate?
- What is a Raster vs. Vector Design?
- What Can You Make with Procreate?
- Do You Have to Be a Digital Artist to Use Procreate?
- How Do You Learn the Gestures Procreate Artists Always Use?
- Can You Use Cricut Design Space with Procreate?
- How Do You Get Started with Procreate?
- About this
- Beyond the Beginner's Guide to How to Use Procreate
- Love This Post on How to Use Procreate? Share it!
Answers to your Most-Asked Questions About How to Use Procreate
What is Procreate?
Procreate is an iPad-only drawing app for digital art. Although professional artists use it, Procreate is so popular because it is easy for anyone to use. Anyone, of almost any age, with any background, can create with Procreate.
This is huge because it means you don’t have to be a graphic designer with a professional graphic design program like Adobe Illustrator to make your own designs to craft with. AND the best part is you don’t have to spend hours learning the program or spend big money on a subscription either!
How Much Does Procreate Cost? And Are There In-App Purchases?
Procreate for iPad is usually $9.99 in the Apple App Store, and Procreate Pocket Edition is usually $4.99. There are no in-app purchases, and updates are always free.
And although Procreate does not sell them, you can purchase additional brushes, stamp sets, paper textures, and even color palettes.
Online marketplaces like Etsy, Design Bundles, Design Cuts, and more have great selections to choose from. But, you can also get lots of these brushes and palettes free from blogs like this one!
What’s the Best iPad for Procreate?
I have an entire post that answers this question! My husband, the techy, wrote it (and I chimed in with my opinion too). He did a great job explaining what to look for in an iPad, which iPads are compatible with Procreate, and what kinds of accessories will make your Procreate experience even better.
You can read this article, The Best iPads for Procreate here. But, you may notice in my video tutorials that I’m using an iPad Pro 12.9″ which has a larger iPad screen.
Do You Need an Apple Pencil to Use Procreate?
No! You can use Procreate with just a finger. However, if you’d like the best experience, using a stylus really makes drawing in Procreate feel much more natural. You can also use a third-party stylus. However, Procreate was designed to work with the Apple Pencil and has features built around the capabilities of the Apple Pencil. It really is worth saving up for!
Can I Make SVG Designs with Procreate?
No…. and yes. Procreate is a raster-based program which means it creates with pixels, not vectors. However, you can use an online image converter to trace your PNG designs and create SVG designs from them.
What is a Raster vs. Vector Design?
Raster programs use pixels, which are little squares of color. And they are used for digital painting, animation, and photography. Most print and cut or sublimation designs are made with a raster program like Procreate and are in a file format like PNG, JPEG, JPG, TIFF, PSD, or PDF.
Vector programs create with shapes made of connected nodes. This allows you to make a design bigger or smaller without losing any quality. Vectors like SVG’s are what design programs like the Cricut Design Space, or SIlhouette Cameo use most often for their cut designs. In addition to SVG, other popular vector file formats are DXF, AI, EPS.
What Can You Make with Procreate?
SO Many Things!!! I actually have a post with 23 Projects You Can Make with Procreate + Cricut. This starts the list of what you can make with Procreate, but when you consider how easy it is to create sublimation designs with Procreate and add that capability then you’ve opened up the hundreds of things you can make with sublimation as well!
I also have many step-by- step tutorials for using Procreate with a Cricut here on my blog. And if you prefer a YouTube tutorial I have playlists on my YouTube channel you’ll want to check out too!
Interested in hand lettering? You’ll find iPad lettering has a huge online following among would-be calligraphers because it makes it so fun and easy to learn.
Do You Have to Be a Digital Artist to Use Procreate?
Absolutely not! Because Procreate is a digital drawing app, it has all kinds of features like QuickShape and drawing guides that make creating when you’re not an artist sooo much easier.
Have trouble drawing a straight line? In Procreate, you can use QuickShape to make straight lines, perfect circles, and absolutely square- squares.
Want to undo? It’s a two-finger tap, and to redo it’s a three-finger tap. There are SO many built-in benefits to using a digital drawing program that you’ll find you’re a much better artist on the iPad than you are with a standard piece of paper and a pencil.
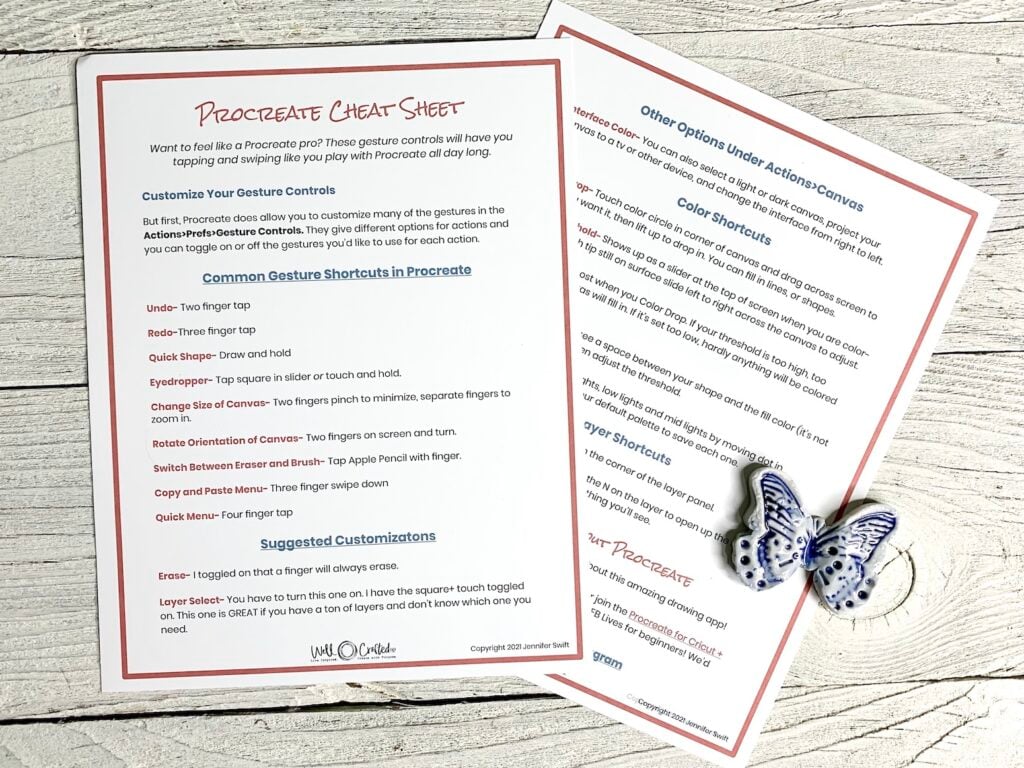
How Do You Learn the Gestures Procreate Artists Always Use?
This is a question I’m asked fairly frequently by beginners to Procreate in my Facebook group. So when they asked for a list, I created a post with a free printable cheat sheet of the common Procreate gestures.
I also explain what all of these are, as well as what they do in my post, The Best Procreate Shortcuts for Beginners to Know. AND I have some awesome professional tips and cheats in the post as well, to make you feel less like a newbie as you start. ❤️
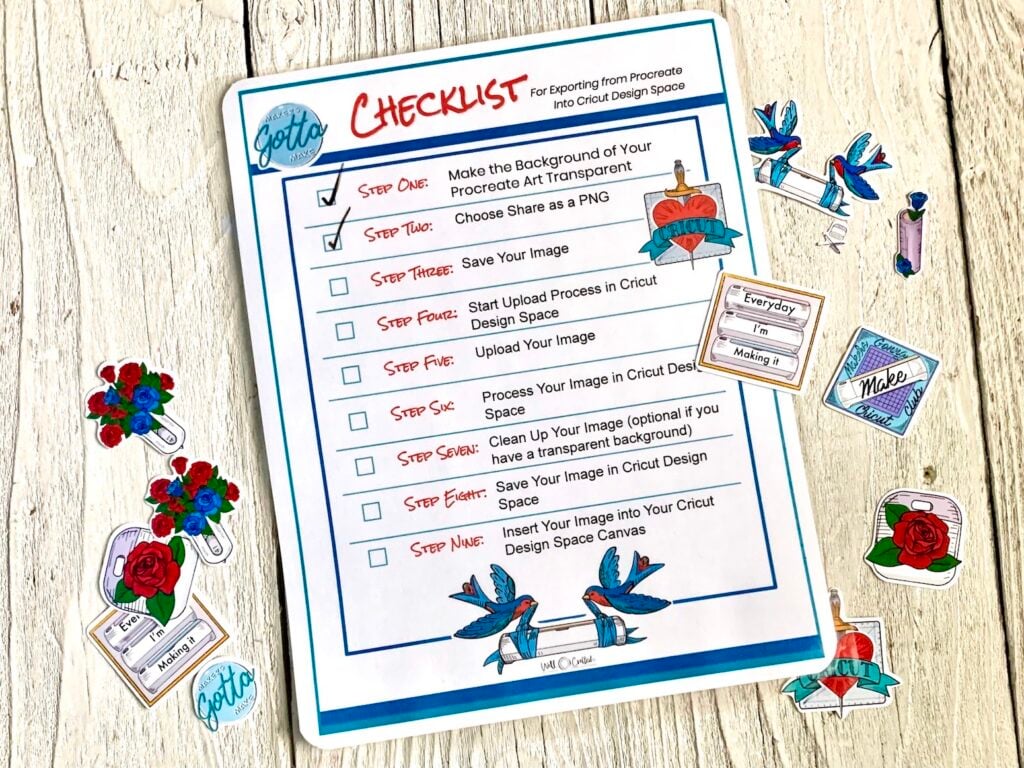
Can You Use Cricut Design Space with Procreate?
Oh, YES- they are SO great together! I’m a little obsessed and have an entire post and YouTube video that will walk you through How to Upload your Procreate designs into Cricut Design Space.
I even created a printable checklist that you can keep handy as you try it. This checklist is a freebie that you’ll find in my Free Library along with free Procreate brushsets, stamp sets, and color palettes.
How Do You Get Started with Procreate?
I’m so glad you asked! Although there are a TON of YouTube videos on using Procreate by digital artists, as well as a lot of really amazing Skillshare courses, you can find Procreate tutorials for beginners on this blog, as well as on my YouTube Channel.
The difference between my tutorials and others is that I SUPER focus on teaching Procreate so you can create designs you can craft with.
And a SUPER EASY way to get started is by using the thorough getting started section below!
About this
Beyond the Beginner’s Guide to How to Use Procreate
Now that you’ve gone through this QuickStart Guide to Procreate here are some next steps
Get the Procreate Downloads from my Free Library
-
- Head to the Downloads in my Free Library and print the Procreate Gestures Cheat Sheet
-
- Grab the Upload Procreate Designs into Cricut Design Space Checklist from the Procreate section of my Free Library.
-
- Get the Sticker Background Brush and the Ink Pen Brush.
-
- Download the 80’s Stamp Set and Blooms Stamp Sets from my Free Library.
Spend Some Time Learning What’s Possible and Connecting with Other Procreate Beginners
-
- Check out the Procreate category here on Well Crafted Studio to see what projects you might want to create
-
- Check out the Procreate playlist on my YouTube Channel for your first video introduction.
-
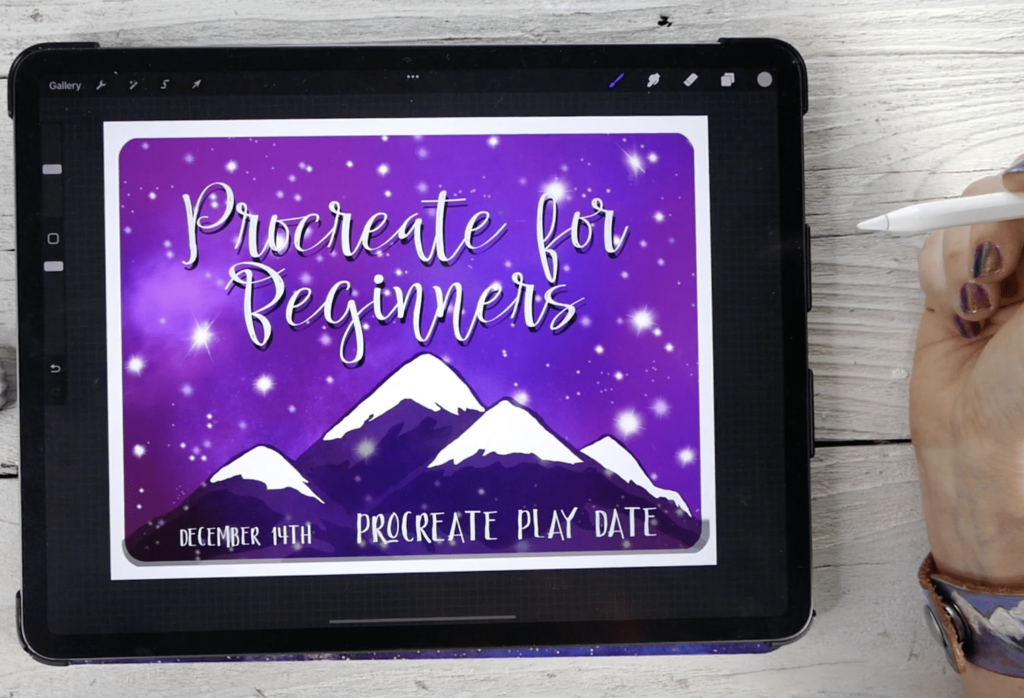
- Watch the Facebook Live from December 14th in my Facebook Group. It’s a Beginner’s Introduction Video that goes over everything in this post and more! You can find it in the Group Guides.

Love This Post on How to Use Procreate? Share it!
If you found this beginner’s guide helpful, please consider subscribing to my email list or to my YouTube channel. This really helps me, and it keeps this post available for when you need it. You can also choose to share this post with any of the social media options below!
Thanks for Reading,