Making stickers is one of my absolute favorite ways to use my Procreate digital art. I know a lot of you love to do this too. And although it’s fun to draw the stickers, adding each sticker’s borders was pretty tedious. So when I saw a different way of adding borders to my stickers on Tik Tok that was SUPER fast, I sat down and tried to figure it out. And honestly, I was a little bummed because it worked great with some stickers and not so great with others. BUT it was SO QUICK, I really wanted it to work. So I tested this method with different variables, and in this post, I’ll give you the info you need to know to make this method work. I also made a step-by-step tutorial and a YouTube video on using this method to make borders for stickers- super fast with Procreate!
To test this method, I used 15 different brushes and 14 different combinations of blur strength and thresholds. And although this new method works like magic, it’s not 100% perfect for the simple reason that the border follows your edge and that can vary with the opacity or hardness of the brush.
✨The Best Solution is to Use Both Methods✨
Use the new way of doing it to get the borders around the stickers quickly, and then use a hard-edge, streamlined brush (like my free Sticker Border Procreate Brush) to quickly smooth out or redefine the edges and shape of each design by hand. Even with this added handwork, this method still SIGNIFICANTLY reduces the time you’ll spend hand drawing borders behind all your designs one by one.
Edited to Add- So since I made this post and video I realized that in Step 4 if you have COLOR FILL on (color set to white) and then do the invert you don’t need to do Step 5 at all. It’s SO slick! ❤️
Read it or Watch (the YT video)
If you’d rather watch how it’s done then you can follow the photo tutorial below.
How to Make Borders for Stickers Super Fast in Procreate!
Tools and Materials
- iPad (models compatible with Apple Pencil– recommended)
- Apple Pencil or Stylus (optional- you can use your finger)
- Procreate app, an iOS-only iPad drawing app
- Digital art (PNG w/transparent background that you saved to your photos or have in your Files.) Or that you drew in Procreate (I use stickers that I sell in my shop as an example in this tutorial.)
This page includes affiliate links- which means that you don’t pay extra, but I get a small commission when you purchase through them. This helps me buy more supplies for these tutorials! So if you choose to support me in this way, thank you!
Directions
Step One: Duplicate Your Image Layer
For this tutorial, you need to start with all your stickers on your sticker sheet on ONE Layer.
To do this without changing my original sticker drawings, I start in the Gallery. Then I duplicate my original project by swiping left and choosing Duplicate. On this second canvas, I merge all the layers to create just one layer. Duplicate that layer by swiping left on Layer 1 and choosing Duplicate.

Step Two: Change Value to White on a Duplicate Layer
You’ll want to do this to the bottom Layer. Because theoretically, you do lose a little bit of the image quality when you duplicate, I move my duplicate layer beneath my original if it is not already.
So on THAT Layer, you want to go up to the magic wand in the upper right corner, and in the drop-down menu, choose Hue/Sat/Brightness. Take the brightness lever and pull it to the right, all the way over to Max (white).

Step Three: Add a Gaussian Blur and Adjust the Threshold
In the same drop-down menu under Image Enhancements (the magic wand in the top toolbar), choose Gaussian Blur.

Place your stylus on the screen and, without letting up, slide it across the screen to adjust the amount of blur.
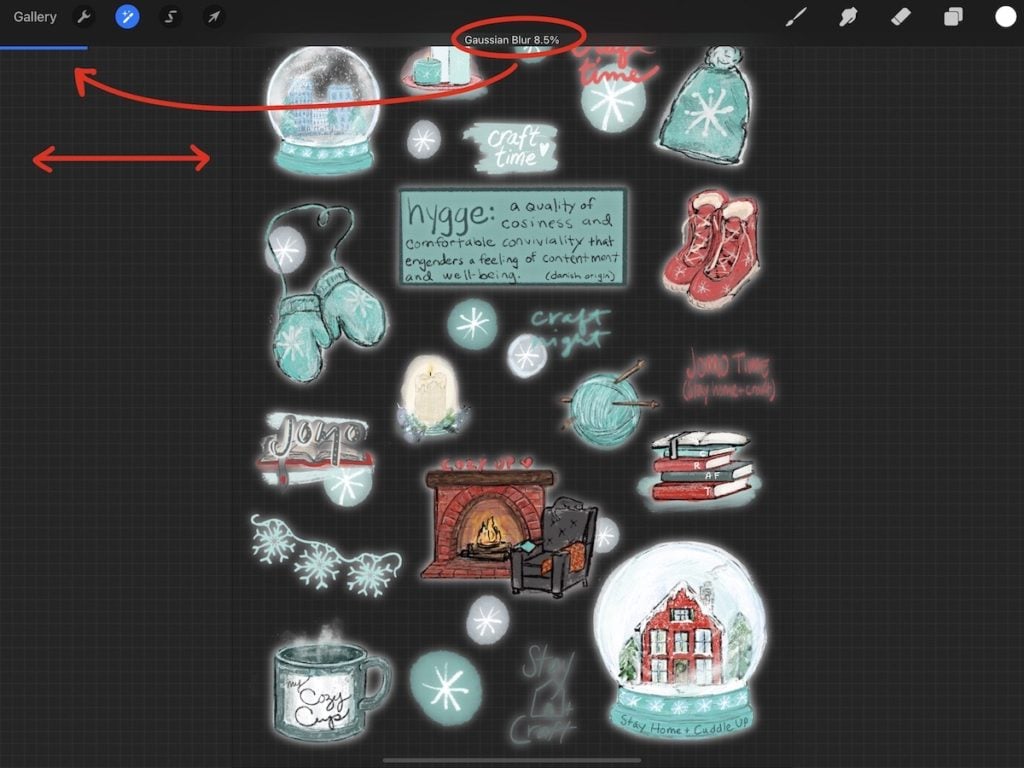
A good blur is 7-10%, but this can vary with the details, the opacity of the edges, type of brush, and other factors. I did a bunch of testing but I really couldn’t find one number that fits every image (more on this below).
Step Four: Select and Adjust the Selection Threshold
Now you want to go to the Select tool in the top toolbar and tap Automatic. Tap the background of your Layer to select it.
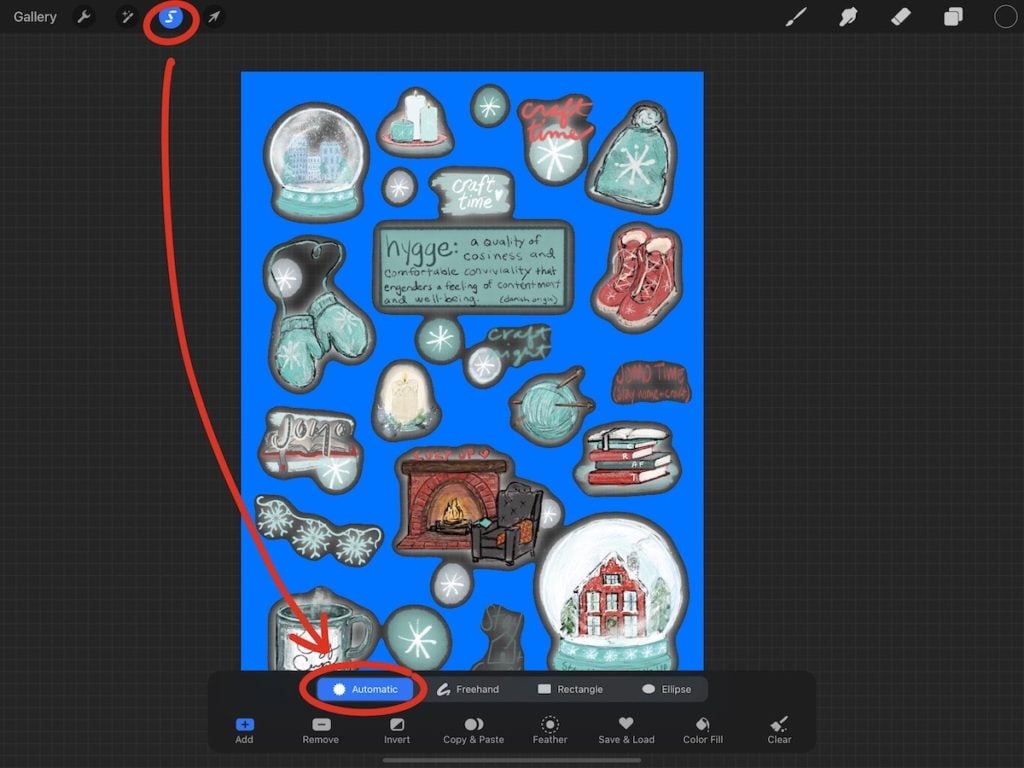
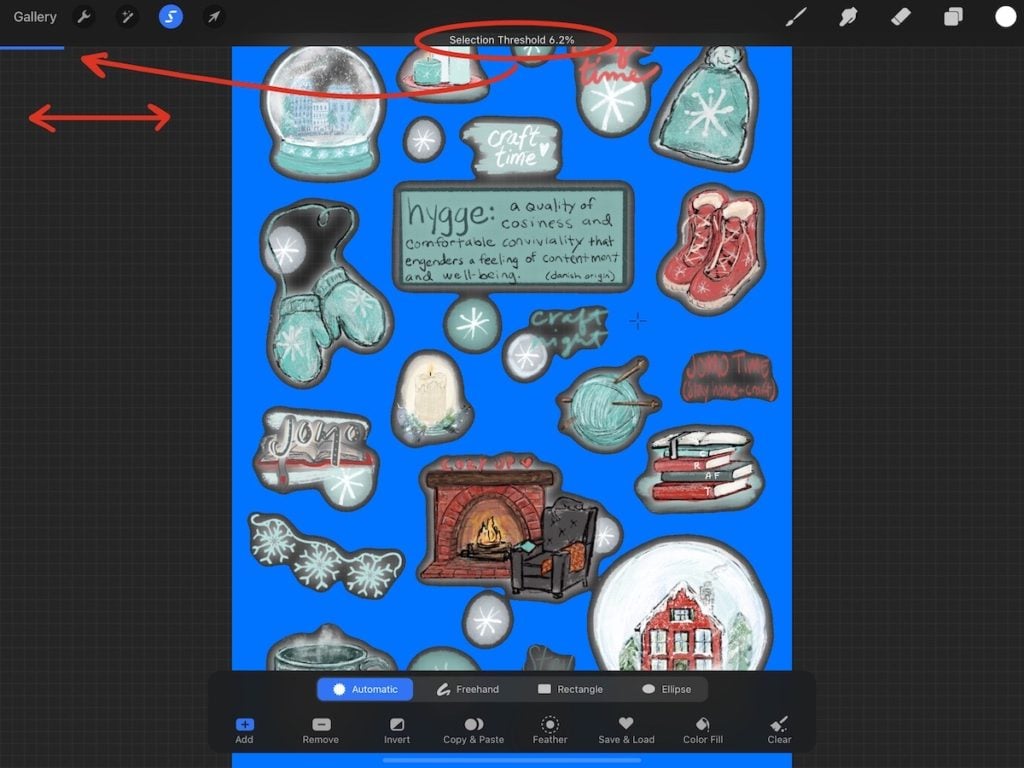
Place your finger or stylus on the screen and without picking it up, slide left or right across the screen to adjust the Threshold. You want a small black border around the edge. You also want to catch as many of your designs as you can.
Step Five: Invert the Selection
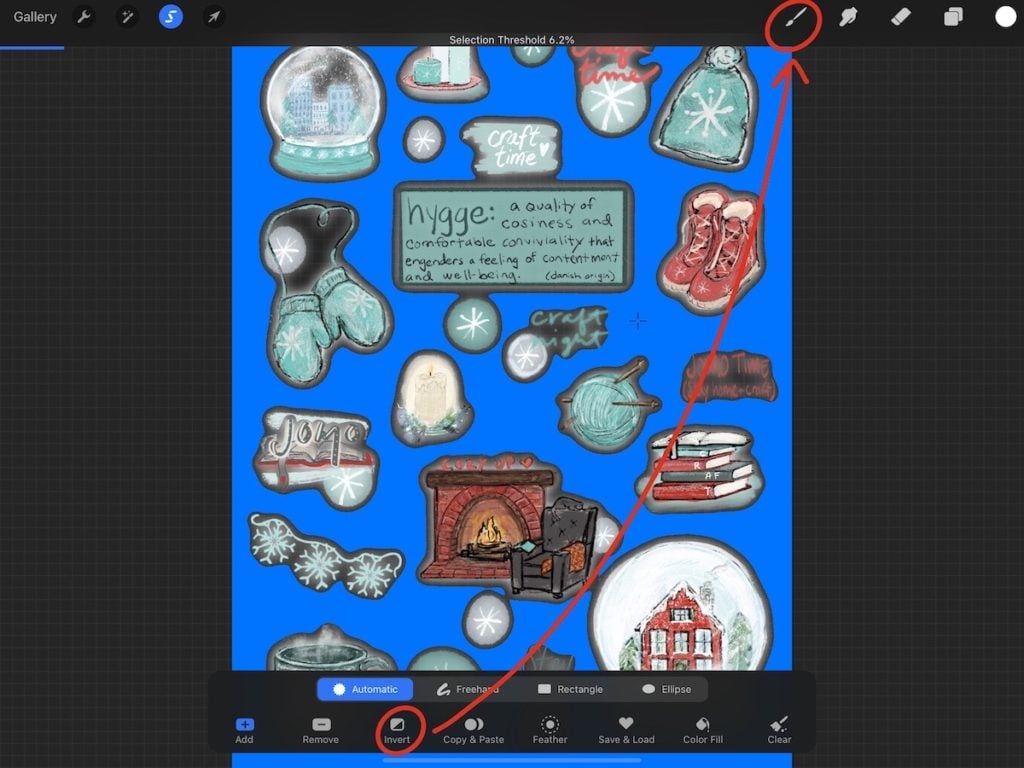
Then, in the in the bottom selection panel, tap Invert.
Step Six: Tap on Color Fill to Flood with Active Color OR Go Over with Brush
With everything still selected and inverted, you have two options to color it in.
1)Tap on Color Fill to Flood with Color- if you have white selected as your current color in the upper right corner then this will flood your selection with white. Then, look at the shapes and make sure you have nice edges using the Sticker Border Brush to tweak as need be. (You can see this option in my updated How to Give Your Stickers a Pro Finish Video on YouTube).
2)Go Over Selected Shapes with a White Brush– You can use my Free Sticker Border Brush which was designed with a hard edge and is streamlined to create a fluid border. Or you can certainly use a hard-edge airbrush as well.
This will make create an opaque white shape that creates a border around all your stickers. When you upload into Cricut Design Space this is the edge that the Cricut will cut around.

Step Seven: Manually Tweak Your Borders
Using the Free Sticker Border Brush you’ll want to look closely at your designs and make sure you get all of them. Sometimes, with the automatic selection tool, you don’t get lighter marks. Below this tutorial, I have more about what to look for in the tweaking step.
Step Eight: Get a Clean Background- MY SUPER HELPFUL TIP
This entire process takes seconds, cleans up your background, and makes your design ready to upload into Cricut Design Space. But it isn’t always necessary. However, sometimes when you go through the whole process of creating a border, you may see a slight hazy glow that wasn’t part of the selection. This is from the Gaussian blur and creates a slight semi-opaque pixellated edge that shouldn’t be there.
To get rid of this extra blur, tap the Selection Tool (ribbon) in the top toolbar again. Select Automatic and tap the background.

Use a 3 finger swipe down and you’ll open up the edit panel. Choose Cut and Paste. This places the background on a seperate layer that you then Delete. You can see how it removes the extra pixels around your borders to create a clean background in the photo below.
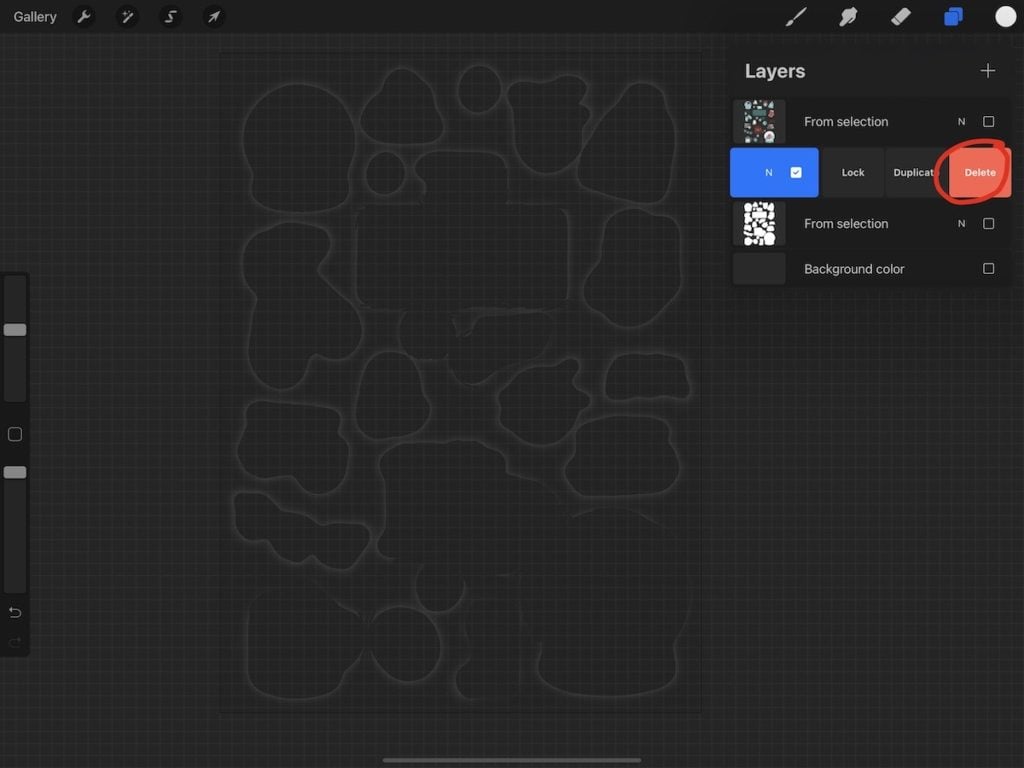
And You’re DONE! You Know How to Make Borders for Stickers Super Fast in Procreate!
Awesome, right? I really love using Procreate for stickers, for my engraving designs, for leather working… seriously, it’s the best. If you’d like to create your own designs but don’t think learning graphic design software is for you then this app may be your answer!
Watch the YouTube Video
3 Tips to Fine-Tune Your Sticker Borders for the Best Cutting Results

1) Some marks may have been missed by the automatic selection. Use the Free Sticker Border Brush (or an airbrush) to fill in white behind these marks.

2) Under the Eraser icon select the Sticker Border Brush (or airbrush) as your eraser. Then adjust the brush size and create breaks between areas. You can also use the Quick Shape option with the eraser.
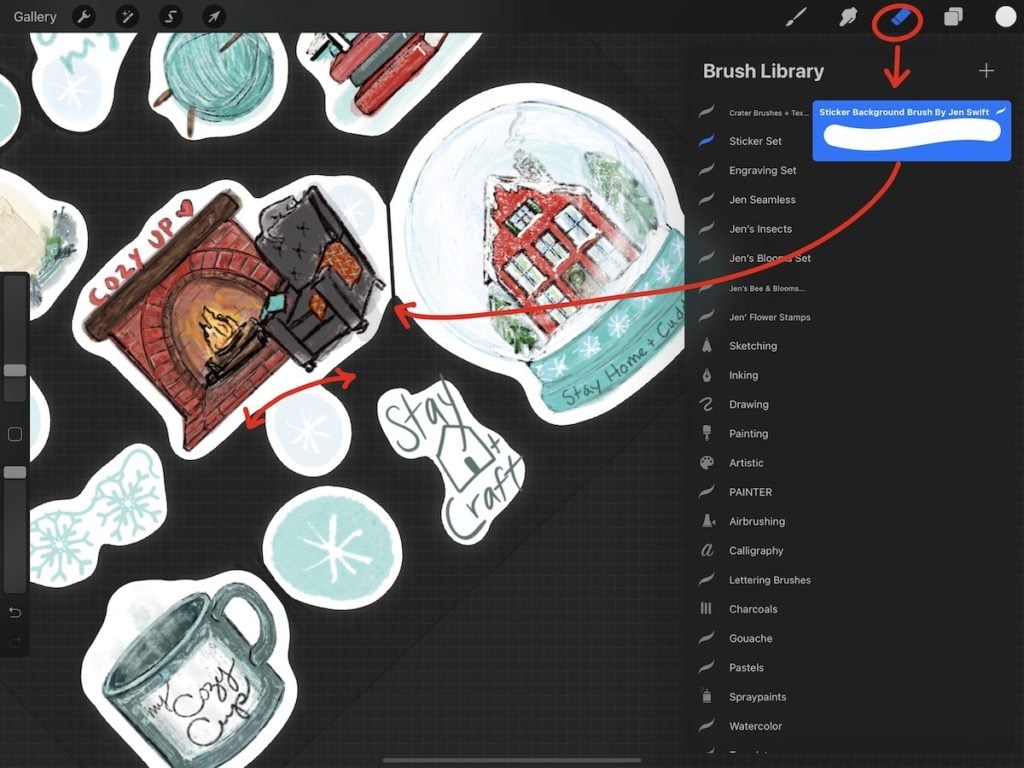
3) Under the Eraser icon select the Sticker Border Brush (or airbrush) as your eraser. Then adjust the brush size and create breaks between areas. You can also use the Quick Shape option with the eraser.
BONUS- How to Export Your Stickers to Print then Cut
This is the next step you would take if you were to print your stickers and cut them with a Cricut machine. If you want a more in-depth tutorial on how to print and cut your stickers, I have a post with a YouTube video that makes it simple.
You can also choose to use a Print on Demand sites like sticker mule, or Society 6 that will do the work for you (for a fee).

***** Credit for this technique goes to @oakleylaneco. on Tik Tok. Be sure to check out her channel for more fun little sticker videos!

LOVE STICKERS?
I have lots of tutorials both here on my blog, as well as on YouTube if you’d like to see how to draw stickers from traced photos in Procreate or how to Print then Cut stickers with a Cricut.
It also helps TONS if you take twenty seconds to share this post on IG, FB, or just pin the image below. Thanks so much!
Love this post on how to make borders for stickers super fast in Procreate?
Pin this post and you’ll always know where it is!



![How to Draw Snowflakes in Procreate [Symmetry Tool]](https://wellcraftedstudio.com/wp-content/uploads/2019/11/How-to-Draw-Snowflakes-square-1024x1024.jpg)

Oh my goodness this is a life saver! I wish I knew about it before I started my sticker business, but at least I knew before I make more. No more manually drawing white around them!
Sweet!!! Okay, so I figured out a new trick too. It’s for when you get to the automatic selection part. Use the Color Fill on the Automatic Selection (set to white) and then do invert. It’s so slick!
THANK YOU so much for this!!! I’ve been TRYING to do the sticker boarder for so long since I first got procreate but couldn’t understand what I was doing wrong when I couldn’t figure it out. I think the small written detail of pressing the *background* of the image before clicking invert is what I didn’t know. Truly thank you for taking the time to write this!
Oh I’m SO GLAD! I know how frustrating it can be when you’re missing some little piece of info abs you don’t know what it is. Especially when everyone says it’s so easy and it won’t work for you. That happens to me all the time. 😂 Thanks for letting me know U helped. -Jen
This tutorial is fantastic! The new method for creating borders in Procreate has really streamlined my workflow. I love the combination of using both the quick border method and the Sticker Border Brush for fine-tuning the edges.
One question I have is, do you have any tips for optimizing the settings for different types of stickers? For example, is there a specific brush opacity or blur percentage that works best for intricate designs versus simpler ones?