
If you’d love to make stickers but don’t feel like you can draw, or you can never think of what to draw- then this sticker-making hack will tilt your world on its axis. With the drawing app Procreate, you don’t have to know how to draw to create your own custom sticker designs! It’s really a little magical. And although there are different methods of drawing stickers in Procreate, this tutorial is everyone’s favorite because it’s just so easy to get great results. The kind of results where you look at the stickers when you’re done and can’t believe that YOU made them.
In this Tutorial You’ll See…
- How to Upload and Trace Photos
- The Benefits of Layers
- How to Get a Sketchy/Painterly Look to your Stickers
- How to Use the Color Panel for Easy Highlights and Shadows
- A Super Simple Way to Add a White Outline to Your Stickers
- How to Quickly Duplicate and Make Columns (for kiss-cut sticker sheets)
- AND How to Export Your Designs to Cut w/ a Cricut or Silhouette Cameo.
If you love stickers, and have ideas but don’t feel like you have the art skills to make them happen, then this sticker-making hack will seem like magical sparkles and pixie dust making the impossible completely possible.

Edited to Add- A Quicker Way to Add a White Border Around Your Stickers
Since I first created this tutorial I’ve found a better way of adding the white layer to the sticker background.
And because I wanted to share it with you too, I did a post/ YouTube video on it, How to Make Borders for Your Procreate Stickers Super Fast.
In this tutorial, you’ll see how to add outlines to even the most intricate designs in seconds using Gaussian Blur and Automatic Selection. Totally mind-blowing and so SO fun!

I also changed the written tutorial below to reflect the changes that the Procreate 5x update made in aligning your designs. For instance, creating rows and columns is MUCH simpler now with magnetics and snapping!
How to Trace Photos to Make Stickers on Procreate
Tool and Supplies
- iPad or iPad Pro
- Procreate iOS-only Drawing App
- Free Download! Procreate Sticker Outline Brush (free optional custom Procreate brush that was designed to help you get sharp, fluid sticker outlines).
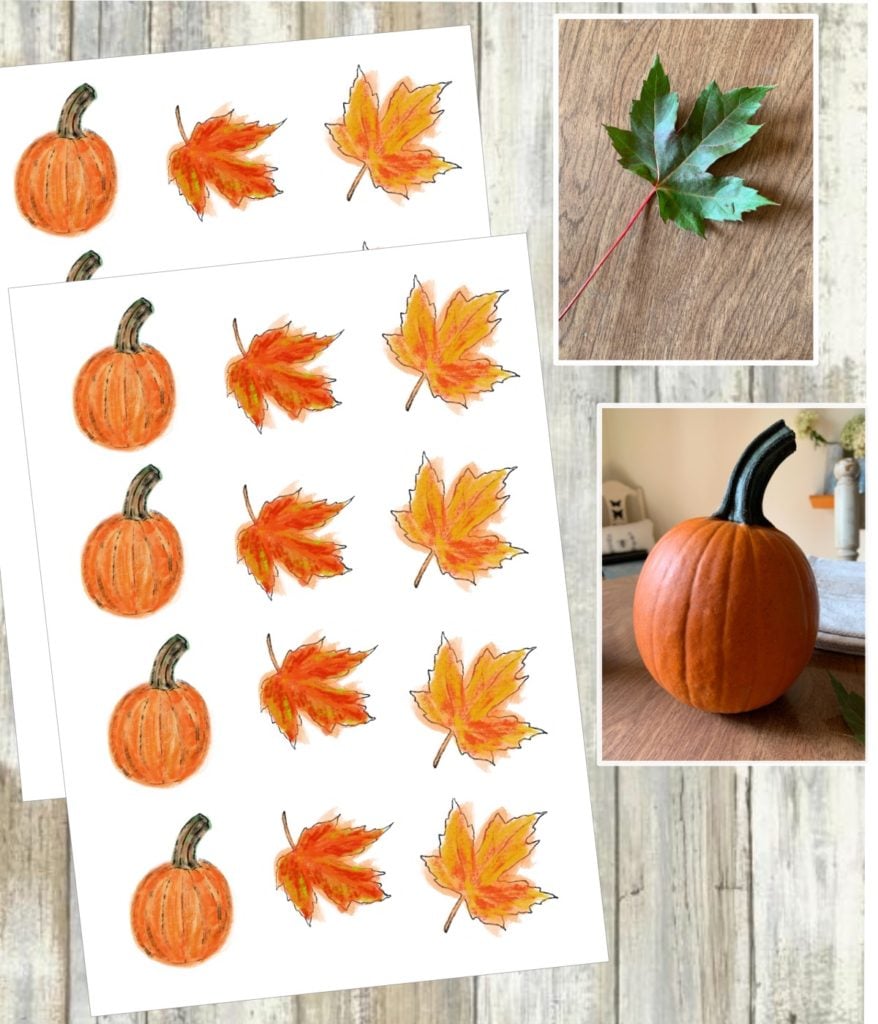
- Maple Leaf and/or pumpkin photos (save the photos in the tutorial below or take your own photos to use)
Optional-
- Apple Pencil (or Third-Party Stylus)- Totally not necessary in Procreate but it really does help your sketching feel natural giving you better results!
- Paper-like Screen Protector– this gives the surface of your iPad a little roughness so that your pencil won’t just slide across the screen. It makes it less fatiguing and you may find you get more natural looking strokes as well!
This page includes affiliate links- which means that you don’t pay extra, but I get a small commission when you purchase through them. This helps me buy more supplies for these tutorials! So if you choose to support me in this way, thank you!
Directions
Step One: Create a Custom Canvas on Procreate
Start in the Gallery and click the + symbol in the top right corner of the screen. Then hit the icon in the top right of the drop-down menu.

About Canvas Size- If you plan to print and cut these stickers in Cricut Design Space, create a custom canvas that’s 2025 px x 2775 px with a dpi of 300. (OR you can just create a canvas that is 6.75″ x 9.25″ since that’s the max size that you can print a sticker sheet in Cricut.)
If you plan to print these without using Design Space at all, then go ahead and make your canvas the standard letter size.
Note: Remember that you can size down without losing detail but you can’t size up.
Next, set the size of your custom canvas and rename it. Make sure your DPI is 300 and then hit Create in the upper right corner.

Step Two: Add a Photo
Tap the wrench icon in the top toolbar on Procreate. This will give you Actions> choose Add. Then Insert a photo. Choose a photo from your photo library (you can also save the pictures in this post to your photo library).

This will import your photo onto your canvas on Procreate. It will be selected, and you can drag the corners to size it as desired.

Save this Image to Your Photo Gallery. Then add this Photo to Make Your OWN Pumpkin Stickers!
Note: You can tap and hold to save photos from this page (or right-click and save to iCloud Drive) follow this tutorial OR use your own.
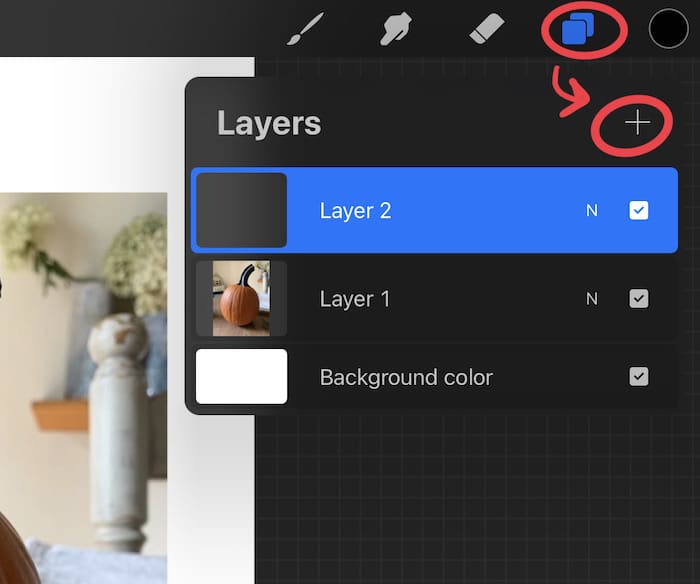
Step Three: Create Layers
Tap on the Layers icon at the top of your screen, it looks like one blue square overlapping another. This will drop down the Layers, and if you touch the plus sign in the corner, you can add layers. So add a second layer. It will be on top of your first layer, which has the photo.
Step Four: Change the Opacity of Your Photograph
On Layer One, touch the N to the right of the layer name. If you tap that some options appear on a dropdown menu. The top is an opacity slider. If you slide that to the left that decreases the opacity. Do that until the image is visible but transparent.

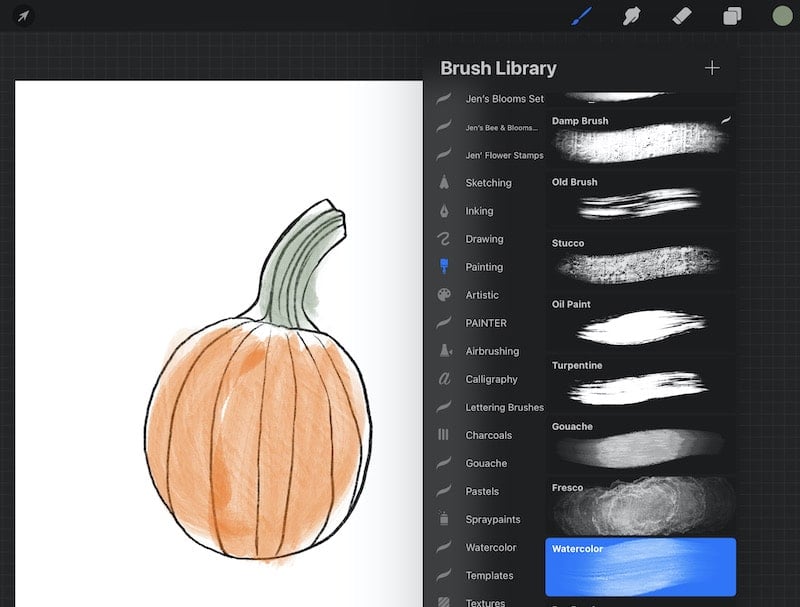
Step Five: Trace the Photo
With Layer Two selected, click on the brush tool to select a brush to trace the photo. I like to use the 6b pencil that is under Sketching in your brush library. To change the size of the brush use the sliding scale toggle on the left-side toolbar on your screen.

Note: To trace details, it helps to enlarge the canvas. You can do this by touching two fingers to your screen and then moving them apart.

Step Six: Check your Sketch, Then Delete Layer One
In the Layers panel, uncheck the square that is next to Layer One (the photos). This will hide your photograph entirely, and you can check that you have everything you want to include in your sketch.
If you’re satisfied, you can delete Layer One by swiping left on the Layer and tapping Delete.

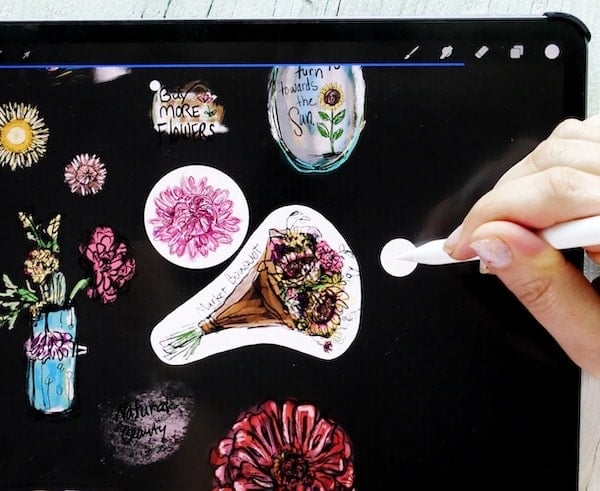
Step Seven: Add Color and Texture with the Brush Library and Color Palette
In the Layers panel touch the “plus” symbol in the corner to add another layer. This is going to be your color layer. Choose the brushes and the colors you like and color your image.
Note: If you’re making a change and you’re not confident you want to keep it, you can create another layer to continue working on.

Use the visibility checkbox on each layer to play around with your options. I like to do a watercolor or gouache layer and then add some colored pencil on another layer on top of that. This is totally where the fun and magic of Procreate happens.
If you prefer a less sketchy-look for your final product you can use a monoline brush (or other inking brush) to go over the original drawing. Then delete your sketch layer.
You can also touch then drag the layers to move different ones on top. For instance, I like to move my sketched layer on top of my color layer.
Tips for Using Color Tools
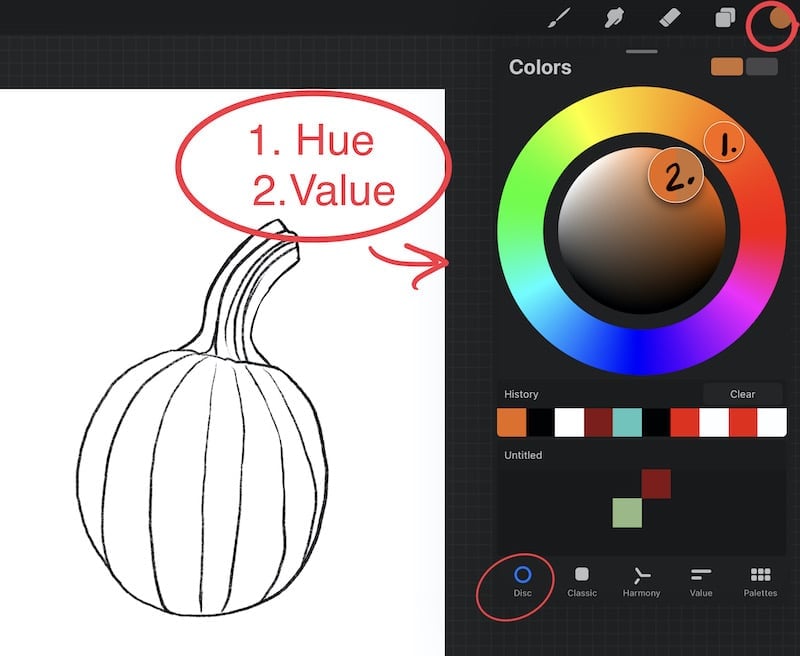
Tip #1) Create Highlight and Lowlights
It’s easy for non-artists to pick highlight and shadow colors on Procreate when you use the Palette tools.
Just select a color in the outer circle and then tap to select the value of that color in the center circle. The top left of the circle is white and the bottom left of the circle is black.
Choose a lighter version of your main color to get a highlight and a darker version to get a shadow. This trick goes a long way to making your art look intentional.

Tip #2) Use the Color Picker and History
If you want to use a color you’ve used before in your canvas (or select one from your photo) you can use the Color Picker or choose from History if you have an iPad Pro.
To use the color picker simply touch the square that is between the brush size tool and the opacity tool in the side interface.
Once you see the circle tool move it to the color you want and that will select it and it will appear for you in the palette window!
Note: I go more in-depth about how to select brushes and create custom palettes in the YouTube video for this post (above).
Step Eight: Merge Your Layers
When you’re done with the final design, you can merge the color and sketch layers. By touching the layer on top and choosing “merge down” in the sidebar toolbar that appears.
Step Nine: Select Your Image
To give yourself room to work, Select your completed sketch by touching the arrow.

This allows you to move and adjust the size of the design.
If you don’t want your proportions to change, then make sure that in the Selection Toolbar (at the bottom of your screen) you have Uniform chosen. This locks the constraints of your image.
Note: Any action can be undone by touching the Undo arrow beneath the brush size slider.
Step Ten: Add the Sticker Border Outline to a Background Layer
Updated: See the link at the top of this post for an easier and quicker way to add an outline to your stickers.
Create another layer and move it beneath all the other layers, directly on top of the “background” layer. Choose either a hard airbrush from your brushes library or download my free Sticker Border Brush that I created to be more streamlined and have a super hard edge so you don’t have extra less opaque pixels hanging off the edge of your stroke.
Then, in the top right corner of the screen open the color panel. Choose white, and draw a shape under and around each sketched image. I demonstrate some ways of doing this in the video. Color drop in white to fill each shape completely.

Then Merge your art image and the white background shape.

Step Eleven: Duplicate Your Image
Once you have your sticker the way you like it, you can have two options to duplicate your image.
- You can swipe left on the layer, and instead of choosing “delete,” select “duplicate’. This will create a second layer with your duplicated image on it directly on top of the image you copied. Repeat to get enough images for a row. This may decrease the image quality slightly if you duplicate a duplicate, so duplicate the original layer each time.
- Now that Procreate 5x is here, you can use the three-finger swipe down to bring up the Copy and Paste panel. Choose Copy and then Paste 3 times.

Step Twelve: Create Columns of Your Images to Fill Your Kiss-Cut Sticker Sheets
Select the image layer by touching the arrow icon next to the ribbon, move your duplicated shape below the original. Continue to do this until you have a column of images.

Note: If you have the Magnetics and Snapping toggled on in the Selection menu, then lining up your images is a breeze (another Procreate 5x feature)!
Merge the Layers to create one Layer and Duplicate the entire column to fill your sticker sheet.

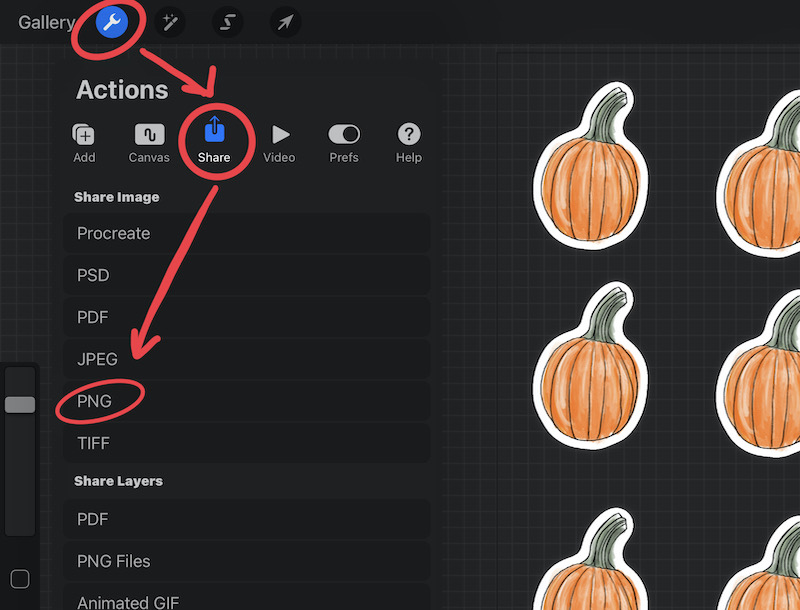
Step Thirteen: Export your Final Design
The final step to making these cute stickers is to go back up to the top toolbar, and under the wrench symbol, choose the Share option. This allows you to choose what file format you wish to export your image in. Choose the .png option and then save it to your photo gallery or files. Or you can also airdrop, message, or email the image.
Note: Make sure the background layer is unchecked- this automatically gives you a transparent background. That keeps your border as the cu. AND is one of the best things about Procreate!
You’ve now learned the secrets of how to trace photos to make stickers on Procreate!
Uploading into Cricut Design Space as a Print then Cut Image
Where this post ends, my post, How to Print then Cut Stickers on Your Cricut, begins. Be sure to click the link to that for the entire process of uploading your .png files to Design Space and using a Cricut machine to cut your stickers. It’s easy to do once you’ve seen how it’s done!
With this tutorial, you can make your own printable stickers with an electronic cutting machine and your home inkjet printer. Of course, if you plan to create digital stickers, or digital planner stickers, then you don’t need to do more than just save your designs as a PNG with a transparent background and upload them into your favorite notes app!
Another way of making your designs into physical stickers is to use print-on-demand sites like Sticker Mule, Red Bubble, or Society 6. And of course, I’d LOVE to see what you make!
Love Me a Freebie!!!
Don’t forget to stop by the Creative Resource Library and get the FREE Sticker Border Procreate Brush and grab the pumpkin and maple leaf stickers I created in this video as well. You’ll also find other free Procreate brush and stamp sets as well!
Want more stickers to print and cut with a Cricut? Stop by the Well Crafted Studio Shop to pick up the printable sticker files for my “Hello Fall” sticker sheets below!

I created this Hello Fall sticker set using the same techniques I demonstrated in the video for this post. Pretty magical huh? Sparkles and pixie dust…
For More Inspiration
I’d love to have you check out my YouTube channel for other how-to ideas, including some awesome stickers and Cricut videos. AND a video on how to make borders for your stickers SUPER FAST. You’ll love this one- it’s like magic!
Love it? Share it!
If you found this post helpful, I would LOVE to have you share it with others. You can easily do this by simply sharing this post through the links at the bottom of this page, or by pinning the image below to Pinterest. Every share counts, so thank you!!! And if the video was helpful hit Subscribe for more!
Thank you for reading,

Want to Remember How to Trace Photos to Make Stickers on Procreate to Cut with Your Cricut? Save it to your favorite Pinterest Board!

![How to Draw Snowflakes in Procreate [Symmetry Tool]](https://wellcraftedstudio.com/wp-content/uploads/2019/11/How-to-Draw-Snowflakes-square-1024x1024.jpg)


The link to these stickers in your library returns a 404 not found error.
Thanks Melissa,
I appreciate the heads up. I just changed the link so it should work fine now!
Jen
Love this tutorial! I’m always looking for new ways to use Procreate and this is such a fun and creative idea. Can’t wait to try it out and see how my stickers turn out. Thanks for sharing!
Loved this tutorial! I never realized how easy it could be to trace photos for stickers in Procreate. The step-by-step instructions were super helpful, and I can’t wait to try it out for my own designs. Thanks for sharing!
I am new to Procreate and am wondering how to get a pure white for the background. It seems as though the closest to white I can get on the color ball when I choose colors is the lightest blue, the lightest green, the lightest yellow, etc. Is there a way to choose pure white?
Yes! You can do that a few ways. One is to go to the value menu option at the bottom of the color panel and drag the brightness slider all the way to the right. You can also go to the hex code and write #FFFFFF. Then, in order to make it easy to get to a pure white, or a pure black, I usually add each of those to every saved palette that I create. If you want to turn an entire layer white, I will often go to the magic wand, and then Hue Saturation & Brightness, and pull the brightness slider all the way to the right. Hope these tips help!
.