Cricut what? If you’ve started to delve into the world of electronic cutting machines for the first time. you may be feeling confused, intimidated, or frustrated. These are pretty common reactions once you get your Cricut home. Then add in that you may not have realized that to make your first project, you need to use Cricut Design Space. No wonder people are intimidated! In this post, I’ll give you an easy introduction to Cricut’s design software. I’ll also help you set up a canvas, show you how to upload designs, how to change the actions you want, and explain what Cricut Access is.
- Basic Questions About Cricut Design Space for Beginners to Ask and Their Answers!
- A Tour of The Home Page in Cricut Design Space
- Your Project Canvas
- Import Panel
- How to Upload an Image in Cricut Design Space for Beginners
- Other Helpful Actions on the Canvas
- Get More Cricut Design Space for Beginners Tutorials
- Check Out My Other Beginner Tutorials
- Love This Post on Cricut Design Space for Beginners? Share It!
Basic Questions About Cricut Design Space for Beginners to Ask and Their Answers!
What is Cricut Design Space?
Cricut Design Space is the software for your Cricut cutting machine and tells your Cricut what actions to take (like cut, engrave, etc.)
Cricut Design Space is free. If you heard that it is not free, then you may have confused it with Cricut Access which is a paid subscription. (OR you may be on iOS and found one of the fake apps that looks like a Cricut app).
What is Cricut Access?
Cricut Access is a monthly or yearly subscription. It includes images and projects you can use in Cricut Design Space to make your crafting easier. Cricut Access does have other advantages, such as 10% off your Cricut.com orders, priority customer service, and sometimes it has free shipping. There is Cricut Access and Cricut Access Premium which has better discounts and shipping cost levels.
What can a Cricut Do?
All Cricuts can cut, score, and draw. The Cricut Maker and Maker 3 can also engrave, deboss, use a knife blade, and it has a rotary blade to cut fabrics. You can read more about the Cricut Maker and what it can do in this post.
The Cricut Explore and Explore 3 is the middle machine and is bigger than the Cricut Joy, but does not do as much as the Cricut Maker.
The Cricut Joy is a small, portable machine that does most of what the Explore and Explore 3 can do, except on a smaller scale (only 4-6″ wide max). However, the Cricut Joy can not do Print then Cut.
How Do I Get Started with Cricut Design Space for Beginners?
First thing, download the software to your desktop or get the mobile app if you have an Android or iOS device. For Design Space, go to design.cricut.com.
I’ll demo this with screenshots of the desktop version. But, if it’s helpful, I can come back and do a mobile version later. Just leave a comment and let me know you’d like this.
A Tour of The Home Page in Cricut Design Space
The Home page for Cricut Design Space is the central go-to place for a LOT of information and actions. I map out everything on the page below and have used a red arrow or black arrow to show what you will and won’t use frequently.

A Close-Up Look at the Top Bar of the Home Page
First, notice the version # of Cricut Design Space software that you currently have installed at the VERY top of your screen. Then, to the right, you’ll see these options.
The Hamburger Menu- If your Home page doesn’t look like the one above, it’s because you need to click on the three lines in the upper left corner of the Home Page. This is commonly called the hamburger menu and has a drop-down menu of options to click.
- My Projects- A shortcut to your saved projects.
- Machine Selection- The type of Cricut machine you’re using. If you have more than one, you’ll want to make sure the right machine is selected for the project you’re doing. This is because your actions may be limited according to the machine you select. For instance, if you don’t have your machine set to Maker you won’t get Engrave as an operation option.
- New Project- This opens up a new canvas so you can start creating!
The Drop-Down Menu Options (on the Left of Your Page)
- Home- Your Home Page Link
- Canvas- Your Project WorkSpace
- Calibration- This is where you can run through a calibration operation to get your print then cut to work as accurately as possible.
- Manage Custom Materials- Make Your Own Cut Settings with Pressure and Pass Changes.
- Update Firmware- Update your Cricut Cutting Machine or Heat Press.
- Cricut Access- Subscription Info for Cricut Access
- Settings- Change the canvas settings like the language, Metric vs. Imperial, type of grid, and how you’d like to Save your files (offline option).
- What’s New- This is where you want to go when you have questions about changes and updates to Cricut Design Space.
- Sign Out- To log out of Cricut Design Space.
Your Project Canvas

Import Panel
Here are the basic import functions available on your canvas. You can add
- Templates
- Projects
- Images
- Shapes
- Text
- Your Own Uploads
- Phrases
- Editable Images
- Monograms
Templates
These are not files but are images that you can use to help you size and design your projects.
For instance, in the pic below I searched for a card template.
When I did, it added options for me to choose what type of card, and the size of the card. Again, this is NOT part of your design, just a tool to help you create it.
Because of this, in the lower-left corner you’ll see below the Layers Panel (far right) the template is there, but there is no action with it.
That means you can’t cut, draw, or do anything else to this template. It’s purely there to help you design. To hide the template on your canvas just click the eye next to it.

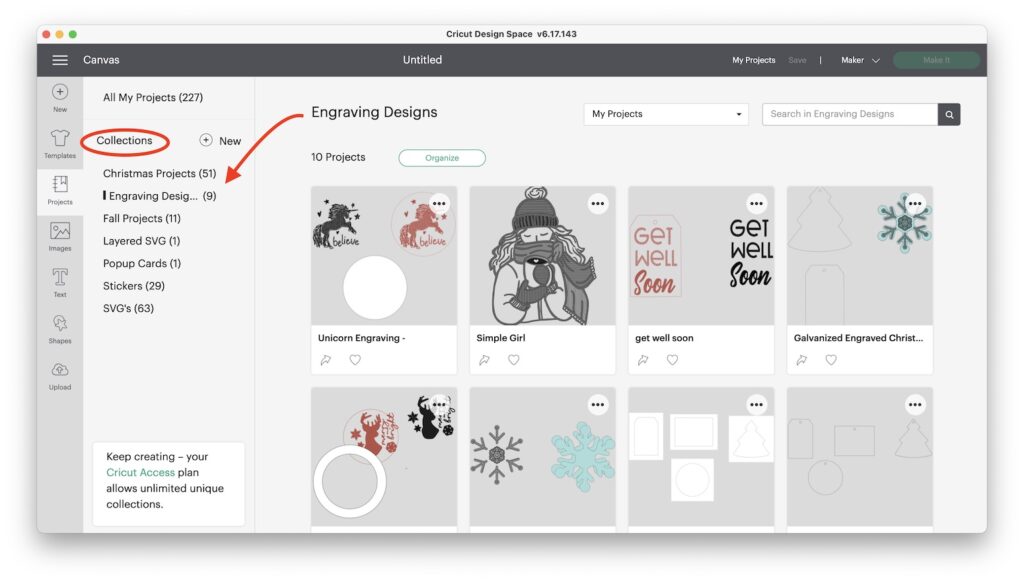
Projects
This gives you the option of importing a project. This may be one of your own that you saved, or it could be one of those in Cricut Access or uploaded by the Cricut Community.
You can filter your search by your saved projects, and then you’ll see your Collections as well.
No collections? This is something you have to create as you Save your projects, it’s not automatically generated for you.
Images
This includes the images that are available free to Cricut users. As well as the 200,000 plus images that are available to Cricut Access subscribers. To know which ones are part of Cricut Access, look for a green flag with a small “a” in it.
When You Have to Pay for Images
Besides the free images, and the Cricut Access images, there are additional ala carte images that you pay extra for. These are usually licensed images such as Star Wars, Hello Kitty, or Disney images. Please note that these are personal use only. This means you can’t sell anything you make with these images, even if you purchase them from Cricut. You’ll see a price next to all a la carte images.
Image Search
One great addition in the last year or so is the constantly refining search feature that will help you find the images you’re looking for. Currently, you can search images by operation, single or multi-layered, project type, materials, free or saved, downloaded, licensed images, and language! You can also filter by bookmarked now too!

Text
Text has all kinds of its own options that I’ll dedicate a separate post to, but one big thing to mention is that at the top you’ll see an All, System, and Cricut. If you’re trying to find the fonts that you’ve purchased in the past and are on your computer, you’ll find them under the System.
Although, there are many different fonts available through Cricut Access, be aware that some fonts are ala carte and cost an additional fee to use. Again, you’ll see a price next to these.
Kerning
Recently, Cricut introduced kerning. And has made this an option you can use to filter by checking the box that says Only Kerned Fonts to help you search fonts with this capability.
You can also bookmark your favorite fonts, search by sytem or Cricut fonts, and filter according to operation like drawing for single line fonts.

Shapes
Click this to add a basic shape to your canvas. Most shapes will have all the same operations available to them as other shapes. For instance, basic cut, pen, engrave, etc.
There are 18 free shapes available as well as a scoreline. With Cricut Access you have the option for many more shapes.
To change the shape (of a shape 😂)-
First, unlock the constraints. Then, use the size tool in the top toolbar (or use the size anchor on your selected image) to adjust the height and width independently of each other.
Otherwise, with the lock on, your height will automatically adjust to the width, keeping uniform proportions. (So a square will always be a square and never a rectangle.)

One more thing to note is that you can now import a score line under the shape options menu and change its operation. This makes adding a cut line to a card for an insert WAY easier than in the past!

How to Upload an Image in Cricut Design Space for Beginners
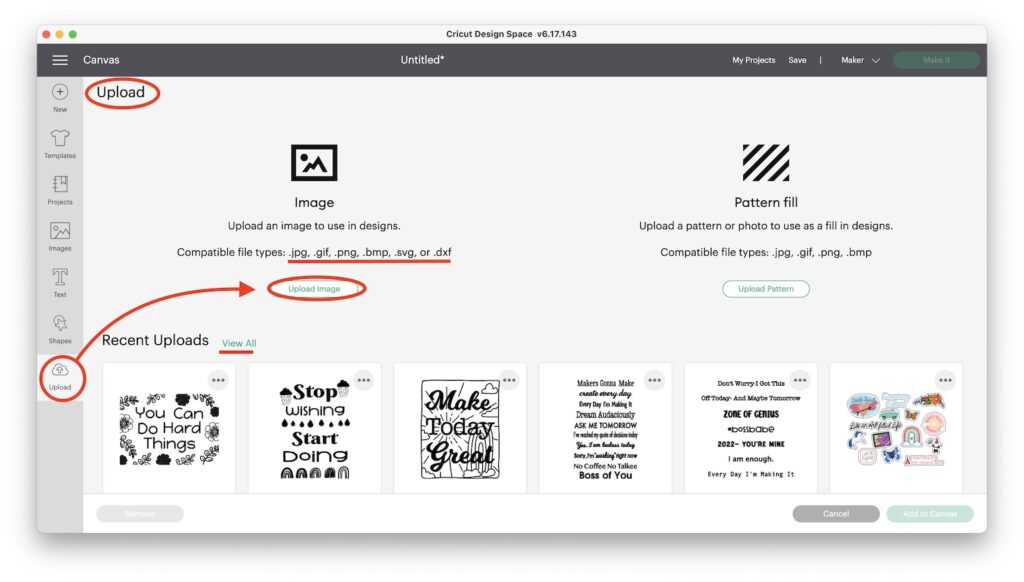
You can use your own uploaded photos, SVG designs, PNG designs, and more into your Cricut Design Space canvas. There is a list of compatible image files available right on the screen.
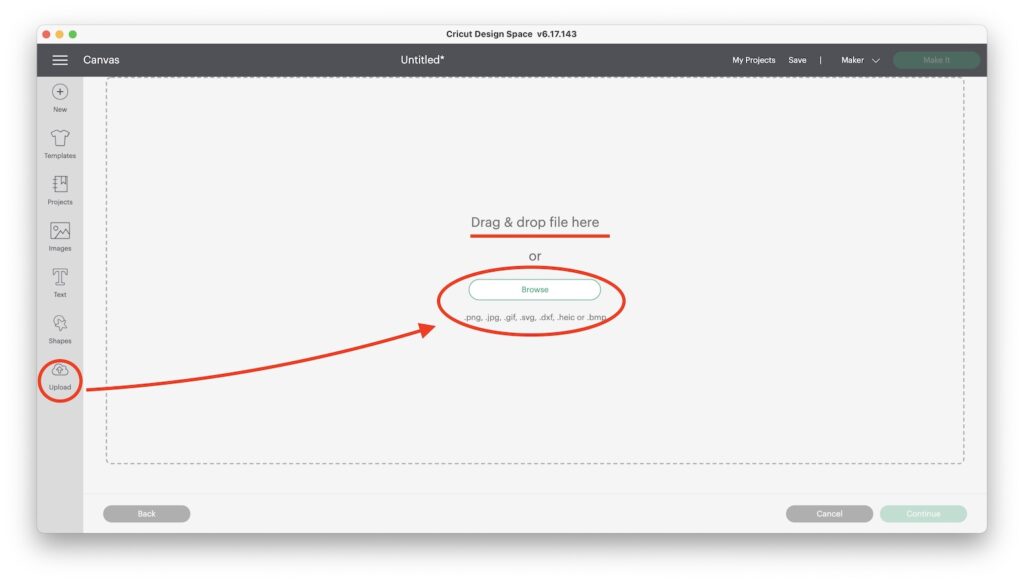
Step One: Click on the Upload Icon on Your Canvas Toolbar
On your canvas click the Upload icon on the bottom left of your left-side toolbar. This opens up the Uploaded Images Gallery. Click Upload Image.
Step Two: Choose Your Image Upload from Your Device
Choose Your File to Upload with either Drag and Drop or Browse.
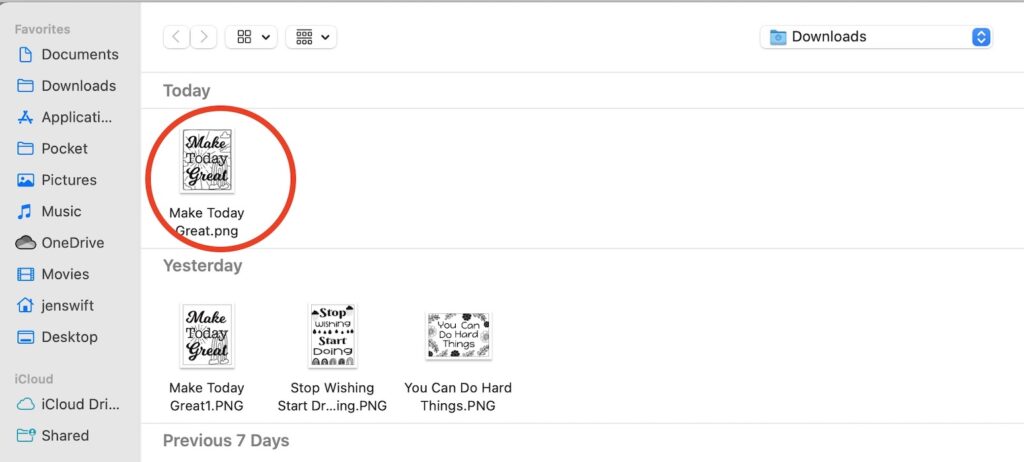
Step Three: Grab Your Image File and Upload It
In your files on your computer, located the file you want to upload. Click to select it, and then hit the blue Upload button at the bottom right of your screen.
Step Four: Start the Image Upload Process + Select Image Type
This starts the Image Upload Process in Cricut Design Space. First, you’ll select the image type. I usually recommend Complex, since I’m not entirely sure why they have you do this. (Maybe to save space on their servers). But you want the crispest upload that you can get, especially for print then cut.
Click to select image type, and then hit the Continue button.

Step Five: Clean Up and Preview Your Uploaded Image
If you’re using a file that has an unwanted background, you’ll need to remove that background. Cricut did just release an automatic background remover. But, you can do it with a couple of extra steps using the magic wand selection tool and erase.
One handy option here is to use the Preview Cut Image option. With this, you can double-check that you have everything removed that you want to be removed.
Note: The checkered background you’ll see means transparent.

Step Six: Upload Your Image as a Cut Image
Select the Upload Type by clicking on the one that works for your project. Give it an Image Name, and Upload.
Note: One thing to be aware of here is that you can change the operation of your image on the canvas. This means you can save it as a Print then Cut but still change it to a cut image under the operations.

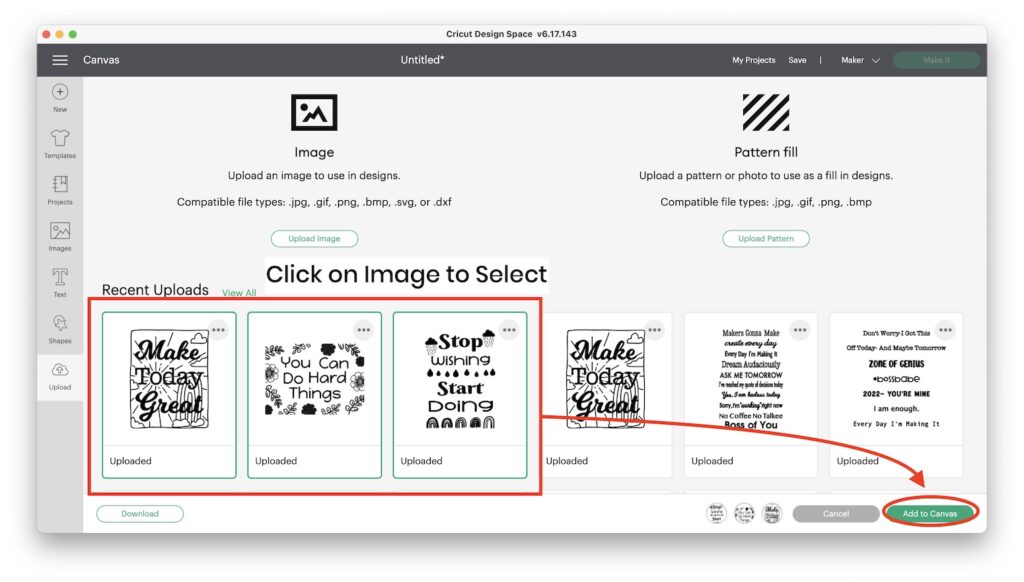
Step Seven: Add Your Uploaded Image to Your Canvas
To do this simply click on the image(s) to insert into the canvas.
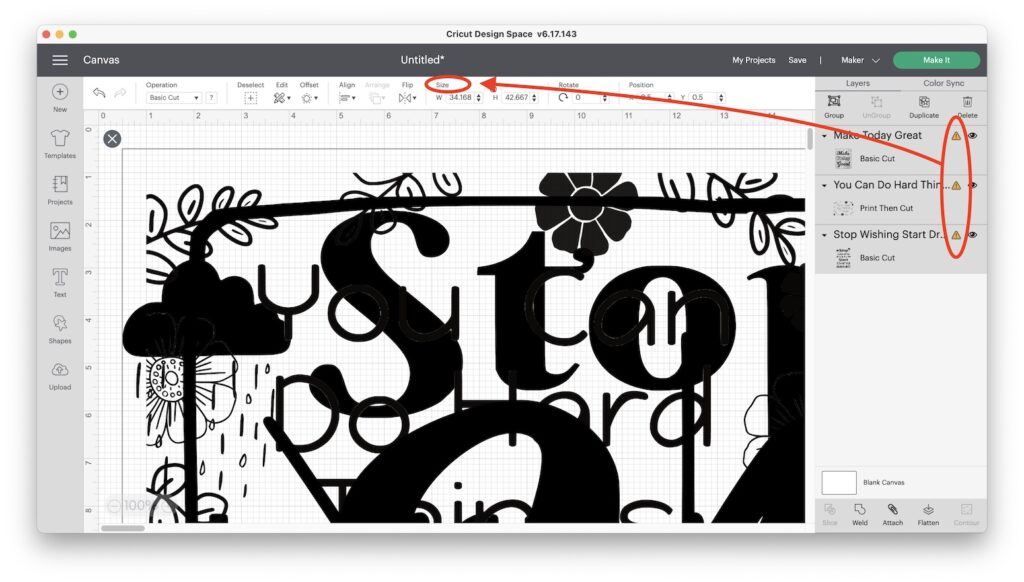
Step Eight: Change the Size of the Image
Images often import larger than needed and you’ll see a warning sign next to the layer that means it’s too large.
With the images still selected (more on this below) you can change the size in the top toolbar to something more manageable.
Step Nine: Select a single layer by clicking on the image layer in the Layers Panel
The Layers Panel is the area at the far right of your screen.
Each layer is arranged in order from top to bottom. This means that if you were to stack them, the one at the top would be the first layer in the Layers Panel.
When you Select an image layer it becomes gray in the Layers Panel.
You can also select a layer by clicking on that image on the screen. You will also see that you have different things you can now do with that image layer. Including changing the size, operation, position, rotation, etc.
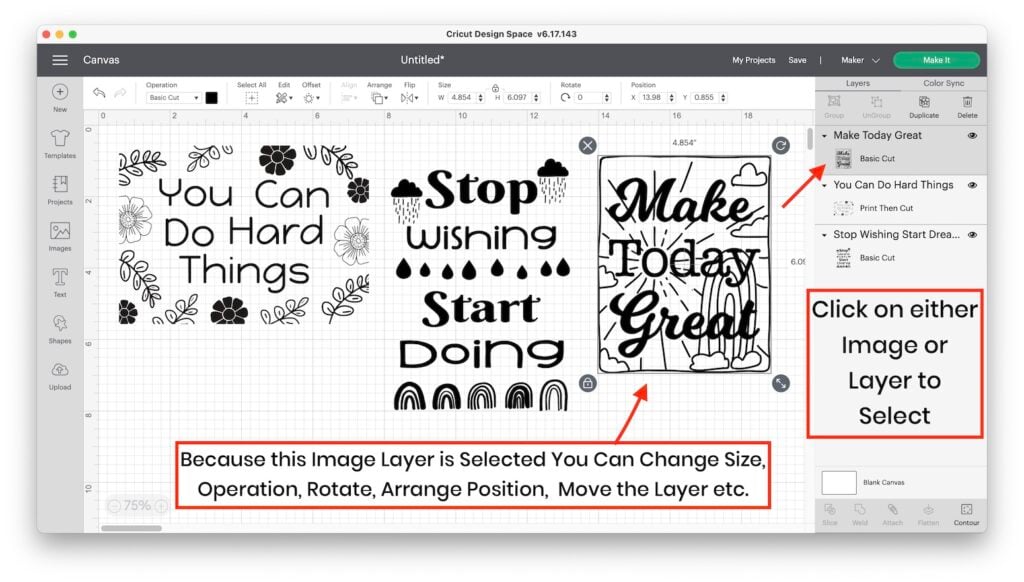
When an image is selected, it gets a Selection Box around it. This selection box has four different anchors at each of its corners that have an action it can do.
With the Selection Box Anchors You Can..
- Unlock the constraints (bottom-left)
- Rotate the image (top-right)
- Change the size(bottom-right)
- Delete the image layer (top-right)

Step Ten: Change the Operation
When you have things sized the way you want, you can change the operation. The operation is on the far right of the top toolbar and has a drop-down menu with the options.
In the image below, I’m changing my selected image from Basic Cut to Pen.
Note: There are different Operation options available depending on the machine you’ve selected in the upper right corner of your screen.

Step Eleven: Save and Make It
Once your image is sized, has the correct operation, and everything looks good you can go ahead and Save your project. Really, you can do this at any point, but I usually make sure I mention it before you hit Make it. Then, next to the Save is the green Make It button– click it and we’re on to the next stage of our project!

Step Twelve: Navigate the Mat Preview Page
On the Mat Preview Page you’ll see a representation of the different mats you’ll be using with your images on it. You have a few options here, such as Material Size, Mirror, and Project Copies. On this page the mat that is selected is white, and that is the mat that will be first.
Important: To change the Material Size and turn on the Mirror you have to click on each mat and make the changes.
Here is an example of the material size options.

And here is an example of the Mirror function.

The Mirror option is something you will use for projects where you need the mirror images of your design because it’s going to be flipped in the application. For example, an iron-on project or an infusible ink project you would be sure to mirror because you’re going to flip it upside down to transfer it as you heat-press it.
Once you’re done, hit Continue in the lower-right corner of your page.
Step Thirteen: Now it’s time to Create!
You’ll just choose the Material Setting and then be prompted to load your mat. Then, it will tell you what blade to use, and you’ll be told to hit the blinking “C” (or go button) on your machine.
Other Helpful Actions on the Canvas
Besides everything we covered already, I just want to call out that you can Undo/Redo your latest action with the arrows at the top left of your screen. There are also keyboard shortcuts for these actions as well.

Get More Cricut Design Space for Beginners Tutorials
There are other tools/functions in Cricut Design Space that you’ll use as you progress in your Cricut journey.
You can Slice, Combine (Unite, Subtract, Intersect, and Exclude), Duplicate, Contour, Offset, and Weld as well as what I’ve shown you here today.
In my tutorials, I get into those actions and more as the project requires. SO be sure to check out my Cricut Project Tutorials.
Check Out My Other Beginner Tutorials
I also have beginner posts for How to Engraving with a Cricut, Sublimation Made Simple for Cricut Crafters, and a Beginner’s QuickStart Guide to Procreate.
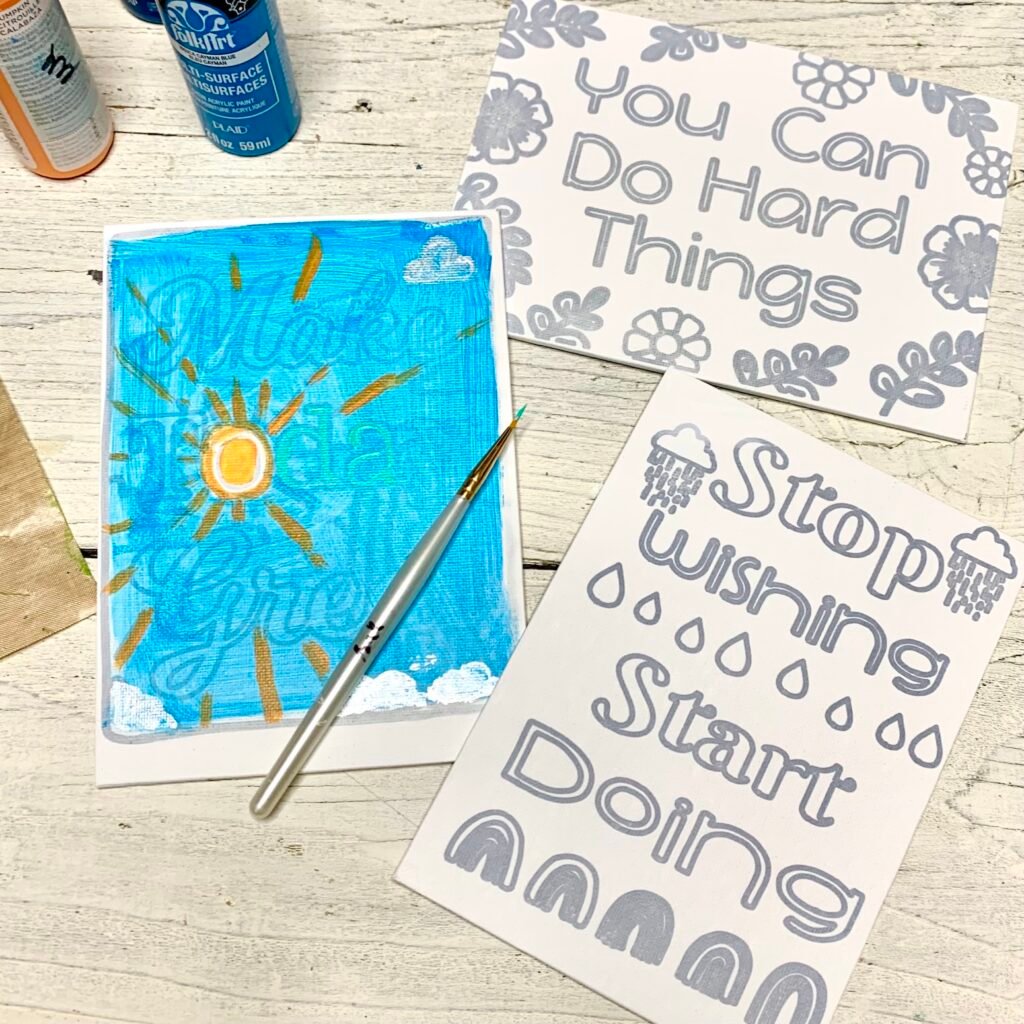
And check out the tutorial on how to make DIY Paint Your Own canvases with your Cricut. If you wondered, that’s what I was doing in this post’s photos! 🥰
Love This Post on Cricut Design Space for Beginners? Share It!
If you found this post helpful I would LOVE to have you share it on social media! It really helps me grow my business AND it helps you remember where you saw this tutorial. 🤩
And I’d love to see you on my other platforms. You can get to Well Crafted Studio on Facebook, Pinterest, Instagram, and YouTube through the links below. Take a minute to like, follow or subscribe. Then, say hi!
Thanks for Reading,

Thanks for Reading,
