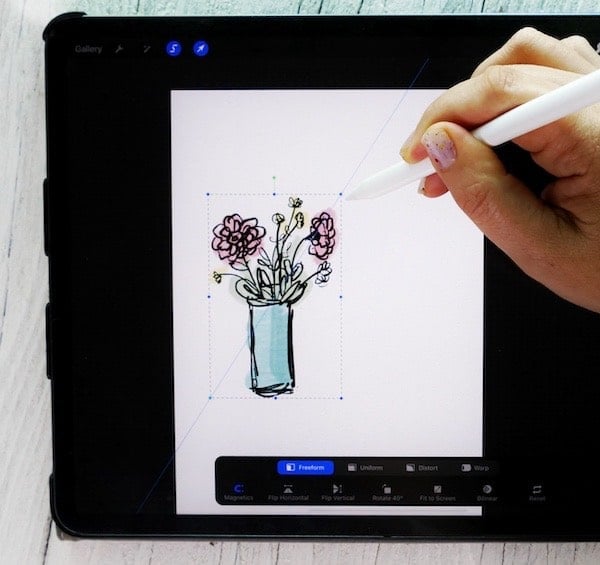


Procreate is an iPad-only drawing app for digital art. Although professional artists use it, Procreate is so popular because it is easy for anyone to use. Anyone, of almost any age, with any background, can create with Procreate.
This is huge because it means you don’t have to be a graphic designer with a professional graphic design program like Adobe Illustrator to make your own designs to craft with. AND the best part is you don’t have to spend hours learning the program or spend big money on a subscription either!
Procreate for iPad is usually $9.99 in the Apple App Store, and Procreate Pocket Edition is usually $4.99. There are no in-app purchases, and updates are always free.
And although Procreate does not sell them, you can purchase additional brushes, stamp sets, paper textures, and even color palettes.
Online marketplaces like Etsy, Design Bundles, Design Cuts, and more have great selections to choose from. But, you can also get lots of these brushes and palettes free from blogs like this one!
I have an entire post that answers this question! My husband, the techy, wrote it (and I chimed in with my opinion too). He did a great job explaining what to look for in an iPad, which iPads are compatible with Procreate, and what kinds of accessories will make your Procreate experience even better.
You can read this article, The Best iPads for Procreate here. But, you may notice in my video tutorials that I’m using an iPad Pro 12.9″ which has a larger iPad screen.
No! You can use Procreate with just a finger. However, if you’d like the best experience, using a stylus really makes drawing in Procreate feel much more natural. You can also use a third-party stylus. However, Procreate was designed to work with the Apple Pencil and has features built around the capabilities of the Apple Pencil. It really is worth saving up for!
No…. and yes. Procreate is a raster-based program which means it creates with pixels, not vectors. However, you can use an online image converter to trace your PNG designs and create SVG designs from them.
Raster programs use pixels, which are little squares of color. And they are used for digital painting, animation, and photography. Most print and cut or sublimation designs are made with a raster program like Procreate and are in a file format like PNG, JPEG, JPG, TIFF, PSD, or PDF.
Vector programs create with shapes made of connected nodes. This allows you to make a design bigger or smaller without losing any quality. Vectors like SVG’s are what design programs like the Cricut Design Space, or SIlhouette Cameo use most often for their cut designs. In addition to SVG, other popular vector file formats are DXF, AI, EPS.
SO Many Things!!! I actually have a post with 23 Projects You Can Make with Procreate + Cricut. This starts the list of what you can make with Procreate, but when you consider how easy it is to create sublimation designs with Procreate and add that capability then you’ve opened up the hundreds of things you can make with sublimation as well!
I also have many step-by- step tutorials for using Procreate with a Cricut here on my blog. And if you prefer a YouTube tutorial I have playlists on my YouTube channel you’ll want to check out too!
Interested in hand lettering? You’ll find iPad lettering has a huge online following among would-be calligraphers because it makes it so fun and easy to learn.
Absolutely not! Because Procreate is a digital drawing app, it has all kinds of features like QuickShape and drawing guides that make creating when you’re not an artist sooo much easier.
Have trouble drawing a straight line? In Procreate, you can use QuickShape to make straight lines, perfect circles, and absolutely square- squares.
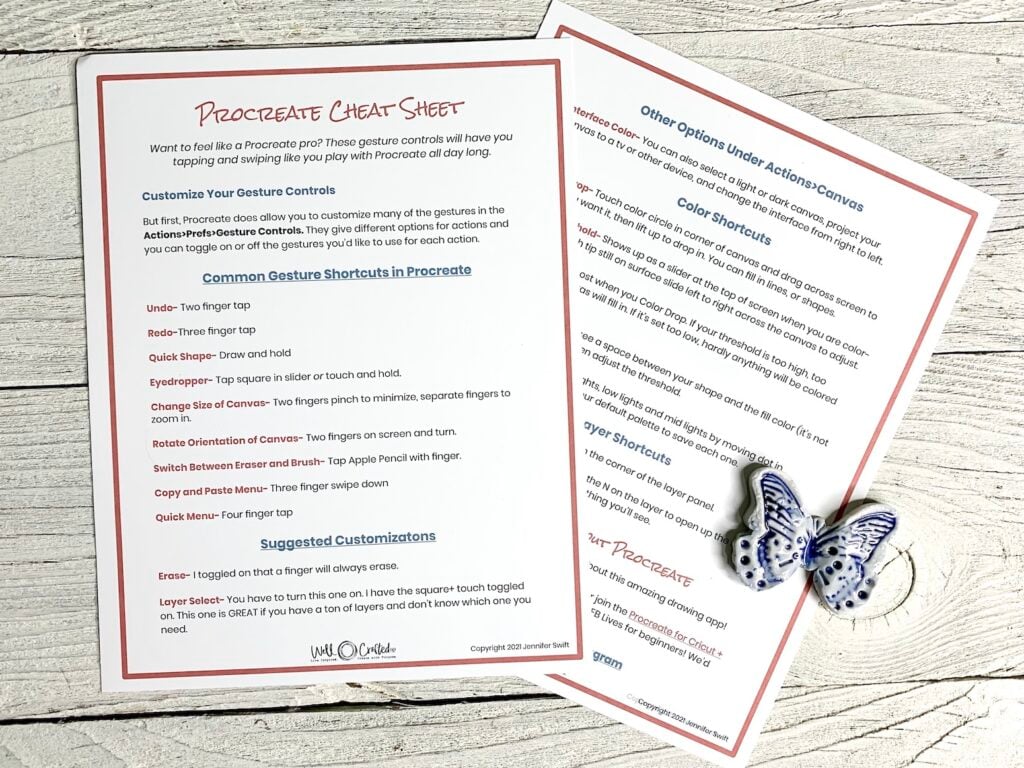
Want to undo? It’s a two-finger tap, and to redo it’s a three-finger tap. There are SO many built-in benefits to using a digital drawing program that you’ll find you’re a much better artist on the iPad than you are with a standard piece of paper and a pencil.
This is a question I’m asked fairly frequently by beginners to Procreate in my Facebook group. So when they asked for a list, I created a post with a free printable cheat sheet of the common Procreate gestures.
I also explain what all of these are, as well as what they do in my post, The Best Procreate Shortcuts for Beginners to Know. AND I have some awesome professional tips and cheats in the post as well, to make you feel less like a newbie as you start. ❤️
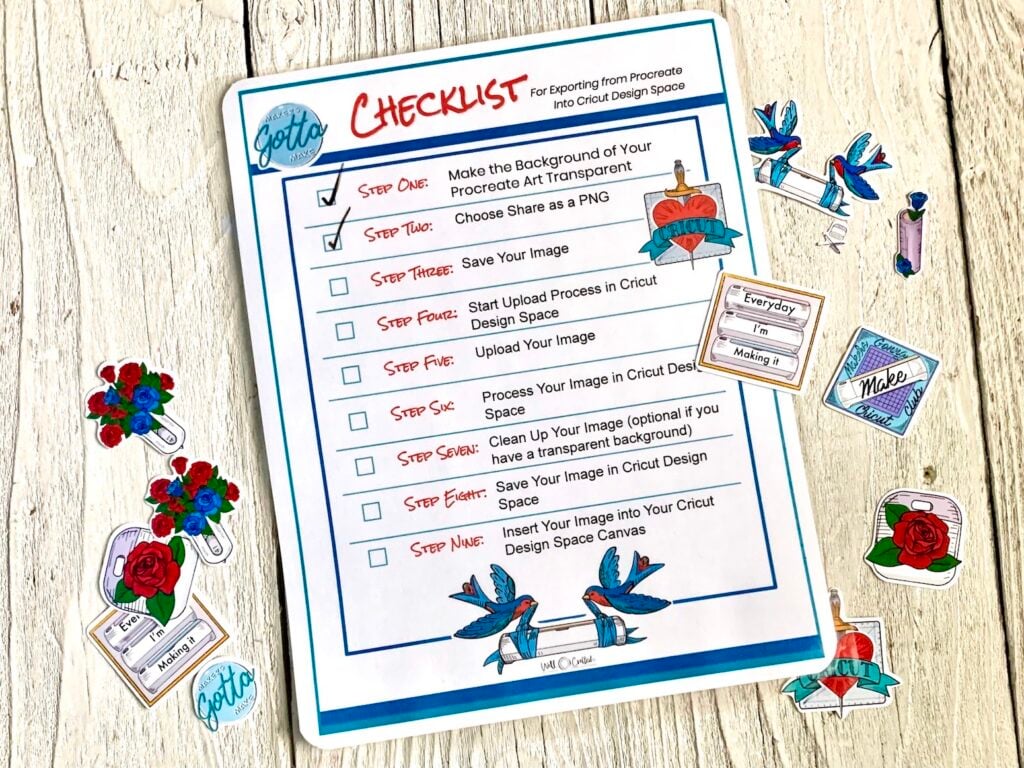
Oh, YES- they are SO great together! I’m a little obsessed and have an entire post and YouTube video that will walk you through How to Upload your Procreate designs into Cricut Design Space.
I even created a printable checklist that you can keep handy as you try it. This checklist is a freebie that you’ll find in my Free Library along with free Procreate brushsets, stamp sets, and color palettes.
I’m so glad you asked! Although there are a TON of YouTube videos on using Procreate by digital artists, as well as a lot of really amazing Skillshare courses, you can find Procreate tutorials for beginners on this blog, as well as on my YouTube Channel.
The difference between my tutorials and others is that I SUPER focus on teaching Procreate so you can create designs you can craft with.
And a SUPER EASY way to get started is by using the thorough getting started section below!
Now that you’ve gone through this QuickStart Guide to Procreate here are some next steps

If you found this beginner’s guide helpful, please consider subscribing to my email list or to my YouTube channel. This really helps me, and it keeps this post available for when you need it. You can also choose to share this post with any of the social media options below!
Thanks for Reading,
Do you want to know how to use Procreate? Or curious about what this digital art app is? Maybe you’ve run into it a few times when doing searches on making stickers or creating your own characters or illustrations.
This post is going to give you the basics of Procreate, answer questions like who it’s for, what you need to know, and how you might use it. First, we’ll give you an overview of how the app works. You can watch the live video or you can go through the photo tutorial below. Then, at the bottom of this post, you’ll get answers to all your procreate questions. This post is a GREAT place to start if this is your first time using Procreate!
In this tutorial, I’ll introduce you to the Procreate canvas, specific procreate tools, and different settings- all to get you off to a solid footing as you begin to explore digital art.
To begin, when you first open Procreate, you’ll find yourself on the Gallery Page. In the top right corner of this page, you’ll see a + sign. Tap that to open up the canvas options.

Choose the Screen Size option at the top. When you tap it, that opens up your first canvas. And you’re ready to create!
To move the canvas around, or make it larger or smaller use two fingers on the screen.
If you want to rotate the canvas- Place two fingers on the screen, and turn your wrist.
And to make the canvas smaller- put two fingers on your screen and pinch them towards each other. (This creates a “zoom-out” effect.)
To make the canvas bigger- put two fingers on the screen and push them apart. (This will create the “zoom-in” effect.)
Familiarizing yourself with the canvas helps a ton. Start by tapping each icon in the top toolbar and then play with the menu options that appear.
But before you do that, check out the rest of this tutorial as I’ll walk you through each one.
To begin, you’ll notice the canvas has two primary features-

This has a slider to adjust the size of the brushes on the top. And an opacity slider on the bottom, which adjusts how see-through a brush is.
Between the two sliders is a square that you can use as an eyedropper tool (color picker) to choose a color. That’s super cool and an easy way to find exact colors that I’ll explain more about that later.

At the bottom of the sliding interface, you’ll see a back arrow for undo. And a front arrow for a redo. You can also use gestures to create these same actions.
Gallery- This takes you back to the Main Gallery Page where all your projects are stored as thumbnails
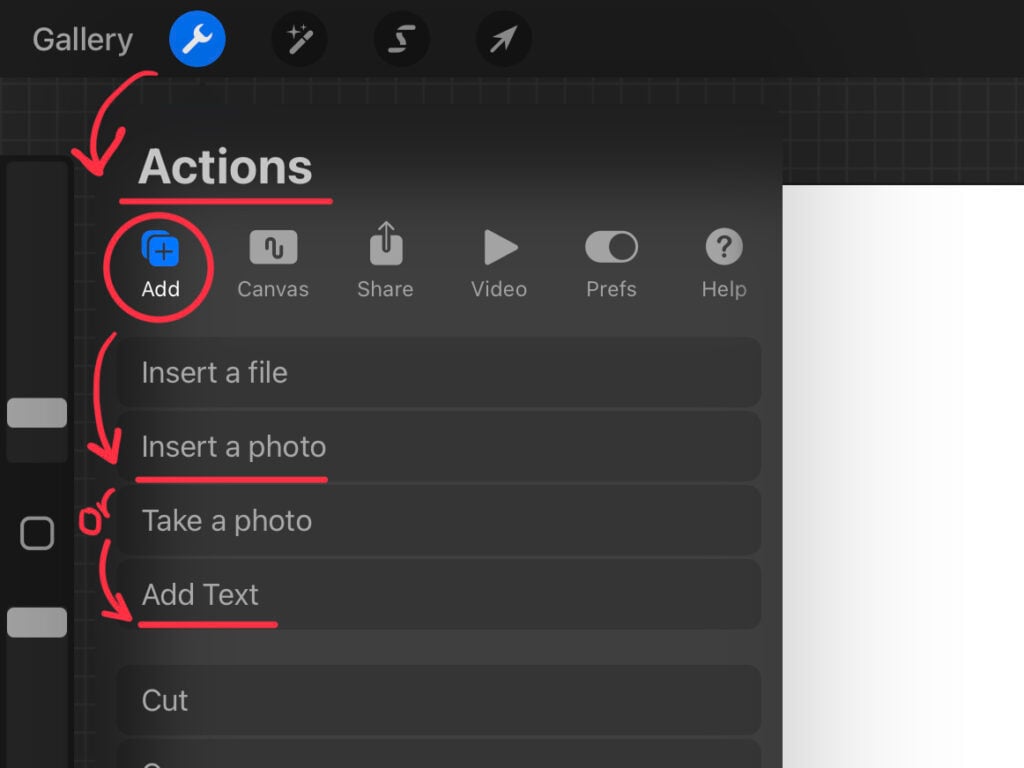
Wrench- This is your Actions menu and you’ll see a drop-down menu that has several possible Actions for you. I use the Add and Share options most frequently.
Magic Wand- This is Image Adjustments like Hue, Saturation, and Brightness. As well as fun tools like the Gaussian Blur, Gradient Map, Liquify, and Clone.

I show you step-by-step how to use the Gaussian Blur and Brightness to make borders for your stickers in my How to Make Borders for Your Stickers Super Fast video.
Selection Tool (Ribbon Icon)- This tool has a pop-up panel that gives you options for selecting. Like selecting automatically, or with a lasso tool. In order to use the Transform (move) tool, you need to have something selected first.

Transform Tool (Arrow Icon)- With this tool, you can move whatever you want, anywhere on the screen.
You can also use this to change the constraints of the selection by touching the Freeform option. Or keep it on Uniform to change the size but not the shape.

Or you could use the Distort to add some tilt to your design. The Warp is a fun option to curve the text. These tools also work with any text you add to the design.
Brush Tool- Touching this opens up the Brush Library. This is where you change the type of brush that you have. More on that in the next step!
To find all your brushes, just tap the brush.
If you’re brand new to digital art, the brushes have different shapes that mimic different types of media like gel pens, charcoal, dry acrylic paint swipes, glitter, markers, etc.

But you can also have brushes that mimic stamps and can be images. These make using Procreate fun and easy for non-artists!

Note: Procreate comes with a TON of free brushes that are native to the app. But you can also purchase and import custom brushes from other sources. Or you can design your own in their brush studio.
Get FREE Brush Sets in my Free Library- There are many free brushes right here in my Free Library. You can get the password when you become an email subscriber. You’re totally welcome to unsubscribe at any time and keep the password and access.
This is where that slider on the side of your canvas comes into play. You can see in the image below that I played around with the size slider AS I was drawing and it did some fun thick/thin effects.

Tap the circle of color in the very top right corner of your toolbar. This brings up the Color Panel. You’ll notice the disc right away. This disc lets you choose the hue on the outer ring, and in the center, you can choose the shade or value of that hue.
Tip: This makes choosing highlights and lowlights of any color easy- which makes your shading look super natural without you even trying.
I won’t get into this a ton, but if you look under the Color Disc you’ll see a space for little swatches of color. This collection of colors is called a palette.

And if you tap on the Palette option along the bottom of the panel you’ll open up a Palette Library. And much like the Brush Library you can create your own palettes, or import pre-made palettes. There is much more you can do with color in Procreate.

Now that you have a brush and a color selected, let’s draw! To change the brush type, simply tap the brush again and choose a new brush. For Undo, use the back arrow on the side slider, or you can use the two-finger tap on your screen.

And to erase, tap the eraser icon next to the finger smudge in the top toolbar.
The Eraser is a brush that removes. So to get crisp, clean erasing make sure that your eraser brush is set to a brush like the hard airbrush, or the Sticker Background Brush.

QuickShape is one of THE best things about Procreate. It allows you to make a perfectly straight line or a perfect circle in seconds.
To activate QuickShape, simply draw your shape or line. But keep the tip of your stylus (or finger) on the screen for a second after you’re done. This will cause what you drew to snap into the QuickShape version of your mark.

To Edit QuickShape- You’ll see Edit Shape at the top of your screen. When you tap that, you’ll see that you can select a circle or ellipse. You’ll also see blue dots that are “nodes” that you can move separately to change the shape of your QuickShape.
QuickShape can do lines, arches, squares, circles, rectangles, ellipses, triangles, parallelograms, and more.

To make a new layer, tap the Layers icon in the top toolbar. This is the two overlapping squares, and this opens the Layers Panel. Which is, in my opinion, one of the absolute BEST things about creating digital art.
The Layers Panel just shows a single layer, to begin with. When you tap the + symbol at the top, you’ll open up a new layer, Layer 2. Layers are stacked on top of each other, but you can switch around the order.

Next, to clear an entire layer, simply swipe left on that layer and you’ll see the Clear option. Or, you can tap the layer to bring up a sidebar that also has the Clear Layer option.
To change the order of layers, simply tap and hold on to the Layer you want to move. It will kind of get smaller when it’s ready to move. Almost like you picked it up.
Then, without picking up the tip of your finger or stylus, move this layer above or below another layer in your list.
When it’s where you want it, pick up the tip of your stylus to “drop” it into that position.

Now that you’ve moved Layer 2 under Layer 1. You can change brushes and colors and paint under Layer 1.
Then, simply uncheck Layer 1 to hide it, and you won’t see your sketch!

Under the wrench icon in the top toolbar, you’ll see the Add option. When you tap this, you’ll see the Add Text. This opens up a text box as a new layer on your canvas. You can type your text in this box.

There is a Text Panel that lets you change the size, the font, the kerning, the leading of your text, and more. I do have an entire Facebook Live on using and importing fonts in my Procreate for Cricut + Silhouette Facebook Group.
In this FB Live, I also show how to warp your text using options in the Transform Panel. It’s pretty fun!

Next, under the wrench icon, you’ll see the Share option. This gives you different file formats to export your canvas with.

I have an entire post and YouTube video that will walk you through how to export your image as a PNG. Because exporting with a transparent background is the easiest way to upload your Procreate images into Cricut Design Space.
For sublimation, you can save it as a JPEG, or PDF and it takes up less space in your files than a PNG does.

But for now, a great tip is to know that if you uncheck the background in the Layers Panel you’ll make the background transparent.
Finally, to save your image, I recommend saving it to your iCloud Files or your Photo Gallery.
Because many of us switch from iPad to desktop to use Cricut Design Space keeping our Procreate images in iCloud Files makes it easy to grab them from any device.

Thanks for Reading,

Procreate is an iPad-only drawing app for digital art. Although professional artists use it, Procreate is so popular because it is easy for anyone to use. Anyone, of almost any age, with any background, can create with Procreate.
This is huge because it means you don’t have to be a graphic designer with a professional graphic design program like Adobe Illustrator to make your own designs to craft with. AND the best part is you don’t have to spend hours learning the program or spend big money on a subscription either!
Procreate for iPad is usually $9.99 in the Apple App Store, and Procreate Pocket Edition is usually $4.99. There are no in-app purchases, and updates are always free.
And although Procreate does not sell them, you can purchase additional brushes, stamp sets, paper textures, and even color palettes.
Online marketplaces like Etsy, Design Bundles, Design Cuts, and more have great selections to choose from. But, you can also get lots of these brushes and palettes free from blogs like this one!
I have an entire post that answers this question! My husband, the techy, wrote it (and I chimed in with my opinion too). He did a great job explaining what to look for in an iPad, which iPads are compatible with Procreate, and what kinds of accessories will make your Procreate experience even better.
You can read this article, The Best iPads for Procreate here. But, you may notice in my video tutorials that I’m using an iPad Pro 12.9″ which has a larger iPad screen.
No! You can use Procreate with just a finger. However, if you’d like the best experience, using a stylus really makes drawing in Procreate feel much more natural. You can also use a third-party stylus. However, Procreate was designed to work with the Apple Pencil and has features built around the capabilities of the Apple Pencil. It really is worth saving up for!
No…. and yes. Procreate is a raster-based program which means it creates with pixels, not vectors. However, you can use an online image converter to trace your PNG designs and create SVG designs from them.
Raster programs use pixels, which are little squares of color. And they are used for digital painting, animation, and photography. Most print and cut or sublimation designs are made with a raster program like Procreate and are in a file format like PNG, JPEG, JPG, TIFF, PSD, or PDF.
Vector programs create with shapes made of connected nodes. This allows you to make a design bigger or smaller without losing any quality. Vectors like SVG’s are what design programs like the Cricut Design Space, or SIlhouette Cameo use most often for their cut designs. In addition to SVG, other popular vector file formats are DXF, AI, EPS.
SO Many Things!!! I actually have a post with 23 Projects You Can Make with Procreate + Cricut. This starts the list of what you can make with Procreate, but when you consider how easy it is to create sublimation designs with Procreate and add that capability then you’ve opened up the hundreds of things you can make with sublimation as well!
I also have many step-by- step tutorials for using Procreate with a Cricut here on my blog. And if you prefer a YouTube tutorial I have playlists on my YouTube channel you’ll want to check out too!
Interested in hand lettering? You’ll find iPad lettering has a huge online following among would-be calligraphers because it makes it so fun and easy to learn.
Absolutely not! Because Procreate is a digital drawing app, it has all kinds of features like QuickShape and drawing guides that make creating when you’re not an artist sooo much easier.
Have trouble drawing a straight line? In Procreate, you can use QuickShape to make straight lines, perfect circles, and absolutely square- squares.
Want to undo? It’s a two-finger tap, and to redo it’s a three-finger tap. There are SO many built-in benefits to using a digital drawing program that you’ll find you’re a much better artist on the iPad than you are with a standard piece of paper and a pencil.
This is a question I’m asked fairly frequently by beginners to Procreate in my Facebook group. So when they asked for a list, I created a post with a free printable cheat sheet of the common Procreate gestures.
I also explain what all of these are, as well as what they do in my post, The Best Procreate Shortcuts for Beginners to Know. AND I have some awesome professional tips and cheats in the post as well, to make you feel less like a newbie as you start. ❤️

Oh, YES- they are SO great together! I’m a little obsessed and have an entire post and YouTube video that will walk you through How to Upload your Procreate designs into Cricut Design Space.
I even created a printable checklist that you can keep handy as you try it. This checklist is a freebie that you’ll find in my Free Library along with free Procreate brushsets, stamp sets, and color palettes.

I’m so glad you asked! Although there are a TON of YouTube videos on using Procreate by digital artists, as well as a lot of really amazing Skillshare courses, you can find Procreate tutorials for beginners on this blog, as well as on my YouTube Channel.
The difference between my tutorials and others is that I SUPER focus on teaching Procreate so you can create designs you can craft with.
And a SUPER EASY way to get started is by using the thorough getting started section below!
Now that you’ve gone through this QuickStart Guide to Procreate here are some next steps

If you found this beginner’s guide helpful, please consider subscribing to my email list or to my YouTube channel. This really helps me, and it keeps this post available for when you need it. You can also choose to share this post with any of the social media options below!
Who doesn't? As long as they're good! Sign up and get the password to my Design Library and get a weekly email that encourages you to be creative (with even more freebies and ideas)! You want to make stuff and I want to help!
“How much does Procreate Dost?”
Procreate for iPad is $9.99 in the Apple App Store. Procreate Pocket for iPhone is $4.99. There are no in-app purchases and updates are free. ❤️
Very Helpful!
Thank you
Mary
This guide was super helpful! I really appreciated the step-by-step instructions for beginners. Procreate can be overwhelming at first, but your tips made it much easier to understand. Can’t wait to practice more!