
Have you ever wanted to make layered designs in Procreate? This hack was a discovery that, like most good hacks, solves a problem and saves time. Using Procreate’s Reference Tool, and Share Layers you can create layered designs in Procreate from a single layer image. SO you can cut multi-layer (or multi-color) designs from htv with your Cricut.
But first, a little about Procreate for those that are curious.
Reasons to Try Procreate
If you have NO IDEA what I’m talking about when I say things about Procreate, then I’d love to be the first to tell you about it. Procreate is a digital drawing app for iPad that you can get in the Apple App Store.
Here are some common reasons you may want to try Procreate –
- If you like to draw or doodle (and have an iPad) you’ll find you’re better at it when you use Layers in Procreate. Plus, there’s an undo and redo function that makes taking risks easier.
- Or if you want to create your own designs for your Cricut and don’t want spend a hundred hours learning a pro design program. Procreate is much simpler to learn and I have weekly FB lives on it too! (see bottom of post).
- You don’t want to spend a ton of money to get a pro software subscription- Procreate is a one time cost of $9.99.
A Little About Converting from PNG to SVG
And although I show you how to create layers in Procreate and upload them into Cricut Design Space as PNG files in this tutorial, the free design is an SVG. To make my Procreate layers into an SVG I converted the design using Silhouette Studio.
Silhouette Studio is a free software program. The only caveat is that you need to either pay for the Business Edition so you can export as an SVG OR you’ll need to use a free PNG to SVG online converter. There are also iPad apps you can use to convert your PNG’s to SVG’s- I’m looking into those and hope to have a post on our options soon.

How to Easily Create Simple Layered Designs in Procreate for Cricut
Supplies and Materials
- Procreate App (under $10 in Apple App Store)
- iPad Pro 12.9 (2019) or iPad 10.2 or newer
- Apple Pencil (optional- you can just use your finger too.)
- PaperFeel Screen Protector- I love this just because it reduces my hand strain bc the added friction of the screen keeps my stylus from sliding. It also gives me a more natural stroke so that drawing on my iPad feels like drawing in my sketchbook. It’s so awesome!
This post contains affiliate links. Thank you for supporting my small business.
Directions
Step One: Start with Your Image
Begin by opening up the Procreate app.
First thing, click on the + in the upper right corner, and from the drop-down menu, open up a new canvas.
Second, in the upper right corner is a wrench symbol. When you touch it, a menu will drop down that has different actions.
Third, look for the “Add” which will allow you to add a photo or file. Touch that and grab the image you want.
Next, import the design that you want to seperate into parts (layers). When it imports into your canvas it will be selected, and you can adjust the size at this time.
Then, deselect it by touching the arrow.
Note: You can design your own design, right in Procreate- that’s how I did this!

Step Two: Create a Reference Layer
Now go to the Layers symbol in the upper right of your canvas. It looks like a square overlapping a second square. When you touch this, you’ll get a drop-down for your layers. Layer 1 is your image.
Next, add a second layer by touching the + in the right corner. Now select Layer 1 and tap on it.
This will give you a side menu for that layer. At the bottom, you’ll see “Reference”- tap on that.
Layer 1 should now say “reference layer” under its name.
Lastly, tap on the “N” on Layer 1, and you’ll see “Opacity” with a slider. Move this to the left about halfway to reduce the opacity of the layer by about 50%.
Pro(create) Tip: If I’m working with a PNG file, I like the option to uncheck the box next to the “Background color” in the Layers panel. This turns off the background color, leaving a transparent background. It will look like a checkerboard, but that means transparent.

Step Three: Create your First Design Cut Layer.
Next, go back to Layer 2, and select a color from the palette menu.
To open the color panel, just tap on the small circle of color at the top right corner of your screen. For instance, I wanted green for my mountains, so I tapped on a green hue I liked.
To close the palette menu, just touch the dot again. The palette menu has to be closed before you can do the next step- the fill.
Okay, now for the super fun part!
Tap the dot of color in the corner again. But this time, without lifting your stylus (or your finger if you’re using that), drag the color to your image. Lift up your stylus, and it will fill with color the section of the design you want it to. This is SO fun to see!

What if Color Drop Fills in Everything?
A common “oops” moment is when you drag your color over to a spot to fill it and then watch with dismay as it floods the whole layer. Not just the part you wanted it to.
This oops is super easy to fix.
Just undo the action by tapping with two fingers on your screen, or by using the undo arrow on the side of your screen.
Then look to see if the problem is one of these three things –
- The shape may not be closed. If you look closely, you may find a small opening in your line which means you didn’t close the shape completely
- Your Color Threshold is set too low. When you color drop keep your stylus tip on the screen and then slide it to the left or right to adjust the Color Threshold. If you have a space between your line and the color fill inside it, your Color Threshold may be too low.
- You’re on the wrong layer, or the reference tool is turned off.
Step Four: Create your Second Design Cut Layer
Now, open up layers and touch the + to add Layer 3. Then select another color and drop it on the parts of your image you’d like to have on this layer of the design.
Pro(create) Tip: The colors you choose now don’t matter because the final color for the cut layer ultimately depends on the color of vinyl you choose to cut it from. So have fun playing and try out different color combinations if you want to.

Step Five: Repeat for All your Layers
Keep doing this process of creating a layer and dropping color into it until you have all the layers you want for your Design.

Step Six: Get Ready to Export
Once you have all the cut layers you want, you can go back to the Layers menu, uncheck the box next to the Background color if you haven’t done this yet. This gives you that transparent background which you want when you export in the next step.
Step Seven: Export your Layers
The next step is to go back to the top menu and click on the wrench again. This time select the Share option. In your list of options, go to “Share Layers.” Choose PNG Files. It will Export, and you’ll be given a choice of where to send the layers. I usually just do the Save option, which saves each layer separately as an image in your Photos. You can also airdrop it to your desktop if you’d like to use Cricut Design for Desktop.

Step Eight: Upload into Cricut Design Space.
To do this, you open up a new canvas in Cricut Design Space and choose the “Upload” option at the bottom of the left-side toolbar. This opens up your Uploaded Images page, where you’ll have the option to “Upload Image.” This brings you back to your canvas, where you choose the button that says, “Browse.”
Select each PNG layer and one at a time upload them into Cricut Design Space as you would any other PNG images. But because each is a clean PNG layer with a perfectly transparent background, you don’t have to do any clicking to erase. It’s pretty sweet!
For More on How to Upload Procreate Designs into Cricut Design Space
You’re in luck! I have an ENTIRE post and YouTube video that breaks this down into steps that are simple to follow. See How to Upload Procreate Designs into Cricut Design Space and get the free Checklist
Watch the YouTube Video on How to Create Simple Layered Designs in Procreate for Cricut

So just to be super clear- the process in this tutorial, How to Create Layers for Cricut Design Space in Procreate, will work with any design image you have. So play around and have some fun with any images you have.
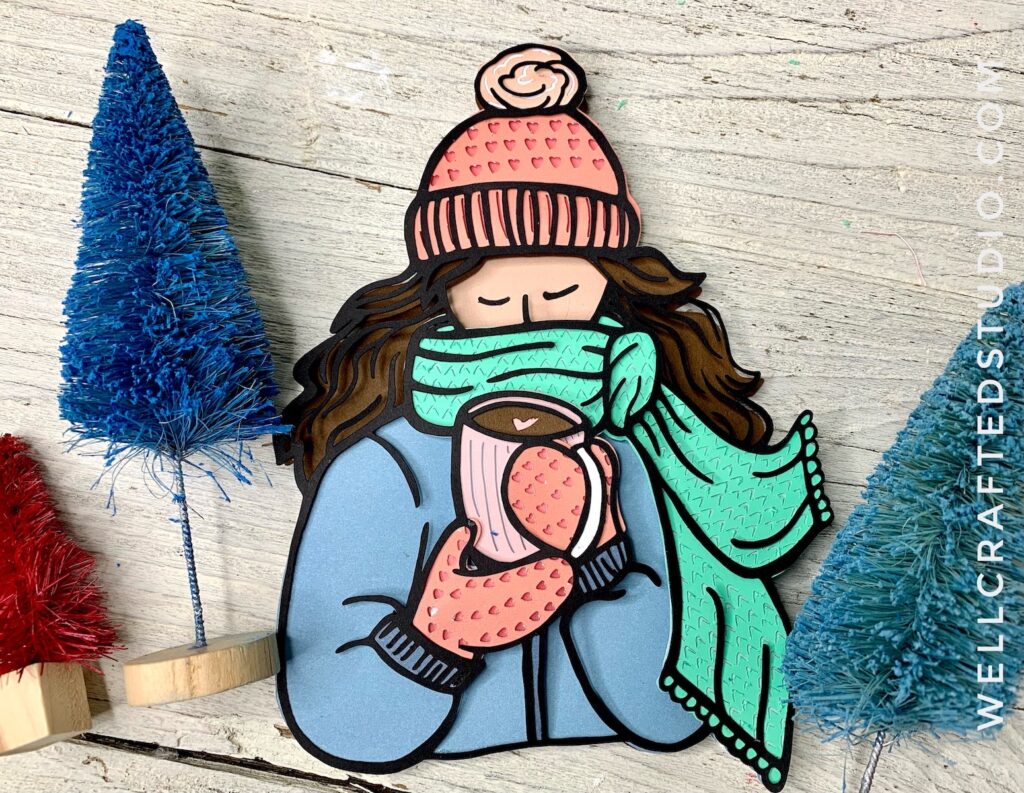
Yeti’s, Skiers, and Teenagers And Merry Maker-mas!
My teenager had the original idea for this design. So I want to give Jasper credit for an awesome idea. And with as popular as Bigfoot and Yeti are right now, I thought I’d try several Yeti designs this Christmas!
However, because this is his design it is for Personal Use Only. You can get it as a Free Download in my Free Library- but only during Merry Maker-mas, then it will move over to my shop. Jasper’s hoping to make a few bucks off it someday. 😂

There is always another way to Design
One thing I’m continuously learning is that with design programs, there is always more than one way to accomplish an action. Some options are just way more fun than others.
I seriously get a thrill every time I drop color on my design, and it floods my fill area. And reference layers are seriously the coolest.
Did I mention more than a dozen times in this tutorial how much I LOVE Procreate? It really is the best.
For more inspiration
If you’d like to see more tutorials on Procreate I have several on this blog. A fun holiday post that demos the Symmetry Tool with the Drawing Guide is How to Draw Snowflakes in Procreate.
I also have a post and YouTube video on how to Upload Procreate Designs into Cricut Design Space. It comes with a Free Checklist that you can print out for easy reference!
Join the Procreate for Cricut + Silhouette Creators Facebook Group!
Love this Post on How to Make Simple Layered Designs in Procreate? Share it!
If you found the tutorial for this How to Make Cut Layers for Cricut Designs in Procreate helpful, please share it either on social media or by pinning the image below to Pinterest.
I really appreciate your help with this! Also, if you have any questions about this project please ask by commenting on this post, through my contacts email, or by leaving a comment on my YouTube Channel. I’d love to help!
Thanks for Reading,

Want to remember this tutorial for How to Make Layered Designs in Procreate? Save it to your Pinterest Boards!


![How to Draw Snowflakes in Procreate [Symmetry Tool]](https://wellcraftedstudio.com/wp-content/uploads/2019/11/How-to-Draw-Snowflakes-square-1024x1024.jpg)


Seriously, this has changed my life! Thank you for this!
Oh, I’m so glad you found it then! Thanks for letting me know too!
This is so good to know!! I just tried to draw something this week in Procreate and couldn’t figure out how to get the layers!