Creating personalized custom home decor is one of my favorite uses for my Cricut. And these little layered maps are my new favorite projects. In this post, I’ll show you how to trace your map art to make a layered design using Procreate and then upload it into Cricut Design Space to cut the layers. We’ll use wood veneer and basswood to give it a cool trendy look. Then, we’ll assemble it and add details like text and shapes to make our maps completely personalized. With so many options and ways to be creative, you’ll love making layered maps with Cricut!
- The Inspiration for this Tutorial
- Watch this Tutorial Live on FB
- Ideas for Making Themed Maps
- Where to Find Stylized Maps to Trace
- Tutorial- How to Create Stylized Maps Using Google Styling Wizard to Trace with Procreate
- Make Your Maps into SVG's (Optional)
- Tutorial- How to Make Layered Maps with Cricut
- New to Procreate or Cricut?
- Love this Tutorial on how to Make Layered Maps with Cricut? Share it!
The Inspiration for this Tutorial
I based this project on a tutorial that I watched by Christina of christinafromwoodshop on Glowforge TV. She uses Vectornator and a Glowforge. You can see her tutorial here. And it’s pretty slick, but if you don’t have a Glowforge, then…. yeah.
So I decided to try adapting this for my Cricut Maker and using Procreate for the design part.
No Cricut Maker? You can use a Cricut Explore. And if you decide to use paper instead of wood veneer, you can even use the Cricut Joy to make this project.
Watch this Tutorial Live on FB
You can watch me walk through this tutorial on my Facebook Live on Wednesday 8/20 @ 8 PM ET. Or catch the replay on my FB channel.
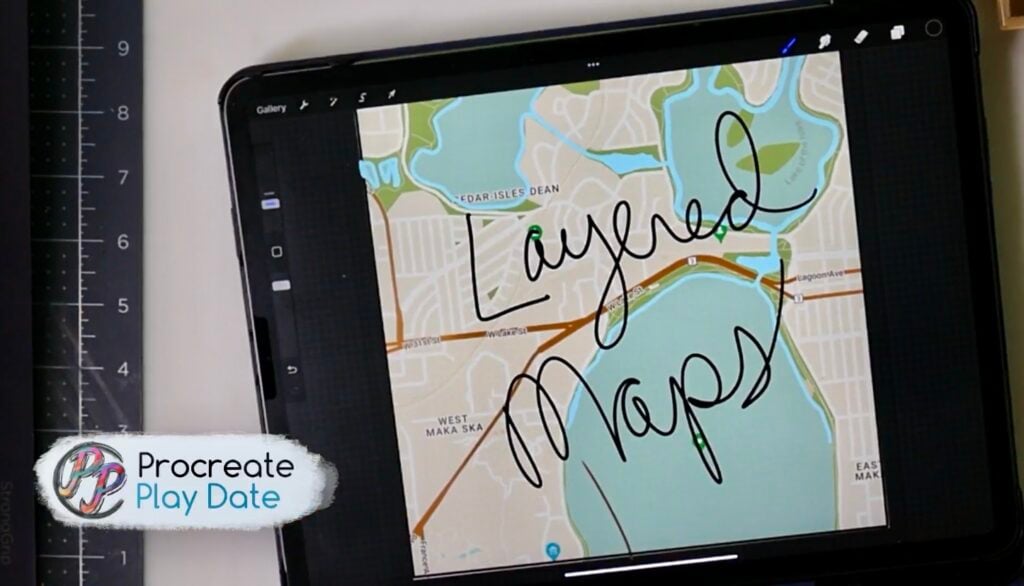
Ideas for Making Themed Maps
A fun way to personalize these maps is to add shapes or text that add significance. Whether it’s places you lived or your favorite breakfast haunts, you can add quirkiness and playfulness with little hearts, houses, or text.
I’ll demo how to do that with Cricut Images & text later in the tutorial.
But for now, I want to help you start thinking creatively about what types of layered maps you can make.
- Favorite beaches (Mexico or Kaui or even locally!)
- Where you first met your bestie or spouse (a great gift!)
- College campus
- Where you first met/got engaged/got married
- Favorite road trip (pair it on a wall with photos of your trip!)
- The places you’ve lived (put them all on one and connect them w/string?)
- Your first apartment (or other firsts work too!)
- Vacation destinations (add a new map as you go)
- Best coffee shops or donut shops in your area
- Ideal road trip or cruise vacation
- National Parks
- Quirky tourist stops (maybe we all need a map showing the biggest ball of twine)
You get the idea- there are a ton of fun ways you can personalize these maps. And if you can’t find an image in Cricut Design Space, you can draw one in Procreate and cut it out with your Cricut using the tutorial below. Fun!
Where to Find Stylized Maps to Trace
This google maps website allows you to personalize and customize your maps and even give them fun color themes. It’s a lot of fun to play with. I show you how to use it for your maps in the tutorial below!
Google Maps Styling Wizard- https://mapstyle.withgoogle.com
Tutorial- How to Create Stylized Maps Using Google Styling Wizard to Trace with Procreate
Step One: Look Up Your Location and Change Theme
Type in your location using the search bar at the top right of your page. Then, choose the theme. I like how easy the Retro color theme is to see, making tracing much easier!

Step Two: Adjust the Feature Labels to Minimize Look
Using the sliders, you can change how many labels and landmarks you want to show if any.

Step Three: Under More Options, Change the Color of the Main Roads
At the bottom of the side panel (next to the Finish), you’ll see More Options. Click on the Arterial or Local roads and change the fill weight and color to stand out more.

Step Four: Take a Screenshot of Your Map
With a Mac, this is shift +command + 5. Or Win + PrintScreen Key in Windows. You can crop the map at this time or do that in Procreate (the next step).

Step Five: Insert the Map Screenshot into Your Procreate Canvas
Open a new 8″ x 8″ canvas in Procreate, and under the Actions feature (wrench in the top right toolbar), go to Add and Insert Photo. Find your screenshot and add it to your canvas. Size it to fit- this crops off whatever isn’t on the canvas.
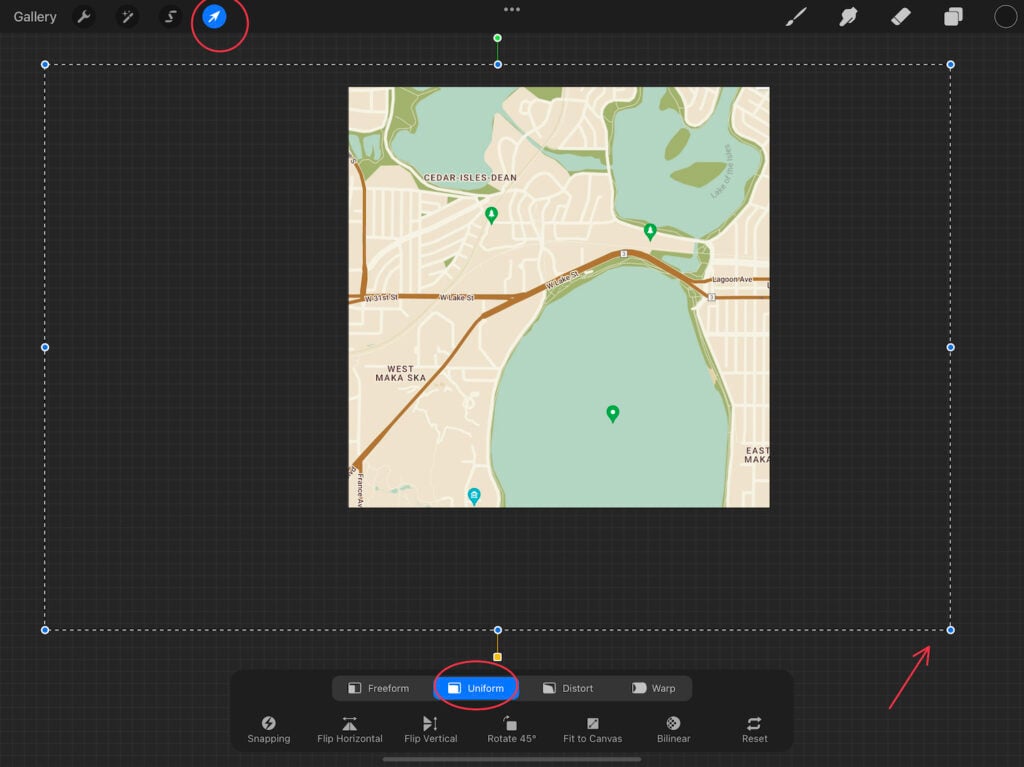
Next, tap the Transform (arrow) tool in the top toolbar. This allows you to move your image. Make sure Uniform is selected in the Transform Panel at the bottom of your canvas.
Tap the Snapping and toggle on Snapping and Magnetic. Then, using the corner nodes (blue dots), make your image slightly smaller (I’m at 2232 px x 2232px.)
Then, tap the Transform again and move it until you see the intersecting gold lines, which means it’s perfectly center aligned to the middle of your canvas.

Tap the N on that layer and lower the opacity to about 75%.
Step Six: Create a Square on a New Layer
Make a New Layer by tapping the Layers icon in the top right of the toolbar and then the + symbol in the corner.
With a monoline brush (I’m using my free Sticker Background Brush), create a square around your image using QuickShape. It’s okay if it’s not the perfect size, you can change the size with the transform tool.

Note: QuickShape is accessed when you make a line or shape on your canvas and keep the tip of your finger or stylus on the canvas. This converts your wonky line (or shape) to a perfect version of it. Right after it converts, you’ll see an Edit option at the top of your canvas, allowing you to tweak the shape.
I don’t know why, but I called this the “Rectangle Frame” in my Layers Panel. But it’s a Square.
Step Seven: Duplicate the Frame and Trace the Lakes
Swipe left on the Frame Layer and tap Duplicate. This creates a duplicate layer.
Then, using a monoline brush (like my free Sticker Background Brush), trace the bodies of water (or other areas of interest) on your map. Erase the parts of the lakes that connect to the frame, so you create one image.
ColorDrop in a blue color. This should fill the entire area; if it doesn’t, you may have to increase the Threshold. (see photo below)
Remember- It’s a two-finger tap to undo and a three-finger tap to redo.
Step Eight: Use Color Drop, AlphaLock and Fill Layer to Finish Lakes Layer

Here’s what the finished Lakes Layer looks like-

Step Nine: Create the Land Layer Using Reference
Duplicate the Frame Layer again. In the Color Palette, choose the color for the land.
Then, tap on the Lakes Layer to open the Layers Sidebar. Tap Reference.

Go back to the New Layer (your land layer) and Color Drop into the land areas.
IF you see pixels on the edges that aren’t filled in, you may have to increase the ColorDrop Threshold. You can do that by sliding your stylus across the screen to the right.

Tap this Layer, and in the Sidebar menu, choose AlphaLock and then Fill Layer. This fills in everything (including the black rectangle) so that your layer is all one filled image.
Here’s what the Land Layer looks like when it’s finished-

Step Ten: Trace the Main Roads on a New Layer
Duplicate the Frame Layer again. Choose a new color. Then, on this new layer, use a thicker monoline brush to trace the main roads.
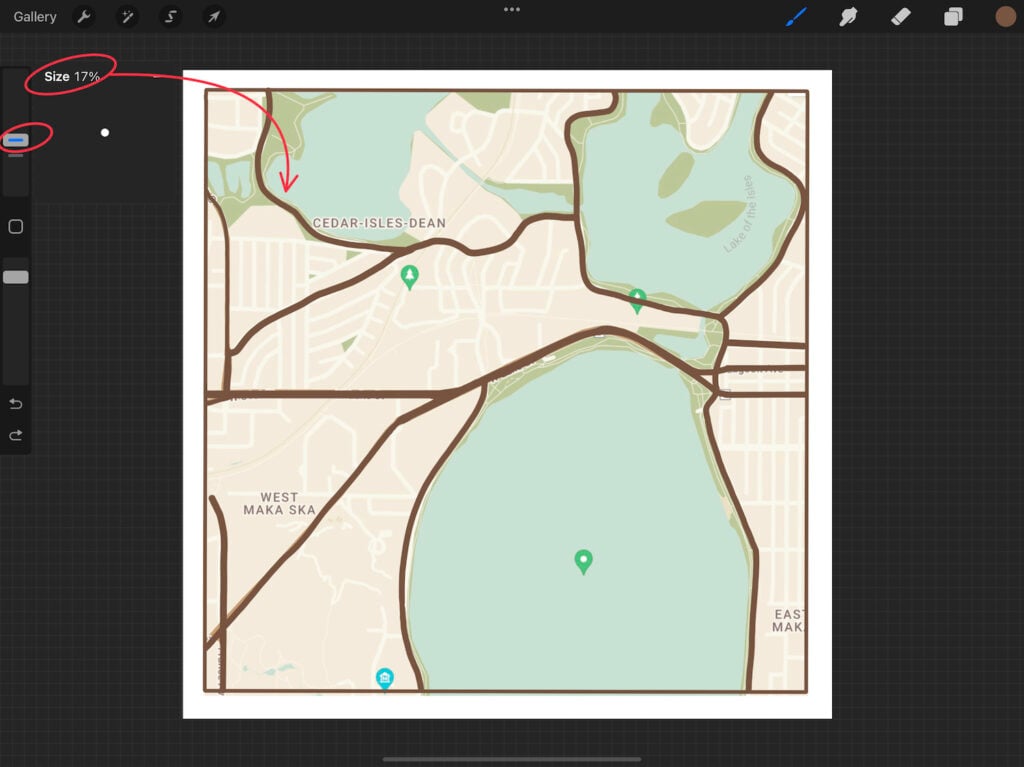
Once you’re done, tap this Layer to open the Layer Sidebar. Then, do the AlphaLock>Fill Layer to fill the rectangle and create one filled image.
Here’s what the finished Main Roads Layer looks like-

Step Eleven: Trace the Local Roads on a New Layer
Duplicate the Frame Layer again, and trace the local roads using a smaller monoline brush and a new color.

Then, do the Layer Sidebar>AlphaLock>Fill Layer trick to make it all one filled image.
Here’s what the Local Roads layer will look like when finished –

Note: This layer will be drawn on the land layer, so we don’t have to fill in the entire edge. But, if you wanted to cut this layer, you could fill the edge border in (like we did above for the main roads).
Step Twelve: Export All Layers to Files
In the Layers panel, make sure that the background layer checkbox is unchecked. This gives us a transparent background.
Next, under Actions, tap the Share icon, and then under Share Layers, tap the PNG Layers option. This will export the visible layers as seperate PNG images. So each layer is its own image.
Share to iCloud Files. I like to create a project folder to put the layers in.

And that’s it! Now it’s on the next part of this post, and we’re going to make these into layered maps with our Cricut!
Make Your Maps into SVG’s (Optional)
You can upload each file into Cricut Design Space as is, or you could choose to upload it to an SVG converter or software like Silhouette Studio to turn it into a cut file. If you’re creating for sale, not just personal use, you’ll definitely want to convert your layers into SVG’s.
I have a FB Live video on converting layered images in Procreate to SVG’s and my post, 3 Best Ways to Make SVG Files from Procreate Designs

Tutorial- How to Make Layered Maps with Cricut
Tools and Materials
- Layered Map Images to Upload into Cricut Design Space (see above tutorial)
- Cricut Maker, Cricut Explore 3 or (even the Joy works if you’re using paper instead of veneer)
- Cricut Deep Cut Blade (for cutting the veneer)
- StrongGrip Cutting Mat
- Blue Painter’s Tape
- Cricut Walnut Veneer (You don’t have to use Cricut- you can get some online or at Rockler)
- Thin Basswood (I got mine at Hobby Lobby- it was 8″ x 24″ x 3/32″, which is too thick for the Maker to cut, but I could cut it to 8″ x 8″ with a heavy-duty scissor) You can use Cricut Basswood and cut it with the Maker.
- Chipboard to support the veneer
- Frame 8″ x 8″ Shadowbox (3-pack at Michaels)
- Foam Tape (optional)
- Singe Quill Marker + Heat Gun
- OR Stain +Vinyl (I give two ways of making the background)
Instructions for How to Make Layered Maps with Cricut
Step One: Open a New Canvas in Cricut Design Space
Log in to Cricut Design Space and click New Project to open a new canvas.

Step Two: Upload a PNG layer Into the New Canvas
Click the Upload icon on the side of your canvas, then the Upload Image button, and then Browse to grab your file.
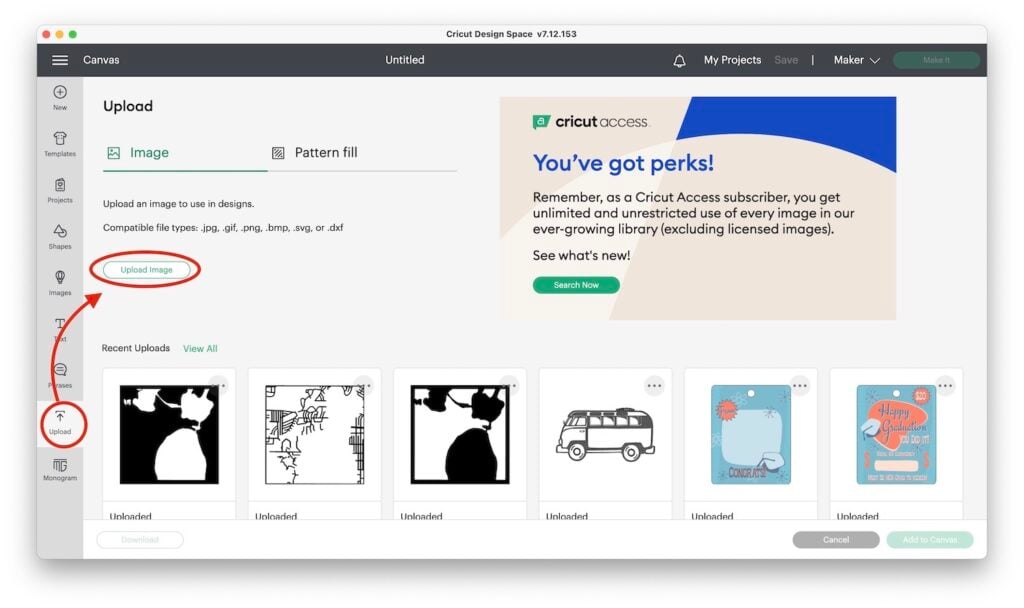
Because it’s a png image file (vs. an SVG file), Cricut will process it as an image. That means that on the desktop version, you’ll need to choose Complex. Then click Continue.

Skip by the Photo Editing and Save as a Cut Image.
Repeat for all of the image layers.

Step Three: Select All Uploads and Add to Canvas
On the Uploaded Images page, click the project images to Select. Then, click the Add to Canvas in the bottom right corner of the screen.

Step Four: Size and Change the Colors of Each Layer
To select a single layer, click on it in the layers panel or on the canvas. Change the size to 8″x 8″, and under Operation, change the color to something that contrasts with the other layers.

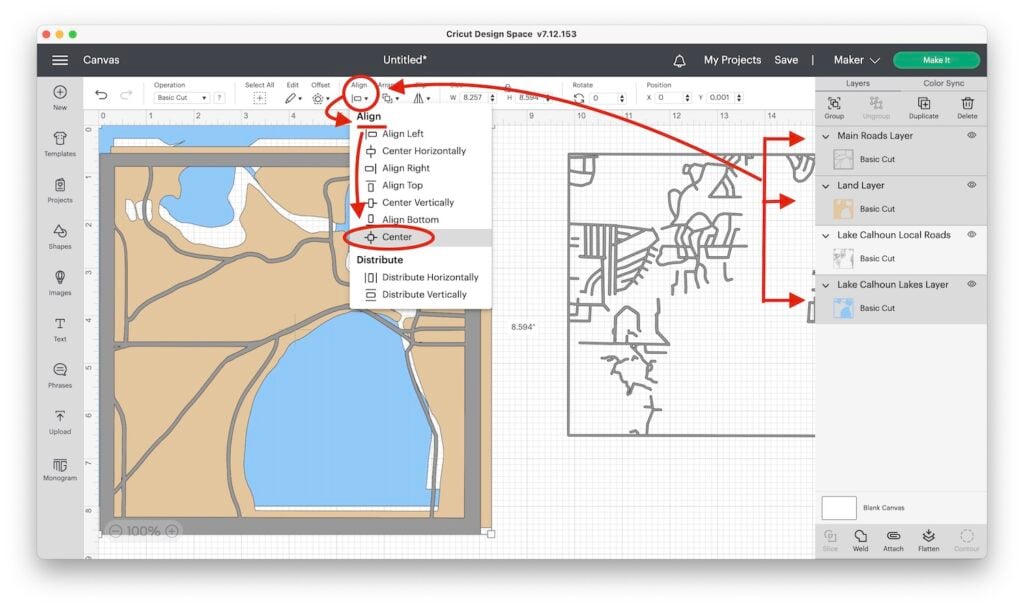
Step Five: Stack the Layers with the Align Tool
To select multiple layers at once, hold down the shift key and then click on the Layers in the layers panel you wish to select.
Tap Align in the top toolbar and then Center.
Step Six: Change Operation of the Local Roads Layer to Pen
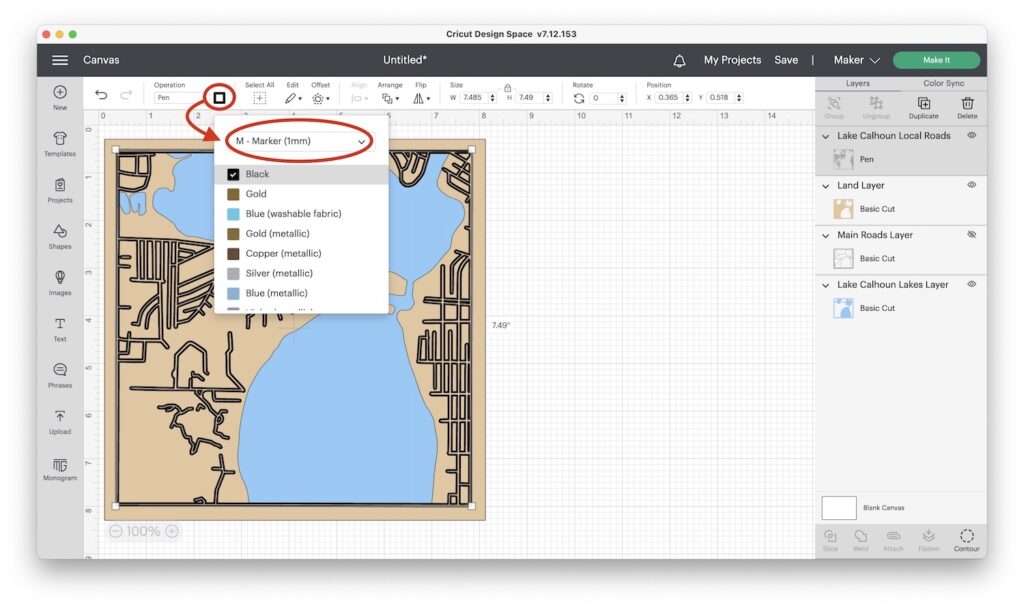
Tap the Local Roads Layer to Select it. Then, in the top toolbar, tap Operation. In the drop-down toolbar, select Pen. Tap the box next to the menu and choose Marker.
Step Seven: Attach the Pen and Land Layer
Select both the Land and the Local Roads Layers and once you’ve aligned them, click Attach.

Step Seven: Use the Shapes Tool to Add a Square for the Background Layer
Tap the Shapes icon in the far right toolbar and choose a square. In the size boxes at the top of the toolbar, change the square size to 8″ x 8″.

Change the color to blue, and move it to the bottom of the Layers panel by clicking the Arrange and then Send to Back.
This piece will replace the Lakes Layer, which you can either hide (tap the eye on the layer) or delete.

FYI- If you decide you want to cut the Lakes Layer, you can. When I made this design with my Glowforge, I cut the Lakes Layer out of blue Acrylic. For this project, I think I’m going to skip it and use a blue stain with a stencil to show the lakes.
Step Eight: Create a Frame for the Top Layer- OPTIONAL
I only do this layer if I don’t plan to use the shadowbox frame that comes from Michaels and if I’m using cardstock. For the wood version, it fits in the shadowbox frame better without this layer.
Duplicate the square you just made two times. Then, change the size of the center square so that it is wider on the bottom than at the top. Think polaroid!
I changed my center square to 7.111 w x 6.772 h.
Select Both and Align Vertically in the Center and then Slice.

Step Nine: Add Decorative Shapes and Text
You’ll find simple shapes under the Shapes icon. And a lot of different shape options under Images (left sidebar). If you have Cricut Access you’ll have thousands to choose from.
Choose something simple, as you’ll likely be cutting it pretty small.
Tip- If you don’t have Cricut Access, you can draw a simple shape in Procreate and upload that to cut!

To add text, use the Text tool below Images in the left side toolbar. Click on it to open a Text Box and the Text Panel where your font options and tools are.

In the Text Panel, you’ll be able to choose the font, size, spacing, etc.
With the new text tool changes, it’s sometimes hard to change the spacing between lines or letters. So knowing how to Ungroup to Lines is super helpful. You can see how to do that below.
For this project, I’m planning on cutting my text and images out of vinyl and adding them to my map as the last step before framing. But you can also write them on with a pen or marker. That might be fun to try!

Step Ten: Save It and Make It!
Woohoo! I know it seems like we did a ton of work already to get here, but you’re going to have an AMAZING finished project, and we’re almost there!
So take a look at your layers, make sure that anything that needs to stay together is Attached, and then be sure to Save your project.
TIP- If you want to add extra stability to your Main Roads Layer, you can cut it twice, once using chipboard and once with the veneer. Just Duplicate the Layer before you hit Make it.
Then, hit the green Make It button in the top right corner.

Step Eleven: Preparing to Cut Your Map
The next screen is the Mat Preview Page. Go through all the mats on the left and make sure that everything has the right Operation (action) and looks right before you Continue.
Remember, if something doesn’t look right, you can go ahead and cancel to come back to your canvas.
The next screen will walk you through the steps you need to take to cut your project. Starting with choosing your materials and loading your mat.
Here is what I did for each layer-
Land Layer- Cut from vinyl to create a stencil for blue stain.
Lakes Layer- Don’t cut if you’re using basswood as your background– ONLY cut if you’re using paper instead. Otherwise, hide or delete this layer.
Main Roads Layer- Cut 1x from Chipboard and 1x Veneer (glue veneer on top of chipboard)
Local Roads Layer- This is where I have two options for you...

- One option is to use stain and use a vinyl stencil. For this, you cut the layer from vinyl and weed out the roads. Then use transfer tape to stick it to your basswood, and apply gel stain over the top. Let dry and remove the vinyl.
- The other option is to use the Bold Singe Quill and a heat gun. For this method, you would set your Local Roads Layer to Pen and draw directly on the Basswood with the Singe Quill. Remove the block from the cutting mat, and then use the heat gun to activate the ink to give a wood-burned look. For an even bolder look, you can try the Scorch marker in your Cricut too!

Tip for Using the Singe Quill: The more heat, the darker your woodburning looks. It starts kind of yellow, and you want a nice brown, so keep applying heat. Be sure you’re working on a heat-resistant surface or using heat-resistant gloves if you’re holding it as you heat it.

Step Twelve: Prep Your Materials and Mats
Cut basswood to 8″ x 8″ with a heavy-duty scissor. Remember it has to be less than 2.4 mm thick to go under the rollers. I used 3/32″ from Hobby Lobby. If your basswood is the Cricut brand, you can cut it to size with the Cricut Maker.

Step Thirteen: Cut Your Map Layers and Check the Fit
Load your first mat and press the Go button.
You’ll need to switch to the Deep Cut Blade for the veneer.
But it will remind you to do that when you choose Natural Veneer as your material. For the vinyl, choose Premium Vinyl.
To switch between materials, you have to click on the material selection again.
When it’s done cutting, you’ll have to unload the mat.

Tip: With delicate materials (like the veneer), it’s important to flip your mat over and keep the material as flat as possible as you peel the mat away. This prevents your paper from curling.

BEFORE YOU CUT ALL YOUR PIECES- Take a second to check your layer fits the frame. If you have to make any adjustments, it’s better to do it now, before you’ve cut everything!
Set aside your pieces and repeat for the rest of the mats.
Step Fourteen: Stain or Wood burn the Local Roads Layer + Lakes
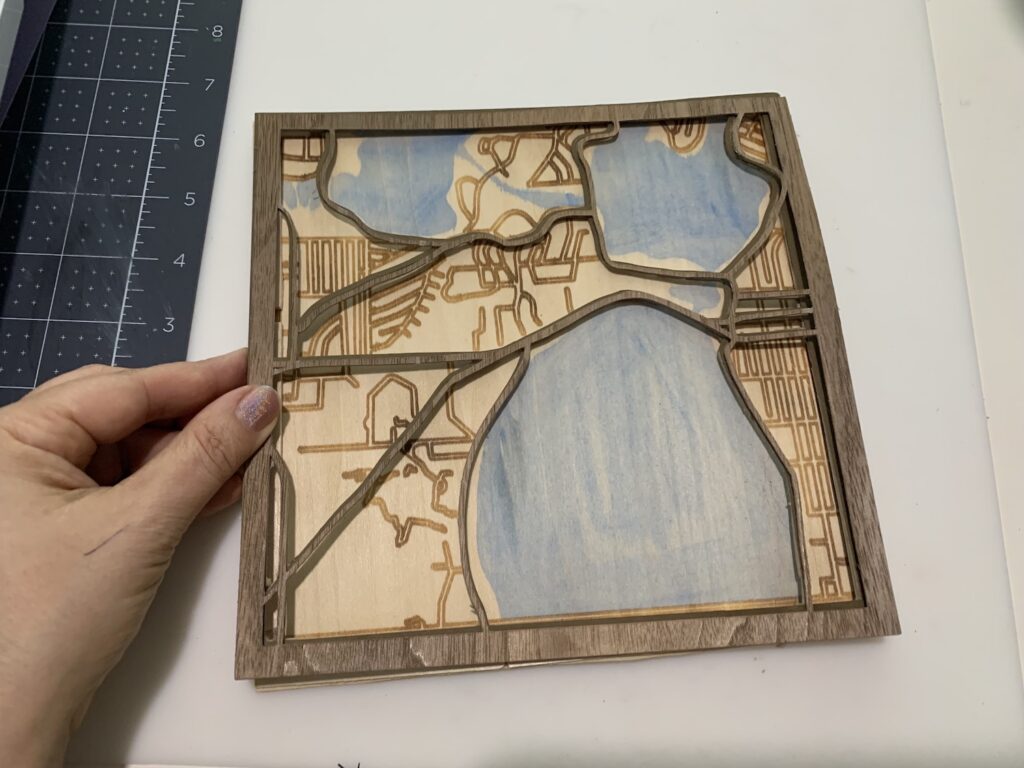
After you cut the vinyl for the stain, weed out the roads. Then, use transfer tape to apply it to your basswood surface. Apply gel stain with a foam brush and let dry. Then, remove the vinyl. Below I pulled the vinyl before it was quite dry, and it got a little messed up.
So… I redid it, waited until it was dry, and it turned out perfect.
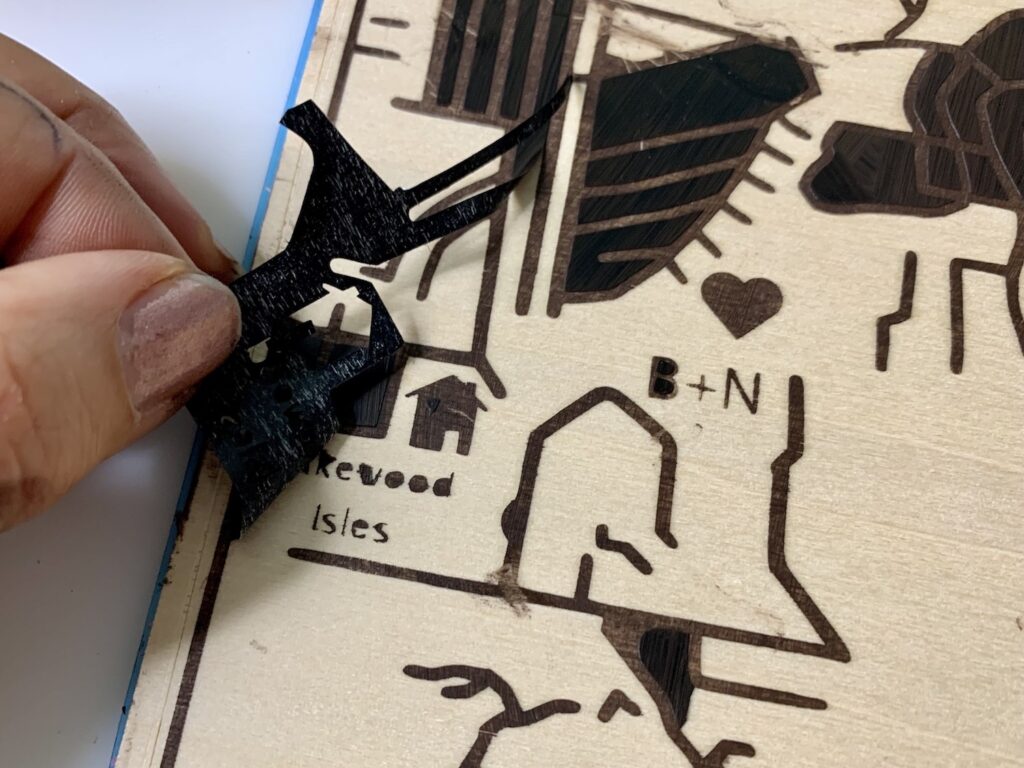
For the Lakes Layer I used Oracal Mask to cut the stencil (but you can use any vinyl). And then used watered-down blue acrylic paint for the lakes. You can also use a blue wood stain.

After you have your main roads layer cut from the veneer, and your background layer with the stain/wood burned roads and the lakes added, and the vinyl cut for the words (if you want to do that) you can move on to the assembly!

Step Fifteen: Assemble Your Map
Time to put it together!
Stack your layers and place them in the frame in this order-
- First, the Main Roads layer.
- Then the insert that comes with the frame.
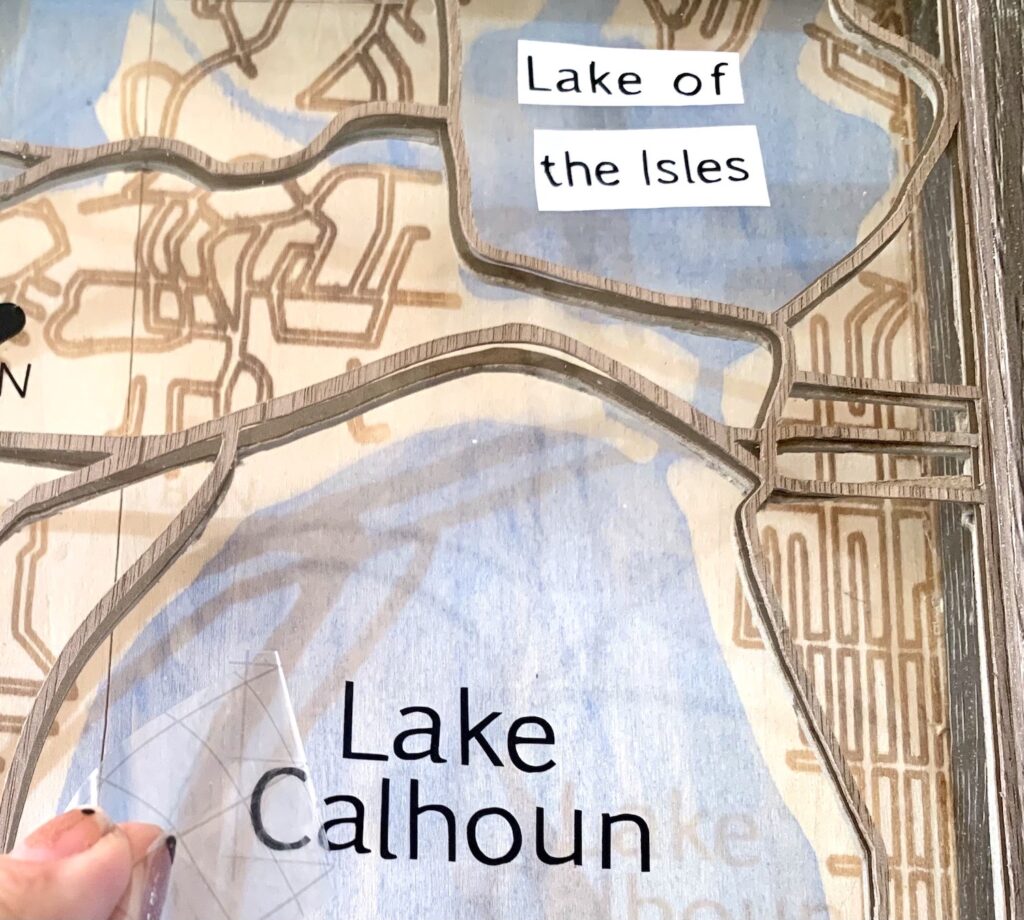
- And then the Local Roads Layer that’s the background.
- Apply vinyl lettering to the glass frame (optional).


Use transfer tape to apply the vinyl lettering to the glass surface of the frame. Or you can put it right on your basswood too. I like how when it’s on the glass, and it adds another layer.
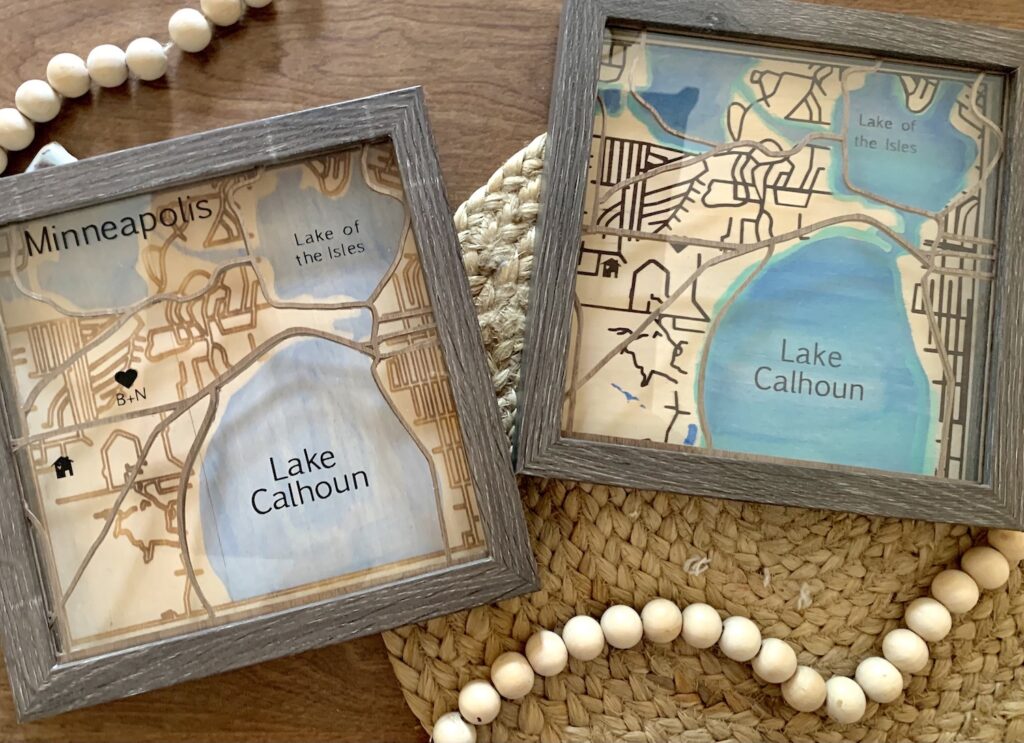
Here’s the finished wood burned map (left) and the stained version (right). Which do you like better? Leave a comment and let me know.
And let me know what you’re going to make too! We’ll make ALL the layered maps with Cricut- I’m super excited about this project and hope you are too.
New to Procreate or Cricut?
If you’re new to Procreate or Cricut, I have great blog posts written with beginners in mind.
You can also join my Procreate for Cricut Facebook Group!
Love this Tutorial on how to Make Layered Maps with Cricut? Share it!
If you found this post on making layered maps with a Cricut helpful, save or share it! And if you try this project, snap a pic and tag me on social media. I’d love to see!
Questions? Feel free to comment below or contact me via email.
Thanks for Reading,

Save How to Make Layered Maps to Pinterest!


So fun!