This is a great project for both Procreate users and Cricut Sticker Makers because it’s a two-part tutorial. The first part of this post, is how to design the sticker backing sheets in Procreate, which is an iPad drawing app. The second part is how to Print then Cut the sticker backing sheets with a Cricut.
Not a Procreate user? I have my Christmas Night Skies, and Mid-Mod Holiday Sticker Sheets as a free download so you can give this a try. Plus, a tip at the end of the post for how to do this entirely in Cricut Design Space as well.
Why Making Your Own Sticker Backing Sheet is Cool
When you first started to create stickers it may have frustrated you that you couldn’t add a logo to the sticker sheet without Cricut cutting around it like a sticker. At least that’s how I felt. But this sticker-making hack is going to make those frustrations disappear. Like a little bit of holiday magic. ✨
So if you sell your stickers, or just want to add a more professional finishing touch, these sticker backing cards are the bomb and can really set your work apart from others.
Get Three Sets of Free Stickers
In the videos, I actually demo this technique using my Cricut Tattoo Stickers which are ALSO available as a free download in my Free Library.
In the post below, I use the Mid-Mod Holiday Stickers since this post is part of my Merry Maker-mas Giveaway Event 2021.
Yay for TRIPLE the FREEBIES!


Find All Three Sets in the Free Library! Don’t have the password? You can get it here.
How to Make Sticker Backing Sheets in Procreate to Cut with a Cricut
Tools and Materials
To Design a Sticker Backing Sheet in Procreate–
Download from Free Library: Rounded Corner Sticker Backing Template
- Procreate App (under $10 in Apple App Store) Not available for Android but you can try something from this list or try Adobe Fresco.
- iPad Pro 12.9 (2019) or iPad 10.2 or newer*
- Apple Pencil, Second Generation (optional- you can just use your finger too.)
- PaperFeel Screen Protector- I love this just because it reduces my hand strain because the added friction of the screen keeps my stylus from sliding. It also gives me a more natural stroke so that drawing on my iPad feels like drawing in my sketchbook. It’s so awesome!
To Print then Cut Sticker Backing Sheet with a Cricut–
- Cutting Machine like the Cricut Explore Air, Explore 3, Cricut Maker, or Cricut Maker 3
- Cricut Design Space on Desktop or Mobile
- Sticker Paper (I like this glossy printable vinyl, and this matte)
- Home Printer, I use this Canon Crafter’s Printer
- Light Grip or Standard Grip Cutting Mat
- Optional: Cardstock, white and Double-Stick Tape
This post does contain affiliate links. That means that if you purchase through one of my links that I will get a small commission for recommending your purchase. This doesn’t change your price at all.
Directions
Part One: Design the Sticker Backing Sheet in Procreate
Remember, if you don’t have Procreate but still want to try making stickers with a backing sheet, then you can skip to Part 2: Print then Cut with a Cricut (Step Ten).
Step One: Download the Free Rounded Corner Sticker Backing Template
Get the free file from the Well Crafted Studio Free Library. You’ll find it under the Procreate section. This is one of hundreds of free files that subscribers have access to!
Step Two: Upload Template File into Canvas in Procreate
Tap the Wrench icon and then under Actions tap Insert a file. Choose the Rounded Sticker Template file from wherever you saved it.

Choose white for your color in the top right corner. Then use Color Drop to Fill it with White. To do this you tap the color circle and without lifting the tip of your stylus (or finger) draw the color to where you want it. Then lift up to “drop” it.

Step Three: Create a Header Bar
Create a new layer by tapping the overlapping squares on the top right and then the plus symbol.
Select the color you want to use for the header bar by tapping the color circle and then choosing a color.
Note: You can use the Mid-Mod Holiday Palette that you’ll find in the Free Library!
Then, tap the Select Tool icon in the top toolbar. Then in the Selection Panel that opens at the bottom turn on Color Fill and then tap the rectangle.
Tap where you want the rectangle and then drag it across. It will automatically fill with the color you currently have selected.

Step Four: Round the Corners of the Header Bar to Match the Backing Sheet
This gets a little tricky- but in a super fun way! First, go back to the Layers icon and open the panel. Then, tap on the white rounded rectangle that is your backing sheet. This brings up the side menu- tap Select.

Next, you want to Invert the selection by tapping Invert in the side menu. It should look like this.
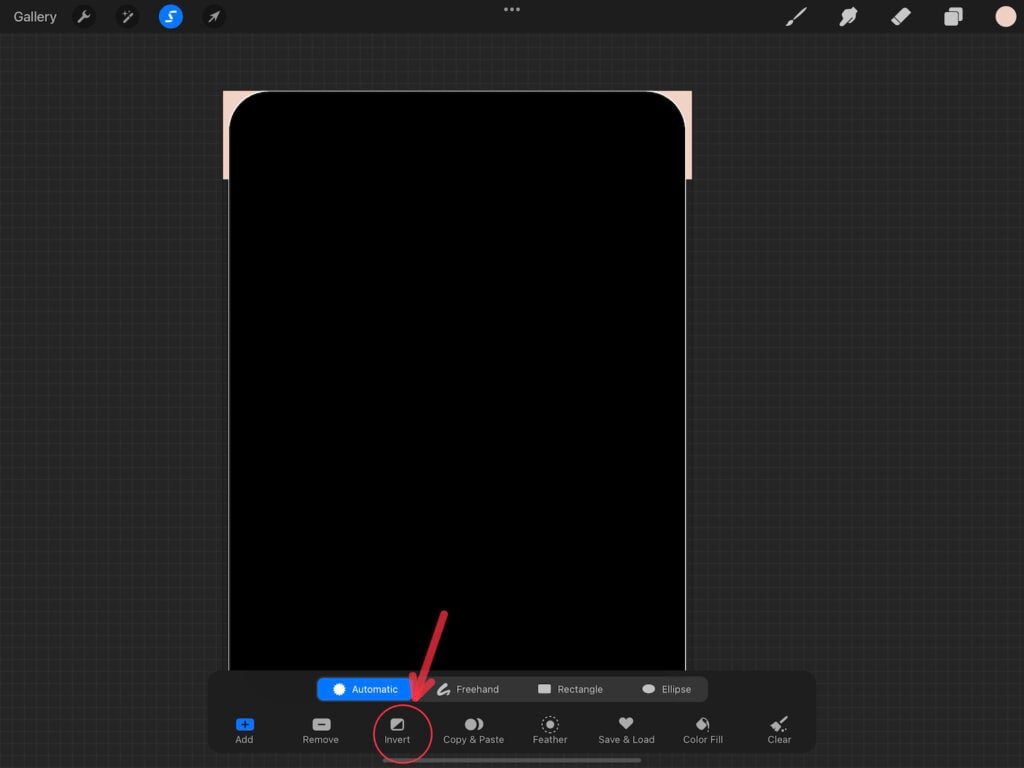
Then with that still selected, tap Layer 2 and from the side menu tap Clear. This basically subtracts Layer 1 from Layer 2 so that you get a perfect header for your sticker backing sheet. I feel cool every time I try this!

Step Five: Add Text and Align to Center
To add text, first tap the Wrench icon to open the Actions panel. Then tap Add and Add Text.
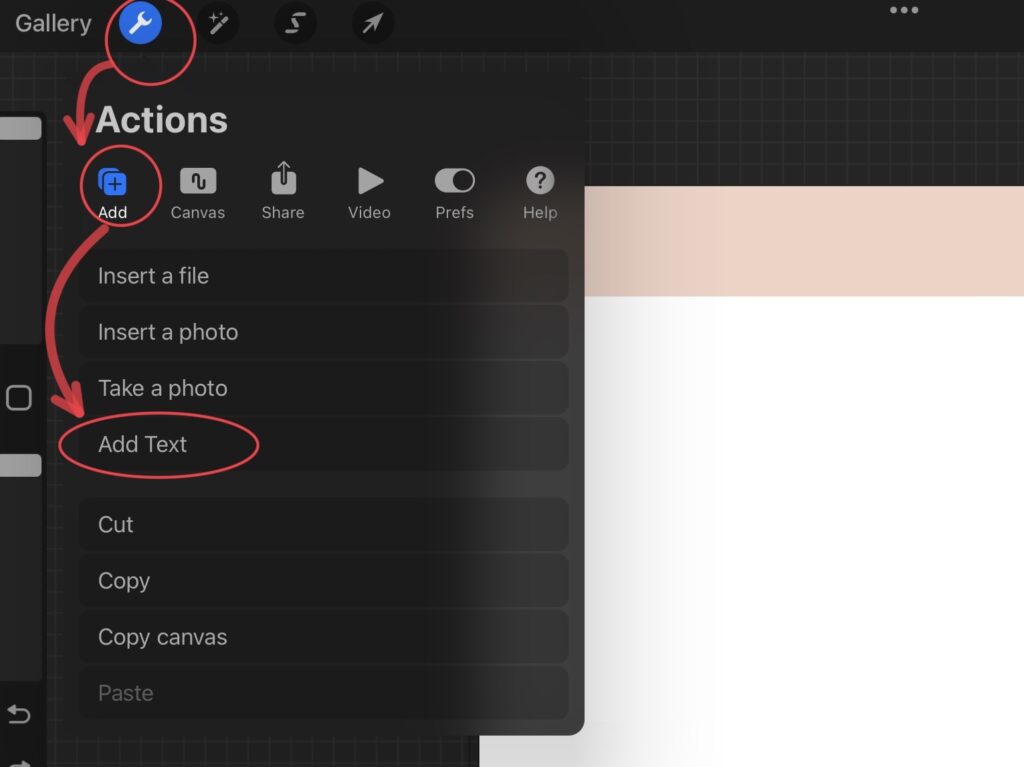
Feel free to change the font, the size, the leading and more in the text panel! You can also get to this when you tap your text layer and choose Edit Text from the Side menu.

To Align the text to center, it helps if you have Snapping and Magnetics turned on in your Transform (arrow) panel. I always think of this as the Move panel.
Then, select the text and using the tip of your stylus or finger, slide your text from right to left until you see a center line pop out. You can see below what this looks like.

Step Six: Add Decorative Elements or Logo
Add a little originality to your header with a small design. First, create a new layer, and choose the color and brush that you want to use. Then draw your element.

Next, duplicate the layer your drawn element is on by sliding the layer left and tapping Duplicate.

Use the transform tool (arrow) to select and then move your elements where you want them. Paying attention to the Magnetics as you slide your image across keeps it aligned. Merge the Layers.

Step Seven: Position Sticker Designs on Sticker Backing Sheet
Insert your sticker designs into the canvas so you can size and position them correctly on your sticker backing sheet. Make sure that you place each sticker where you want them to be on the sticker backing sheet. But give a little space around all the edges.
You may have to use the Select tool, Freehand to move your sticker images into place.
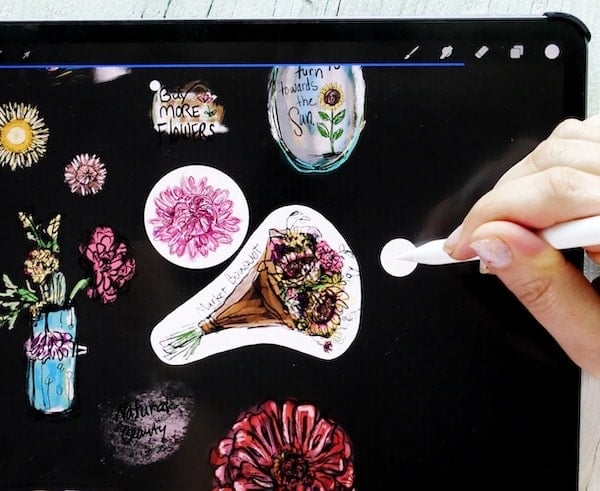
Note: If you’d like to know how to draw stickers and add a white outline border to them I have posts and YouTube videos you can watch.
Step Eight: Create a Group>Duplicate> Flatten*
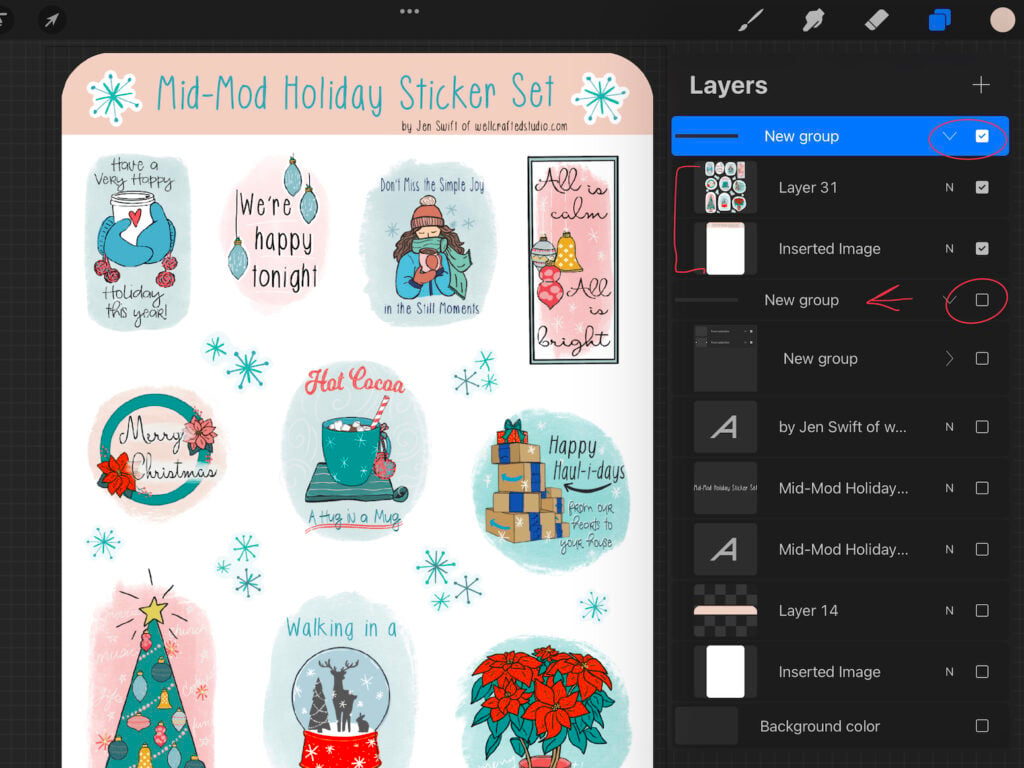
In the Layers panel, swipe right on all your layers that make the sticker backing sheet to select them all. Then tap Group. Tap off the visibility checkbox next to the original group.
Slide left on the layer for the new Group and then Duplicate. Flatten this duplicate group so it’s all one layer.
*This protects the original layers so you can come back and change them at any time.
Step Nine: Export Layers as PNG
With the Background Layer checked off, tap the Wrench Tool to open the Actions panel. Tap Share and then choose Share Layers>PNG. Save to your iCloud Drive files, your photo gallery, or some place like Dropbox.

Part Two: Print then Cut with a Cricut
Step Ten: Upload Layers to Cricut Design Space
Next, open a new canvas in Cricut Design Space and upload your two layers one at a time. Choose complex, then Continue. Skip the Clean Up page.
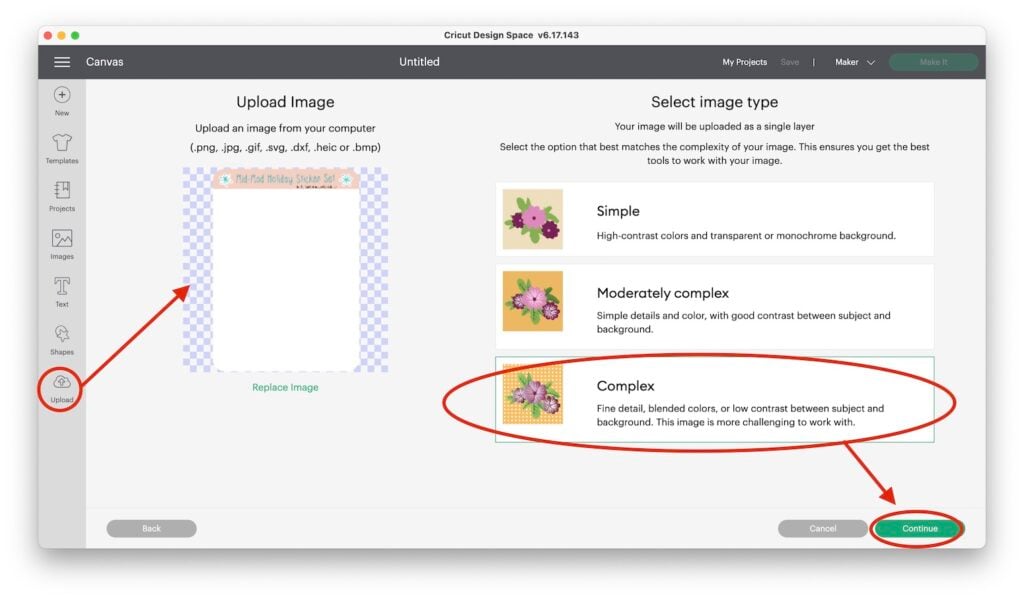
Then, save as a Print then Cut Image. Click Continue.
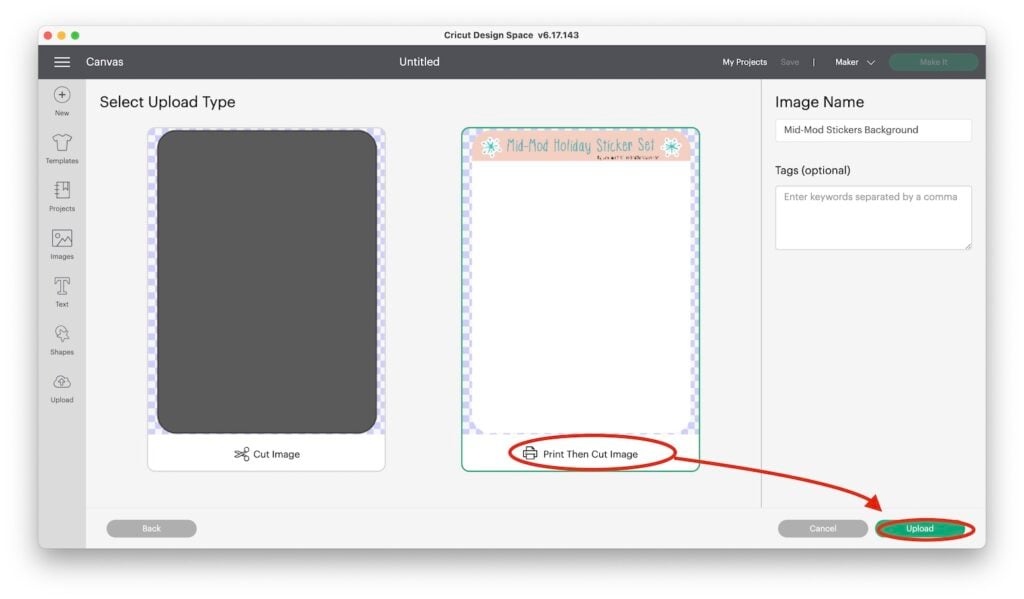
Tap to select and Insert Images into your canvas. Place the stickers over the sticker backing sheet
Step Eleven: Duplicate the Backing Sheet>Align Center>Attach for Multiple Passes
To get the backing sheet to cut all the way through use the same trick for multiple passes that you use for engraving. Select the backing sheet, Duplicate about 9 times, and then Select All, Align>Center and then Attach.
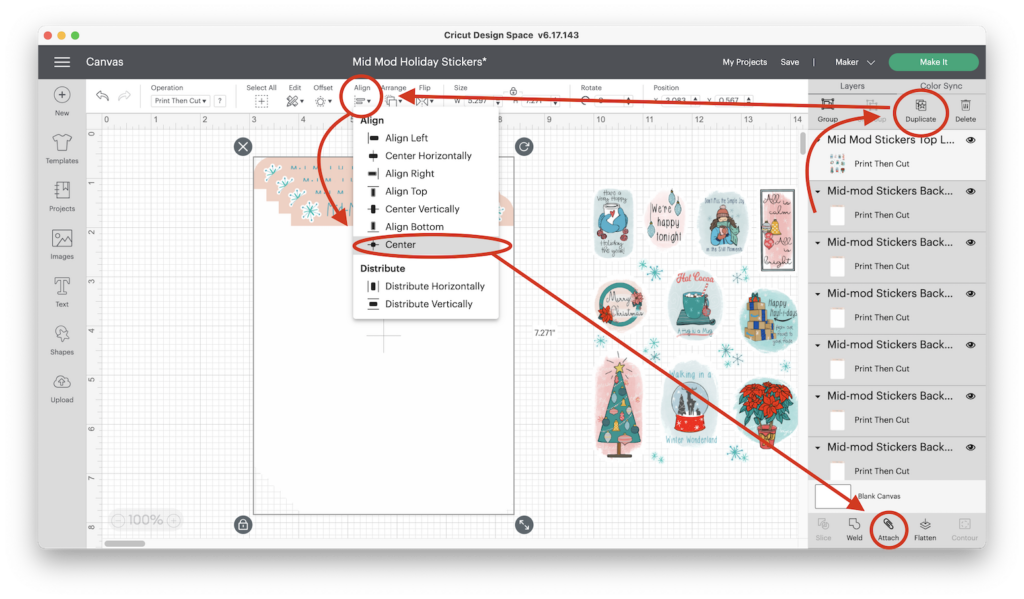
Step Twelve: Position Stickers On Top>Select All>Align Center Horizontally>Attach
Now it’s time to place the stickers over the backing sheet, so select all and then Align> Center Horizontally, and then Attach.
Step Thirteen: Duplicate to Create Two Small Sticker Sheets
Duplicate and move next to original sheet and against the top of the canvas. Then, Select All, and check the Size. Make sure that the combined stickers are less than 6.75″ x 9.25″.

Then, Attach the two sheets.

Step Fourteen- Save Project and Make it!
You’re almost done! So be sure to Save your project and then hit Make it!

Step Fifteen- Print then Cut Your Sticker Sheet
When prompted, hit the Print button. turn off Bleed, and toggle on the System Dialog.
Note: You don’t have to use this system option. I like it because I can choose the rear tray, which allows me to use thicker – than- normal papers without fear of jamming.
Step Sixteen-Prep Mat
Place your printed sheet on your Light Grip Mat (or Standard mat) as shown on the Mat Preview Page.

Step Sixteen- Select Materials and Cut Your Stickers!
I like to use the Premium Vinyl Material Setting set to More Pressure and either Online Labels glossy sticker paper, or I use Zicoto glossy printable vinyl. Be sure to check your cut BEFORE you unload your stickers. If the sticker backing sheet has not cut all the way through you may have to use a scissors to finish trimming it. Then, next time increase the number of Duplicates in Step .
If the stickers have not cut through, (and you didn’t unload your mat) then press the GO button again and your Cricut will repeat the cut.

How to Make a Sticker Backing Sheet without Procreate
Remember, even if you don’t have Procreate you can still follow along with Part 2 of this tutorial, and really, with the free rounded sticker template you can probably create a sticker backing sheet entirely in Cricut Design Space as well. Just use slice and flatten everything then follow along from Step 11.

The YouTube Videos- Part One and Part Two
Part One- Best Tips to Give Your Stickers a Pro Finish in Procreate
In the video, you’ll also see-
- How to make white stickers outlines in less than 27 seconds
- How to clean up the transparent background on your sticker layers with just a swipe
- How to add a sticker backing sheet to your kiss cut sticker sheets
- How to cut a backing cardstock piece to add perceived value to your stickers
Part Two- How to Make Sticker Backing Sheets with Cricut
Love this Post on How to Make Sticker Backing Sheets? Share it!
If you found this post helpful, I’d LOVE to have you share it on social media!
Thanks for Reading,



![How to Draw Snowflakes in Procreate [Symmetry Tool]](https://wellcraftedstudio.com/wp-content/uploads/2019/11/How-to-Draw-Snowflakes-square-1024x1024.jpg)

So fun and
thank you!
Going to be
a fun month.
Carla from Arizona
Oh YAY! I’m so glad you think so!
I’m a little confused and maybe it’s because I don’t have the product in front of me, but why does it need to cut through the backing? Don’t you want it to stay as a full page and just peel the stickers off? Or is this to cut out and sell each sticker individually and not as a sheet? Thanks!
Great question! What I wanted was the sticker sheets cut out with the rounded corners, but I want the stickers themselves just to be kiss-cut. So it’s like the sticker sheets you bought as a kid. The backing sheets have the info on them, and we don’t want those to be stickers, just printed so this solves the problem AND you don’t have to trim your sheets by hand.
Does that make sense? It’s okay if it doesn’t. I can try and explain better.
Jen
Hi! My Cricut cuts the backings out but completely ignores the stickers… It says it is completed after only doing the backing. What am I missing? I have the multiple layers etc. and followed each step. Thank you!
Hi Summer! So you should have the layers Attached but not flattened. I’m not sure that’s the issue without seeing your layers, but that’s the first thing that came to mind. If you’d like to email me screenshots I can maybe help more. ❤️
Jen
Thanks so much Jen! I just sent you my email using your websites contact form… Can you please email me your email?