
Although I can get lost in designing, I know that it’s the techniques I teach that have the most value to my readers. I like to think of it as everyone has a toolbox of their own skills and experiences, and every time you learn a new technique, you add to that toolbox. In this post, I build on the techniques you already learned in my Engraved Photo Cards with a Cricut Maker tutorial and expand on it to show you how to cut custom metal shapes and manipulate your print then cut photos to look like they fit inside the globe. I also tell you how to glue and layer metal to create a two-toned version of this engraved snow globe ornament with Cricut!
Important Safety Tips for Handling Aluminum Flashing
Before we jump in with cutting the metal, I feel like I really need to call out that the metal IS sharp on the corners or jagged cuts.
To safely handle the metal you need to be sure you round off corners and it’s important that you use flat nose pliers to flatten any edge that is curling up at all. If it curls it could cut.
AND the little bits that you cut off ARE sharp so be careful that they don’t end up on the floor.
If you’re unsure about handling it before you’ve done either of these two things then you should wear safety gloves.
How to Spray Paint Aluminum Flashing to Engrave
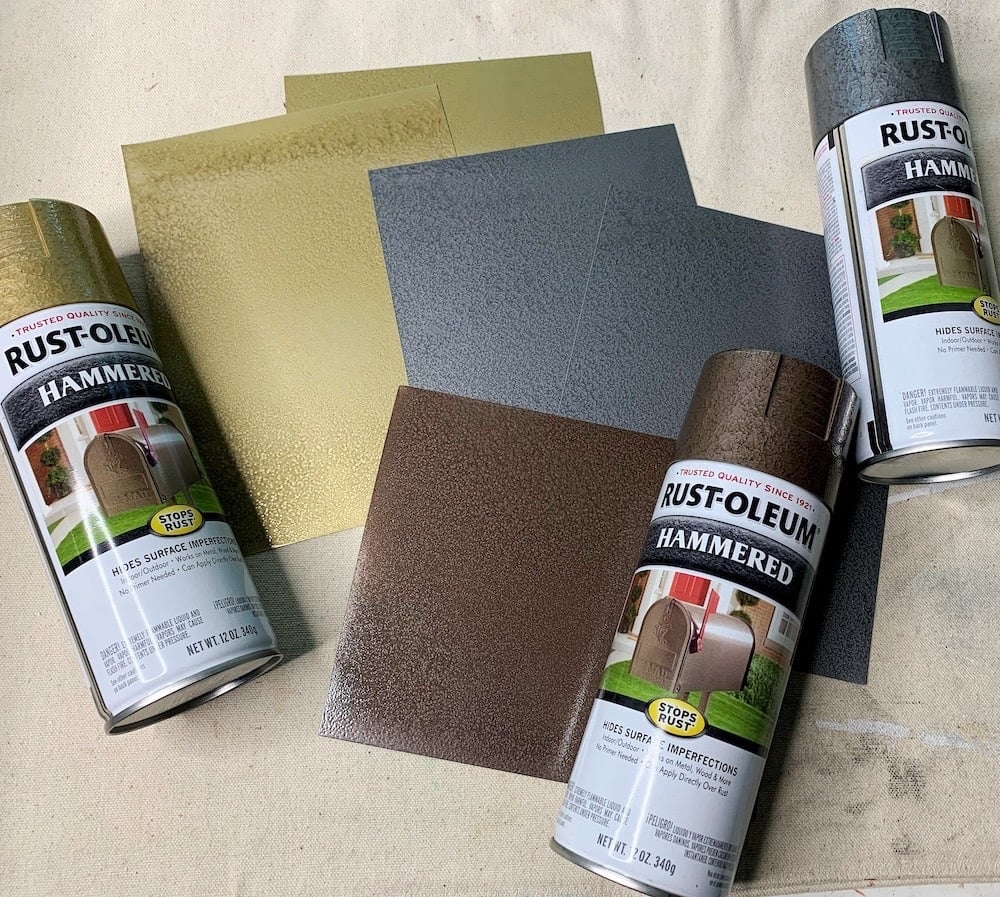
If you’re wondering how to get the different colors of aluminum flashing- I spray paint it with Rustoleum’s Hammered Metal Spray Paint. There are lots of colors available- you can see them all in this photo.

And there are some tricks to working with spray-painted metal, so I wrote an entire post about it, How to Spray Paint Aluminum Flashing to Engave with Cricut.
Note: Spray Painting needs to be done 8-24 hours ahead of time, but there’s a window when you can engrave through it cleanly. It does cure with time, so after approx. 24-36 hours it’s too hard to engrave. I explain how to gauge your window in the same tutorial. I also give an alternative to the spray painting in that post.
Watch How to Make an Engraved Snow Globe Ornament on YouTube
Rather watch than read? I’ve made a video tutorial for you to watch, or you can go through the photo tutorial below!

How to Make an Engraved Snow Globe Ornament with a Cricut Maker
Tools and Materials List
- Cricut Maker
- Cricut Engraving Tool (w/ housing) *OR the Engraving Tip (w/o housing)
- Strong Grip Mat
- Standard Grip Mat or Light Grip Mat
- Painter’s Tape
- Jeweler’s Shears
- Flat Nose Pliers (for flattening the edge)
- Crop-a-Dile * OR Mighty Hole Punch
- Printable Glossy Vinyl or Glossy Sticker Paper
- Spray Painted Aluminum Flashing* (See this Tutorial)
- FREE Snow Globe Ornament Engraving Design- Available in my Free Designs Library
These are affiliate links, which means I may receive a small commission if you purchase through any of these links. Thank you!
Directions
Step One: Upload your Engraving Design and Insert into the Canvas
In the zip file for this project that you download from my Free Designs Library, you’ll find a .PNG for a Snow Globe. Upload this Snow Globe design into Cricut Design Space, and process it as an image file. Upload as Complex, and then Save as a Cut Image. Insert it into a new canvas and change the Linetype to Engrave. In the Size boxes in the top toolbar change the height of the ornament to 5″.

Note- You can make the ornament any size you want. The beauty of this method of creating everything on the same canvas is that you CAN easily size things differently without having to play around with getting the measurements of the engraving design and the photo to match.
Step Two: Upload>Insert>Size Your Photo
Upload your photo to Design Space just as you would a design. Save it as a Print then Cut. Then insert it into the same canvas you’re using in Design Space. Size it to fit your engraving design, then insert a circle from the Shapes menu in the toolbar. Drag the anchor point on the shape to size it to fit into the globe shape of your engraving design.* Change the LineType of the circle to draw and then stack the engraving design, photo, and circle on top of each other. Now visually position and size everything to fit as desired within the frame.

Select your photo and the circle shape you stacked on top of it. Use the Slice to cut a circle out of the photo.

*Optional: To add the white circle frame duplicate your circle 2 times and pull them off to the side. Size one smaller, Select them both, Align>Center. Then use the Slice at the bottom of your screen and cut one out of the other.
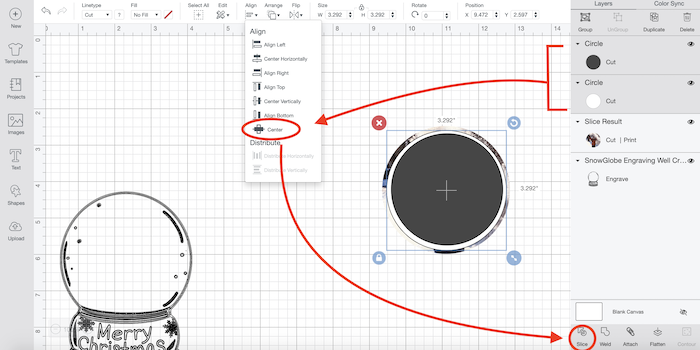
Note: Keep the circle that’s an outline and change the color to white. Select the photo and the outline, Align>Center again and then Flatten the two images.

Click Save.
Step Three: Print and Cut Your Photo
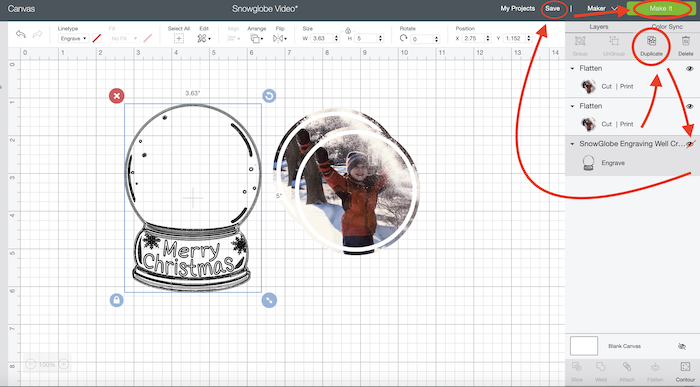
Hide the Layer with your engraving design by clicking on the “eye” with the layer.
Note: We hide the layer because we can’t Make It with both the Print then Cut and Engraving actions and have a full selection of Material Settings to choose from. So by working with just one action at a time, we’re able to do everything on one canvas but still, have options.
If you know you are going to do several of these ornaments then you may want to duplicate the photo now. I could get 4 photos per sticker sheet.
Click Make It! If you are using the iOS (tablet) for this project, you may want to check out my tutorial on making stickers using the Design Space app. They do differ for print then cut.
If you’re using Cricut Design Space for desktop, follow the prompts to print and cut your photos. I use printable vinyl for this project because I like the feel of the vinyl vs. the sticker paper for this project, and it’s a little more durable. But either one will work. Turn off the bleed.
Note: If you choose to use the system dialog you have to hit Print before the dialog box pops up. And frequently it opens behind your browser. I like to use this option so I can choose my paper (glossy), quality (normal), and which tray I’d like to print from.
Use a green or light blue cutting mat and place your printed sticker paper, as shown on the Mat Preview Page. Use printable vinyl but change it from Default to More. Once it’s finished cutting, DO NOT UNLOAD your mat until you check that it’s a clean cut. If it didn’t cut all the way through, then just push the “Go” button on your machine again.
Step Four: Switching Between Print then Cut and Engraving Actions
When done, unload your mat and set it aside. THEN, go back to your screen and click cancel and back.
Go back to your canvas and Hide (click off the eye) of the print, then cut layers (the photos). Click on the eye next to the engraving design layer to show it. Now when you go to engrave, you’ll be given the Material Settings for Engraving.
Step Five: Engrave Your Painted Aluminum Flashing
Take your painted aluminum sheets and place them on your purple Strong Grip Mat as shown on the Mat Preview Page. I like to have mine in the middle of the mat and move the design on the Mat Preview to engrave in the center of the mat. This gives me plenty of room to tape down the edge of my metal sheets with painter’s tape.
SPRAY PAINTING IMPORTANT MESSAGE- I have directions on how to paint the aluminum flashing along with links for the paint and the metal in my post, How to Spray Paint Metal for Engraving with a Cricut Maker. Because I use a paint that bonds to metal, to get a good engraving, we need to find the window of time where it’s dry enough to engrave through but has not bonded too much. The post explains this all, and it gives photos so you can see what the metal should look like.
Double-check that your metal sheet on your mat matches the placement of the template on your screen. Then click continue to the action screen. Choose Stainless Steel as the option for engraving. Move the star wheels all the way over to the right of the roller bar. When prompted hit the Go button on the machine.
After the engraving is finished, you’ll notice there is a lot of debris on your sheet. That totally normal; just peel off the tape and use it to pick up the paint/metal debris.
Step Six: Cut Around the Engraving
Using the jeweler’s shears (a tin snips works too), cut around the engraved image. Try to get as smooth a cut as possible and round off any corners with little nips. If the metal bent anywhere along the edge, use the flat nose pliers to flatten that part gently.

Step Seven: Add the Photo and Trim Off the Bottom Edge
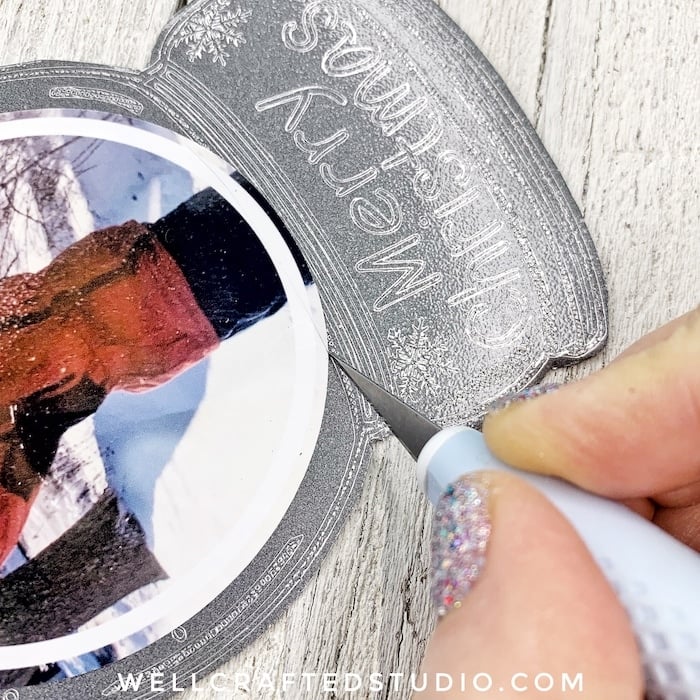
Peel up a photo sticker and carefully place your photo sticker onto your metal ornament, as shown below—Press flat.

With a craft knife, carefully slice across the bottom of the circle where the snow globe’s base is. It’s a simple step, but it really enhances the overall appearance of your ornament!!!
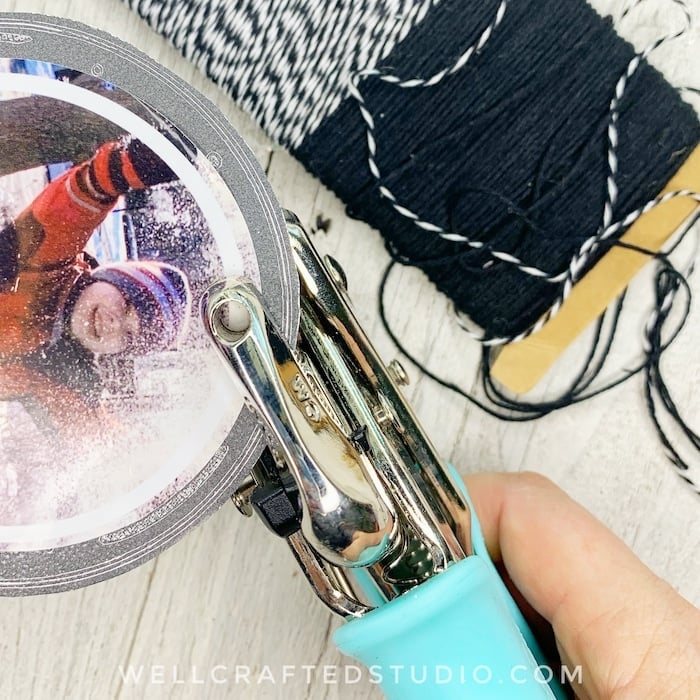
Step Eight: Punch a Hole for the Hanger
Use a metal hole punch like the Crop-a-dile or the Mighty Hole Punch to create a hole in the center top of your engraved photo ornament. Use baker’s twine, decorative ribbon, jute twine, or yarn to create a loop to hang your ornament on the tree.
Step Nine: Add Embellishment (optional)
This is an optional step- but I think it’s fun. Cut out the Snowflake SVG’s included in the Project Digital Download Kit onto shiny silver vinyl and then add them to the snow globe. Another idea is to add a little bit of extreme glitter mod Podge along the ornament’s edge for some extra sparkle!
You’ve Made an Engraved Snow Globe Ornament!
Mail it, hang it on the Christmas Tree, or gift it. Part of the beauty of this ornament is how lightweight and flat it is. Of course, the fact that it’s so darn inexpensive to make helps too!

Mini Tutorial: How to Make a Two-Toned Engraved Snow Globe Ornament
If you’d like your ornament to feel a little more weighty, though, you can glue two pieces of the metal together. I engraved two ornaments for one example; one spray painted silver and the other painted gold. Next, use the jeweler’s shears to cut off the base of the gold ornament. Apply E6000 (or super glue works too) to the base metal- make sure to get the edges. Press the two pieces firmly together and smoosh around a little bit (technical term, I know!) to increase the bonding. Use clothespins or clamp along the edges, or press with a heavy object until dry.

Not only does this add interest, but it also increases the perceived value of the ornament because we increased the weight. People feel like heavier items are worth more, just like they think gifts made of metal have a higher value than paper.
Want MORE Engraving Inspiration?
I LOVE engraving with my Cricut Maker and have a ton of resources here on my blog, and on my YouTube channel. The most popular posts are How to Engrave Stainless Steel Servers, 16 Tips for Engraving with a Cricut, Best Tools and Supplies for Engraving with a Maker, and 14 Surprising Metals You Can Engrave with a Cricut Maker!
Love this? Share it!
It helps me SO MUCH whenever a reader shares my posts. So if you found this tutorial helpful, then I would LOVE to have you share it either on social media like FB or IG or by clicking on the Save Pin below!
Thanks for Reading,


Want to Remember this Post, How to Make an Engraved Snow Globe Ornament? Just Pin it to Your Favorite Pinterest Board!


I am so in love with your engraving projects and excited for the Maker Fest!
I have a problem I Must have deleted the Welcome Email and I lost the password for the Free Library