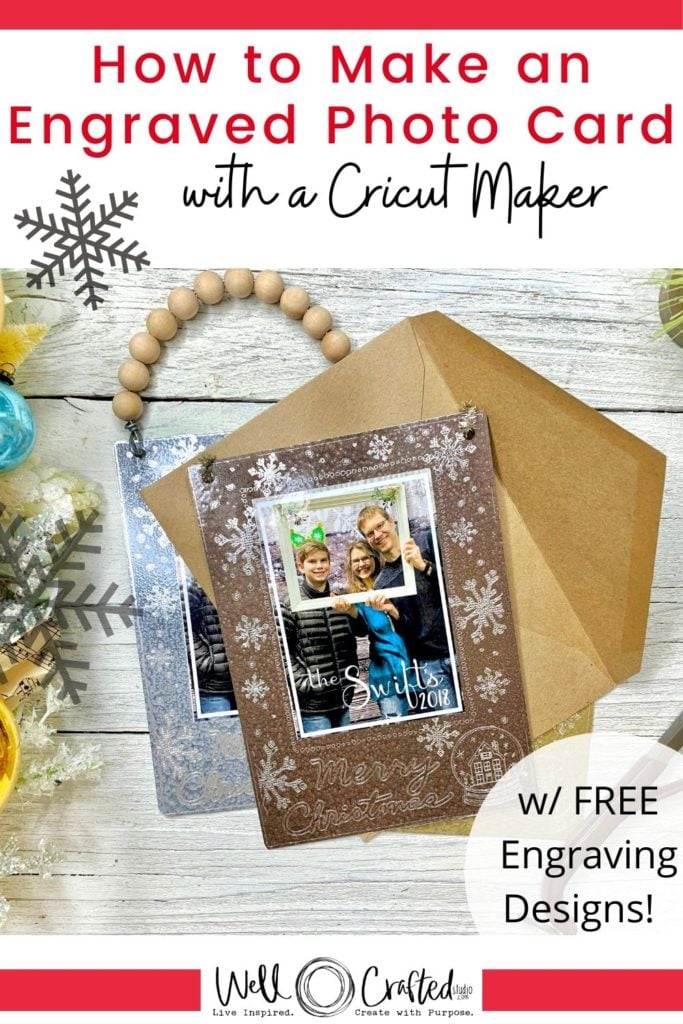
Yes, there’s the food, the gifts, and the Christmas Carols, but what I like best about the season is the Christmas crafting. Today’s project is a mash-up of two traditions, the Christmas card, and the Christmas ornament. Although it works as an ornament, it can also be mailed. Which I kind of love. Ornaments are gifts, so this project goes beyond just a greeting and will be something they keep and treasure for years to come. Or, it’s just something that you can make for your own tree too! I’d love it if you tried to make this Cricut Engraved Photo Card this Christmas!
About the Materials Used to Make these Engraved Christmas Photo Cards
Because the materials are so inexpensive, this makes an ideal gift to make several variations of. You can vary the paint color, the photos, or the handles. I give you several options below. For the card itself, we’re using aluminum flashing which can be purchased from a home improvement store like Home Depot, Lowe’s, or Menards.
If you shop at Menard’s you’ll find some flashing that is pre-painted. It will not have the hammered texture that I use below though. That’s one of Rustoleum’s hammered metal spray paints. (I have links below).
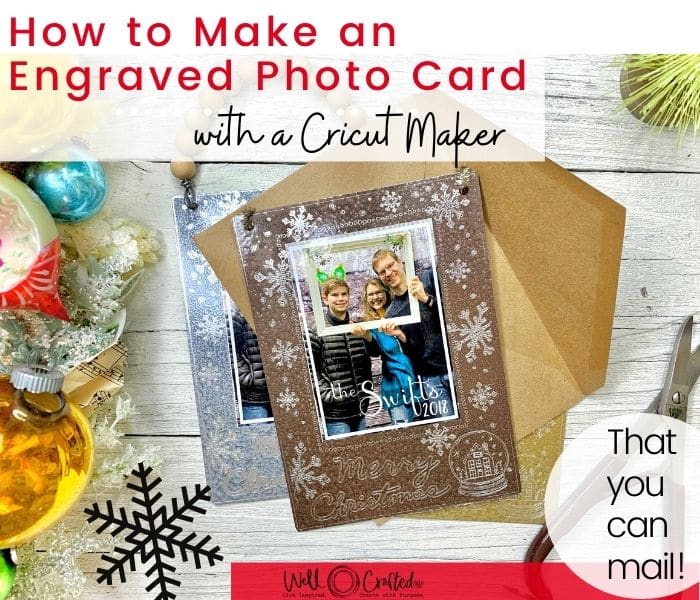
Watch the Video on How to Engrave Christmas Cards!
Rather watch a video than read the tutorial that’s below? I do have a YouTube video on how to do this! I made it last year as part of a paid event, but have permission to post it free on YouTube. Merry Almost Christmas to us both!
How to Engrave a Christmas Card with Cricut
Tools and Materials
- Cricut Maker
- Design Space for Cricut on desktop or ios
- Cricut Engraving Tool (w/ housing) *OR the Engraving Tip (w/o housing)
- Strong Grip Mat
- Standard Grip Mat or Light Grip Mat
- Painter’s Tape
- Guillotine 8.5″ x Guillotine 12″
- Jeweler’s Shears
- Printable Glossy Vinyl or Glossy Sticker Paper
- Spray Painted Aluminum Flashing* (See this Tutorial) Note: Spray Painting needs to be done 8-24 hours ahead of time, but you can’t use it after approx. 24-36 hours. I explain how to gauge your window in the same tutorial. I give an alternative to the spray painting in that post as well.
- FREE Photo Card Engraving Design- Available in my Free Designs Library
These are affiliate links which means that if you purchase through these links I may get a small commission. Thank you!
Directions
Step One: Upload the Design
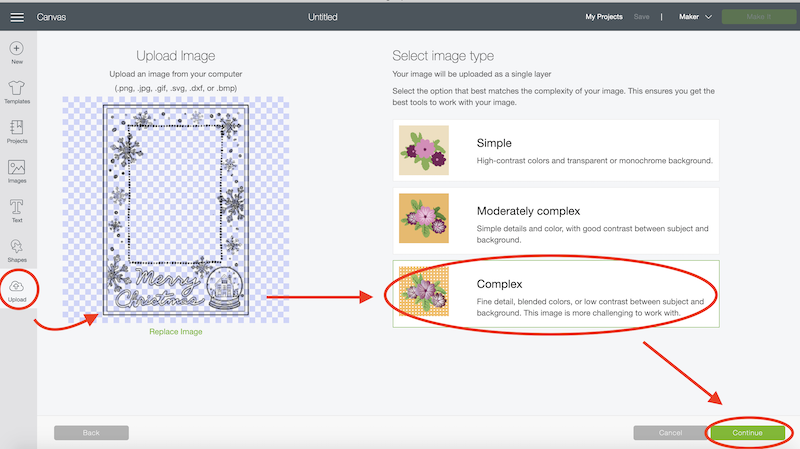
Get the free engraving design for this project in my Free Design Library. Download the zip file and open it. Open up a new canvas in Cricut Design Space and in the side toolbar hit Upload. Grab your design from your downloads. It’s a .PNG file with the background already removed. Process it as a Complex file, skip the cleanup page, and then Save as a Cut file.
On the Image, Uploads page, select your design and click the Insert Image in the bottom right corner. This opens it up in your Design Space canvas.
Step Two: Create a Simple Shape Template
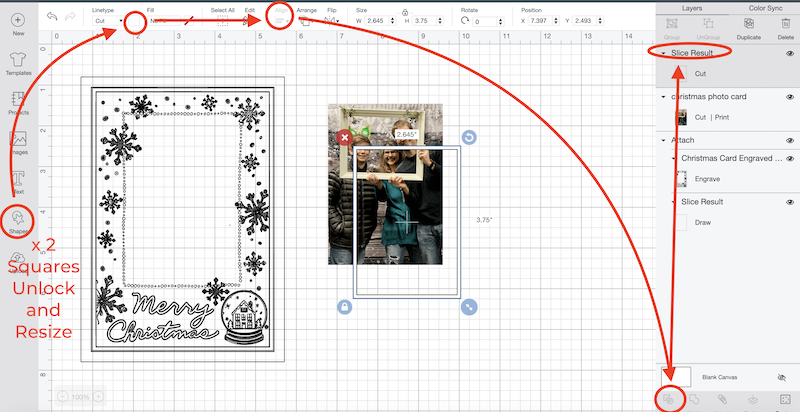
In the left toolbar (desktop) click on the Shapes and add a square to your canvas. Then go up to the top where it says Size and unlock the constraints by clicking on the little lock. Now, you can change the width to 5″ inches and the height to 7″ inches. This is going to represent our piece of aluminum flashing. Click on the lock.
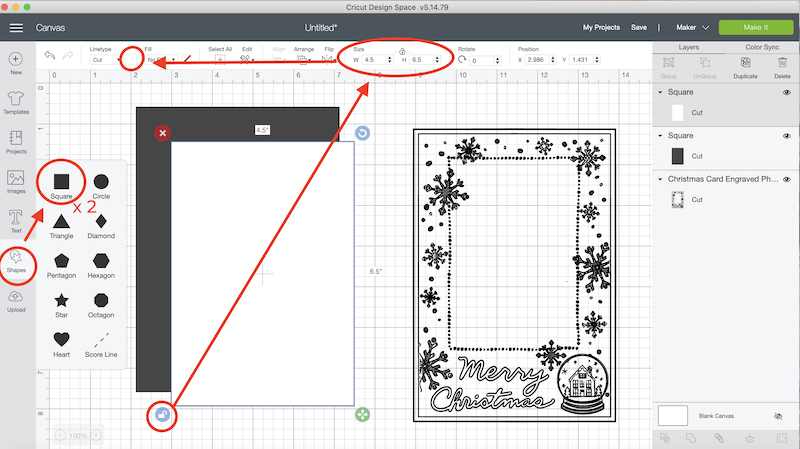
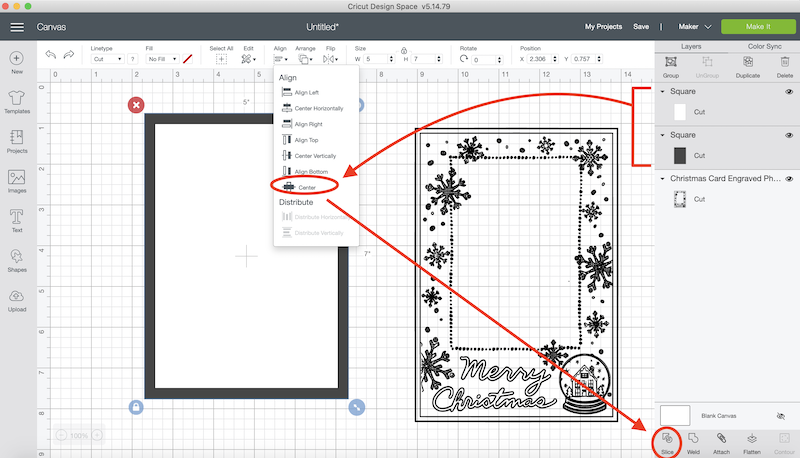
Repeat with a second rectangle, but change the Size to 4.5″ w. and 6.5″ h. Move this rectangle over the first, then Select both and Align>Center.
With both still selected go down to the lower right side and hit the Slice option. Delete the layers you don’t need and change your template’s Linetype to Draw.
Step Three: Ready the Engraving Design
Select the engraving design and then in the Size boxes type in 4 .5″ x 6.5″ inches. This gives us a .25″ margin around so that we can tape the flashing to our mats. This also gives us a little bit of a safety, if for whatever reason your design is off slightly, you can go ahead and trim it straight. Select that design and change the Operation to engrave.
Now, Select both the template and the engraving design and Align>Center and then Attach for now.
Step Four: Add the Photo to the Canvas
Upload your photo just like you did the engraving design. Choose complex and skip the cleanup. We don’t want to remove anything from the image. Then continue to the next page and save as a print and cut image. Insert it into your canvas, and let’s go ahead and size it down to fit inside our engraving design. You can tweak the size by either cropping your image, or if you need just a tiny tiny distortion you can unlock the constraints and manipulate the photo slightly.
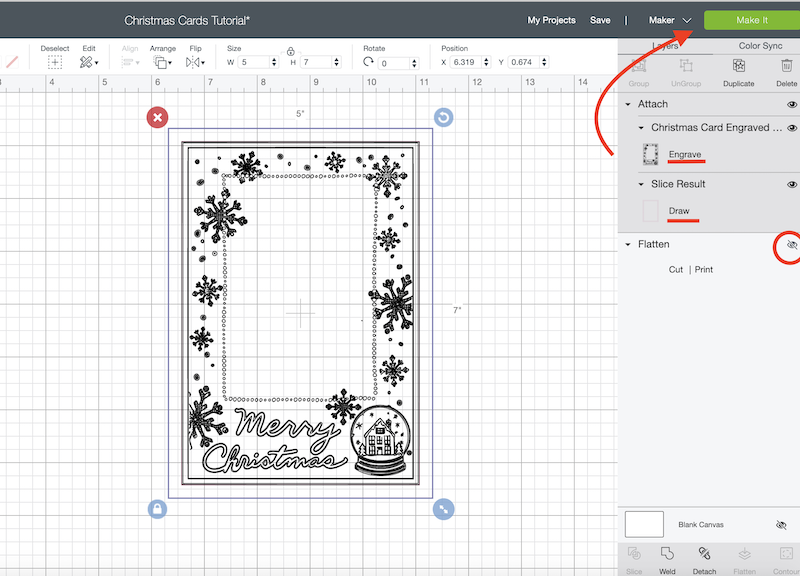
In the Layers panel click off the eye on the Attached Layer. This hides the layer by clicking off the visibility.
Step Five: Add Personalization to the Photo
This is an optional step but it really adds a designer look to the photo and we can do it all right in Design Space! Go to the Shapes icon and create two squares one the size of the photo and one a little smaller. Change the color of the larger square to white. Align>Center and then Slice. This gives us a frame. Use the anchors to size it down slightly so it fits inside of your photo.
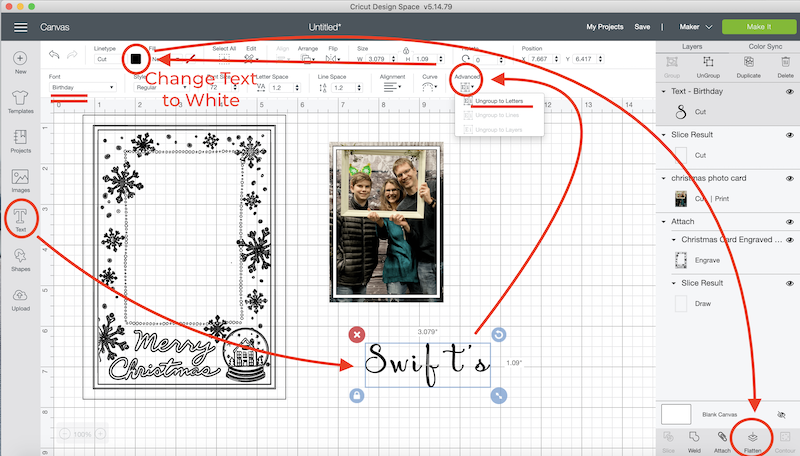
To add text, you go to the Text icon in the side toolbar. I wrote “The Swift’s” and used a system font that I had. If the spacing is off (it frequently is) then go up to the top and Ungroup the letters. You can then move them separately and can connect them. Select all the text and Group them again.
Note: Whenever you work with text within Design Space make it really large. This will prevent the issue of letters being filled in where they shouldn’t be.
Unlock the constraints if you want to manipulate the size a little, and if you’re satisfied, click Weld. With the text still selected, change the color up top to white. Place on the photo where you want it. Select the frame and the photo and Align>Center. Select all and then Flatten to create one image. You’ll see the outline around the text disappears with this command.
Note: You can’t unweld but you can use Command Z on your Mac to go back and undo it.
Step Six: Prepare the Canvas to Make It
In the Layers panel click on the eye to make the template visible again. Make sure the template layer Linetype says Draw, the design layer says Engrave, and the image layers say Print then Cut.
Now we have to essentially split our project into two parts. If we tried to make it as we currently have it set up then Cricut would limit our Material Settings. We want to have the Material Setting for Stainless Steel.
For a workaround, we’re going to go ahead and click off the eye on the engraving layer again. I’m left with the Photo image. To save paper, if you know you want to make more than one of these you’ll want to go ahead and duplicate the photo. I wanted a total of 4 images.
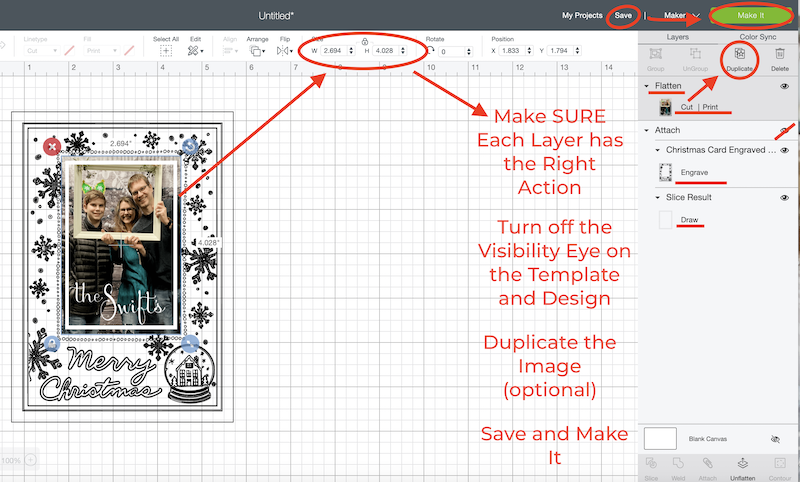
Save your project, and then hit Make it in the upper right corner of your screen.
Step Seven: Print then Cut the Photos
Now we hit Make it and that brings us to the Mat Preview Page. Cricut puts a black registration box around our image when we print so that the sensor in our machine can find it. Click Continue.
Toggle off the bleed. You can print now or you can choose to print through your system dialog.
I like to toggle on the system dialog and then hit print. This prompts your computer to open up the system dialog box (and they do warn that will probably pop up behind your browser). The system options vary on what kind of printer and computer you have. I chose glossy photo paper and the normal image quality setting. Then hit print!
Note: For this project, I chose to use Printable Glossy Vinyl by Zicoto (link is in supply list above). You can use any printable vinyl but I recommend you check to see if it’s waterproof. You could also use a printable sticker paper in Matte or glossy. I like the vinyl for this project because it’s a little more durable than the sticker paper is.
Once you’ve printed your photos, you get to cut them with your Cricut! Carefully place the paper in the upper left corner of a Light Grip Mat (or standard works too). Load the mat, and on your screen choose Printable Vinyl as your Material Setting and change the Default to More. Then hit the Go button on your machine.
Do NOT unload your mat after it cuts! Get a little scraper and try to peel up one of the stickers to make sure it’s cut through. If it hasn’t, then just go ahead and repeat the cut by pressing the Go button again. I’ve also used the regular Vinyl setting vs. Printable Vinyl and I like it.
Step Eight: Set up Your Mat to Engrave
After you finished the print then cut go back to your canvas and we’re going to basically switch projects from the photo to the engraving. In the Layers panel click ON the layer with the engraving design and template- and click off the eye on the print then cut layers to hide them. Make sure that the template says Draw and the design says Engrave. Then hit Make it.
Before you set up your mat, check to make sure that your spray painted aluminum flashing is ready to go by trying to scrap it a little with your nail. If it hasn’t bonded enough then it will scrape off really easily. Set aside and allow to dry longer. (I use this test piece with the scratch for the Snow Globe Ornaments).
IMPORTANT-I feel like I really need to call out that the metal IS sharp on the corners or jagged cuts. That’s why you need to be sure you round off corners and it’s important that you use a flat nose pliers to flatten any edge that is curling up at all. AND the little bits that you cut off ARE sharp so be careful that they don’t end up on the floor. DO NOT use your hand to clear off your work surface. If you’re unsure about handling it before you’ve done either of these two things then you should wear safety gloves.
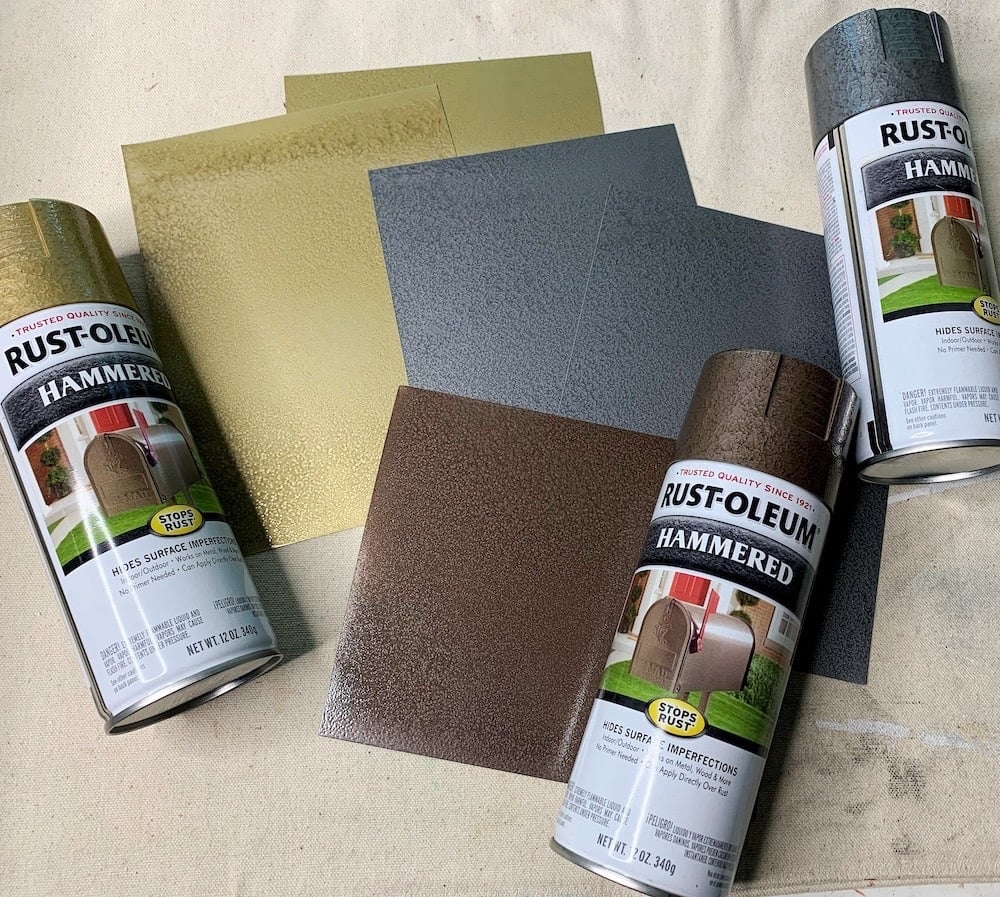
Note: I go into a lot of detail on spray painting your aluminum flashing to engrave through in my post, How to Spray Paint Metal for Engraving with a Cricut.
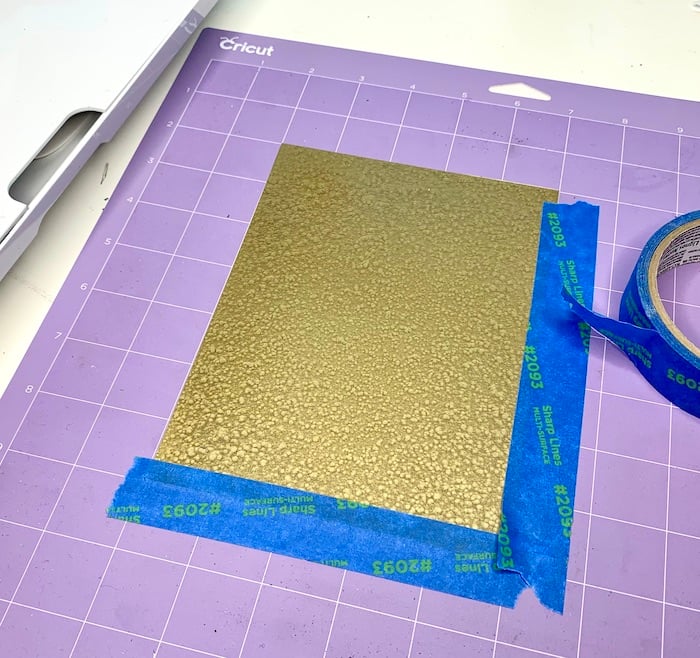
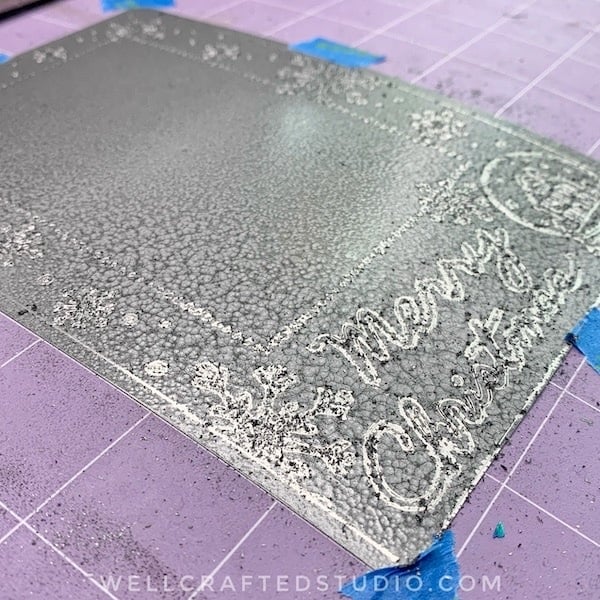
Using the grid lines, position your metal up against the lines. I placed it between the 2″ x 7″ lines. Use painter’s tape to tape around the edges of your sheet using that .25″ margin that we left. Press down firmly on everything.
Step Nine: Engrave the Design
On the Mat Preview Page in Design Space click on the template and position it on the screen so it matches the placement of your metal sheet. Zoom in for precision placement by clicking on the screen size in the lower-left corner of your canvas. I like it to be REALLY big so that I can precisely position it to match my metal sheet. Place your engraving design within the shape template, and then Click the 3 dots in the top left corner of the design and Hide Selected. Click Continue.
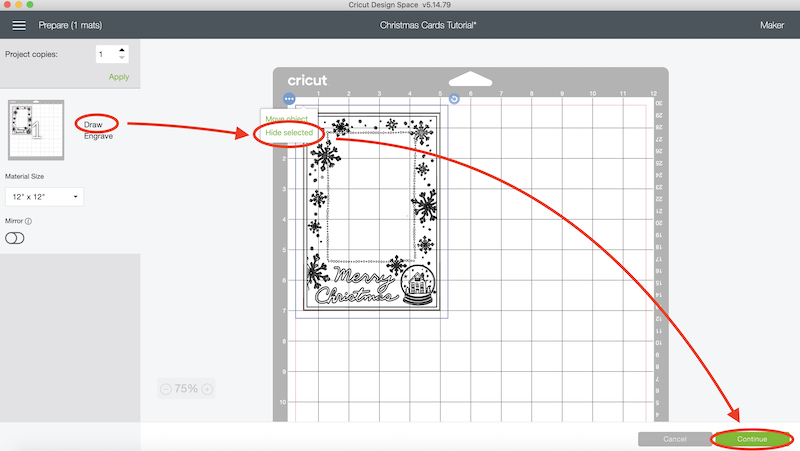
For the Material Settings choose Stainless Steel. If you do not see this as an option make sure that your engraving design is set at Engrave and that your template has been hidden. Place the Engraving tool in carriage B, and move the star wheels all the way to the right. Load the mat, and if it all looks good, hit the Go button on your machine.
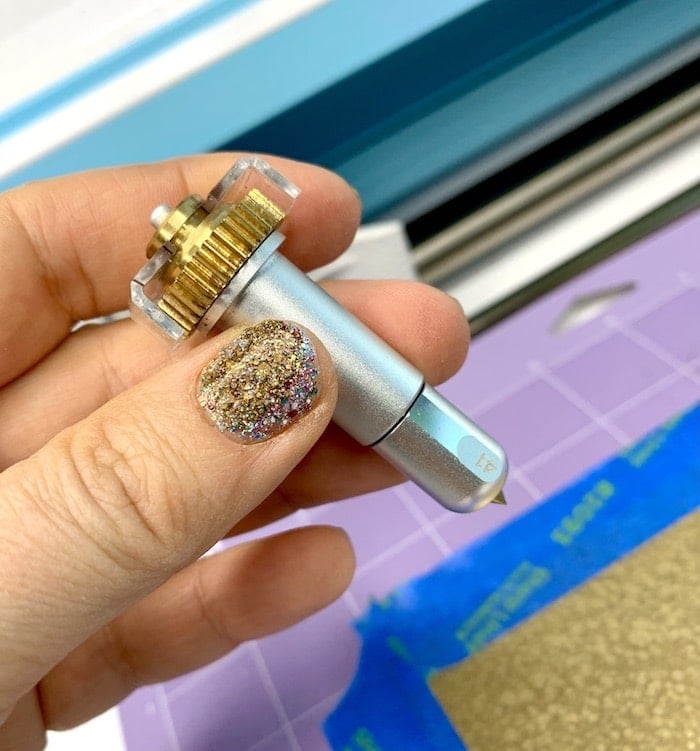
This design takes about 30 min. or so to engrave. Notice that I did NOT duplicate the design for multiple passes. When you’re using a design with pattern fill like this you don’t need to engrave deeper.
Peel off the blue painter’s tape and use it to pick up the debris on your metal sheet. You can use a soft paintbrush or canned air to clean up your tool and machine from the debris.
Step Ten: Put it All Together
Peel up your sticker and place it carefully on your metal. Then use the Jeweler’s Shears (or tin snips) to round the corners of your metal. Remember, if your design is crooked at all, trim the margins with a Guillotine Paper Cutter to straighten them.
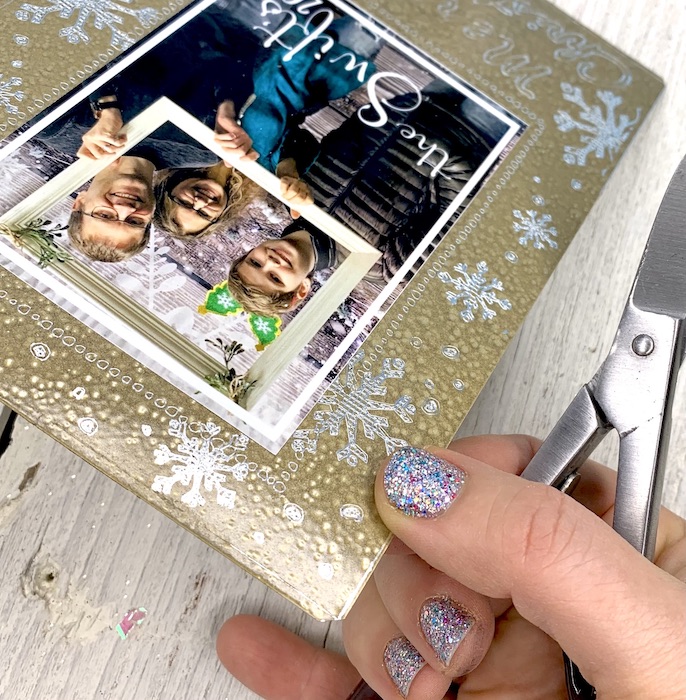
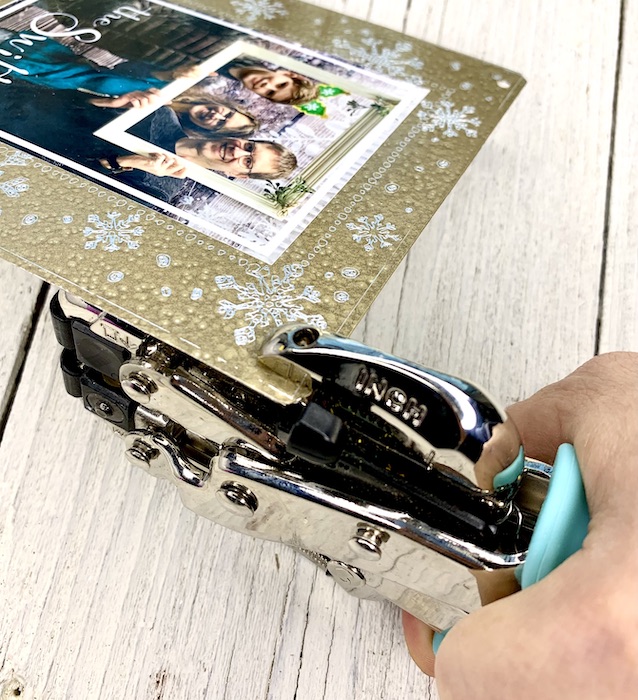
If you want to make this into a mailable ornament or wall hanging you can use the Crop-a-Dile or a Power Hole Punch (like the Mighty Punch) to punch a hole in each top corner. Then use yarn, twine, or a sparkly chenille stem to create a hanger!
Finished! So What’s Next?
If you enjoyed this tutorial for an Engraved Photo Card and Ornament then you will LOVE my other engraving tutorials! I already have posts on Engraving Stainless Steel Servers, Cheese Spreaders, Cookie Spatulas and Bookmarks.
Engraving is TOTALLY my jam and I’ve literally written the book on Engraving Metals with Your Maker this last summer. It includes techniques like you’ll find in this project, but SO much more as well! I’d love to have you sneak a peek here!
Love this? Share it!
If you enjoyed this tutorial, or it gave you LOTS of ideas, or you just like me- then it would be SO helpful if you would take a minute to either share this post on social media or pin the image below! Thanks- every click helps tremendously. And of course, if you have ANY questions about this project or anything else I can help you with, don’t hesitate to comment here or on my IG or YouTube channel.
Thanks for Reading,


Want to Remember this GREAT project? Pin this post, How to Make a Cricut Engraved Photo Card to your Favorite Pinterest Boards!


Hi Jen, I am just wondering if the “updated pumpkin” with patterned insides is available? THe link on the site does not seem to work. Maybe it was a limited time. IT looks nice though!
Well darn I forgot I added that. I’ll do the link today. ❤️ It seriously took about 5 hours to engrave but the final result looks really good. I’m glad you like it! Thanks for the comment!
I am really interested in trying some of your tutorials but for some reason the webpage keeps saying there is a problem & reloads. It happened about 15 times trying to get through this particular tutorial. It is very frustrating. Is there a better way to follow your instructions? Thank you!
Hi Pam, Thanks so much for the feedback. I did have my tech guy check out the page on Chrome, Safari, and Firefox but he couldn’t find the issue. But, I do have a couple tips for how to read the tutorials more easily. First, if you’re using Safari or Firefox they have Reader Views. This really simplifies the format and it removes the ads. Or, I believe you can use Adblock in Safari too. Hope this helps!
Also, you asked for an easy way to follow the tutorial. And I do have a YouTube video that I forgot to link to that goes through it step-by-step. I’ll add it now but here’s the link.
https://www.youtube.com/watch?v=F5AR3O0o2Dc
Jen