
When you purchased a Cricut machine, was part of the plan to make gifts with it? Then you’re faced with a huge amount of options and wonder what to do? These engraved key fobs are a GREAT example of simple, handmade gifts that do NOT look handmade. With just the Cricut Infusible Ink, some sublimation keychain blanks from Amazon, and my Cricut Engraving Tool, I was able to make something that’s absolutely one-of-a-kind in just one afternoon at home. Plus, I think you’ll fall in love with making these engraved resin keychains.
A Resin Optional Cricut Project
You do not have to use resin to make these keychains, but I think it really adds a professional finish to the final product that is worth the small bit of extra effort. It’s also a great way to try your hand at resin art without going all-in on the molds, and large amounts of resin.
- A Resin Optional Cricut Project
- Where to Find the Engraving Designs- OR Create Your Own
- Watch the YouTube Tutorial on How to Engrave Infusible Ink Keychains
- How to Make Engraved Resin Keychains with Cricut + Infusible Ink
- Engraving tools and materials
- Looking for More Cricut Engraving Ideas?
- Join the Community that Makes Engraving with Your Cricut an Adventure
- Love this? Share it!
Where to Find the Engraving Designs- OR Create Your Own
You can use the same designs as I do in this tutorial by downloading them from my Free Library. Or you can create your own.
Lots of my engraving friends use Cricut Access to find basic images and then they add line fill to those designs using CleverSomeday’s method.
OR you can use the iPad app, Procreate to create your own engraving designs. I have a video and post that will show you step-by-step how to make your own filled engraving designs.
Bonus- I also give you the Procreate brushset that I created to add different types of line fill to my engraving designs.
Below, you can see an example of the original design, created with stamps and a fill pattern in Procreate, and the finished engraved keychain. You can literally make ANYTHING, and turn any doodle into a custom keychain. It’s so fun!

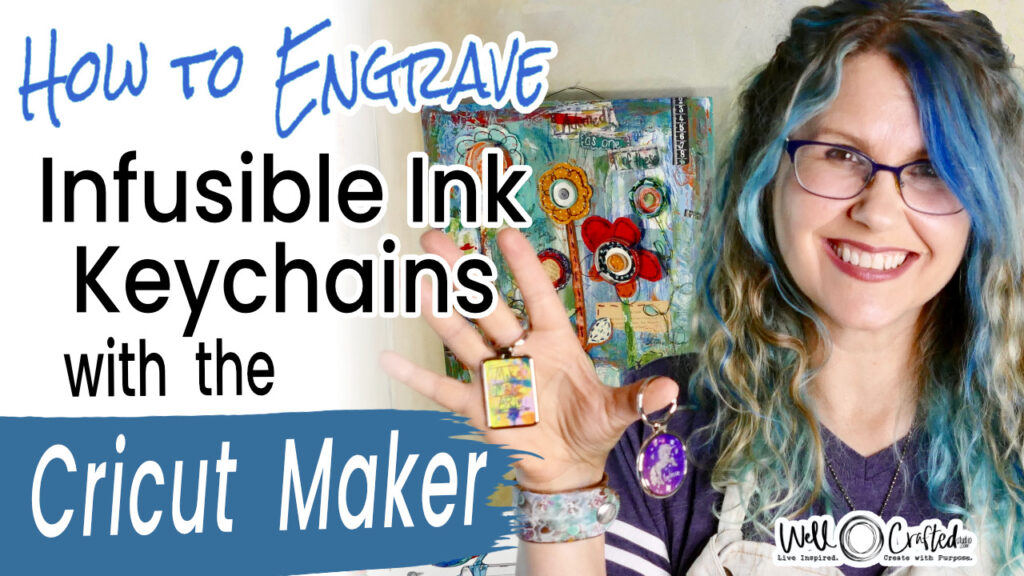
Watch the YouTube Tutorial on How to Engrave Infusible Ink Keychains
If you’re someone who’d rather see it than read it, be sure to check out my YouTube tutorial below. I go through all the same steps as this tutorial, but you can watch the magic as it happens.✨ Interested? It’s pretty cool- just click play!

You can also follow along and see the project links with the step-by-step tutorial below directions below!
How to Make Engraved Resin Keychains with Cricut + Infusible Ink
Tools and Materials
For the Engraving-
- Round Sublimated Keychain Blanks (these are metal disks coated with a sublimation base with metal key fob bases)
- Rectangle Subimated Keychain Blanks
- Engraving Designs, from my Free Creative Resource Library
- Cricut Maker
- Strong Grip Mat with Painter’s Tape or Double-Stick Tape
- Cricut Engraving Tool (with Quick Swap Housing, or just the Engraving Tip if you already have the housing)
For the Infusible Ink-
- Cricut Infusible Ink Transfer Sheets (I use Galactic Stars, Retro Marble, and Distressed Blue scraps)
- Mini Easy Press, Easy Press 2, or Easy Press, or Heat Press
- Easy Press Mat or Ironing Pad
- Unwaxed Butcher Paper (some sheets come in the box with the transfer sheets)
- Heat Resistant Tape
- 2 Sheets White Cardstock (one piece for jig and one for protecting iron-on surface)
To Add Resin:
- Resin- I use ICE Resin for this project, but you can use any epoxy resin (I like the push syringe for mixing small amounts but you can get a better deal if you’re using a bulk epoxy resin like Dr. Crafty Pants.)
- Popsicle Stick and Toothpicks– easy to pick up at craft store/grocery store
- Silicone Mat- I use one from the thrift store but you can purchase them and cut them to size as needed
- Tray– I just use old trays from the thrift store
- Safety Equipment- like gloves, respirator with filters, etc. There is more on using resin safely here- https://jennifermaker.com/epoxy-safety-make-tumblers-safely/
This post contains affiliate links, which means that if you purchase through one of these links I earn a small commission at no additional cost to you. Thank you for your support!
Directions for Part One: Infusible Ink
Step One: Pre-heat the Easy Press
For this project, I used Cricut’s Mini Easy Press but you can use any Easy Press or Heat Press.
For the Infusible Ink Transfer Sheets and these keychain sublimation blanks, you’ll want to set your Mini Easy Press at the highest heat, or the Easy Press 2 at 385 degrees for 40 sec.
Note: If you’re using the Original Easy Press, you’ll want to set it at 360 for 120 sec. If you’re using a heat press then set the temp for 385 degrees.
Step Two: Prep the Infusible Ink Transfer Sheet and the Blank
To cover your entire sublimation aluminum blank with the Infusible Ink, you’ll want to cut a transfer sheet slightly larger than you need it. I cut mine at 2″ x 2″ approx. because my round keychain is 1.36″.
Remove the plastic transfer tape on the back of the Infusible Ink Transfer Sheets.
SUPER IMPORTANT- Take off the plastic sheet that’s on top of the white sublimation side of your aluminum blank. Warm up the Easy Press or your heat press.
Step Three: Infuse the Metal Disk with the Infusible Ink
The Cricut Heat Guide instructs us on how to create a “stack” that will give us the best results when using the Infusible Ink on Aluminum.
The stack is from top to bottom is as follows-
- Mini Easy Press
- Butcher Paper
- Transfer sheet (ink side down)
- Aluminum Sublimation Blank (coated side up)
- Cardstock
- Easy Press Mat (or ironing blanket)
Use the Cricut heat-resistant tape to tape down the transfer sheet onto the cardstock on the sides that we cut larger for this. Once you’ve assembled everything, place the Easy Press on top of your stack (and avoid moving it).
Count to 30 seconds or so. When done, pick up the Mini Easy Press and set it in its cradle.
Check the transfer. If it didn’t transfer all the way, or go ahead and apply the Mini Easy Press again, just be careful not to move anything or your transfer will be off.
Below are Some Pics of the Transfer Process with a Larger Sheet of Infusible Ink
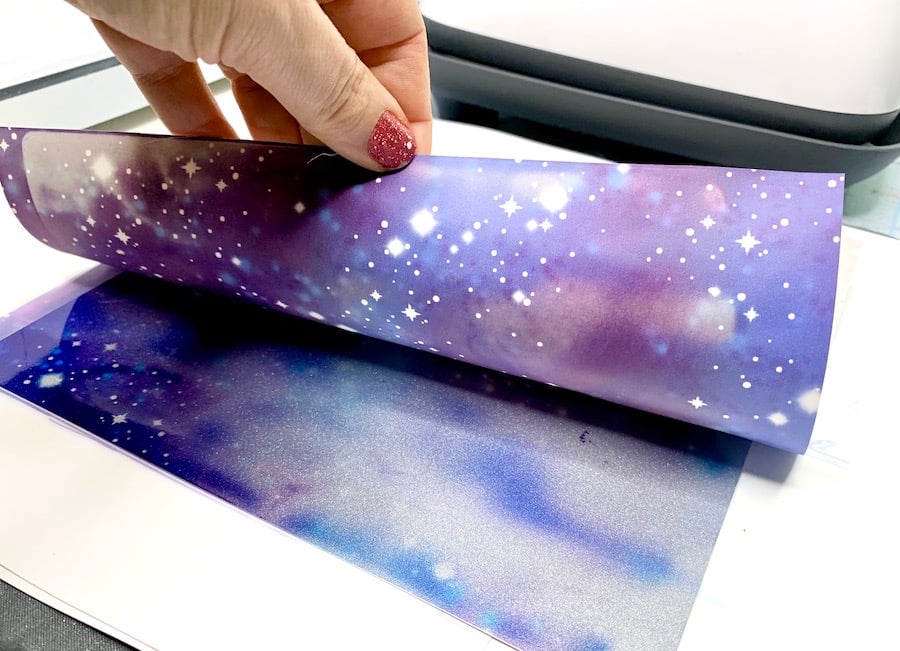
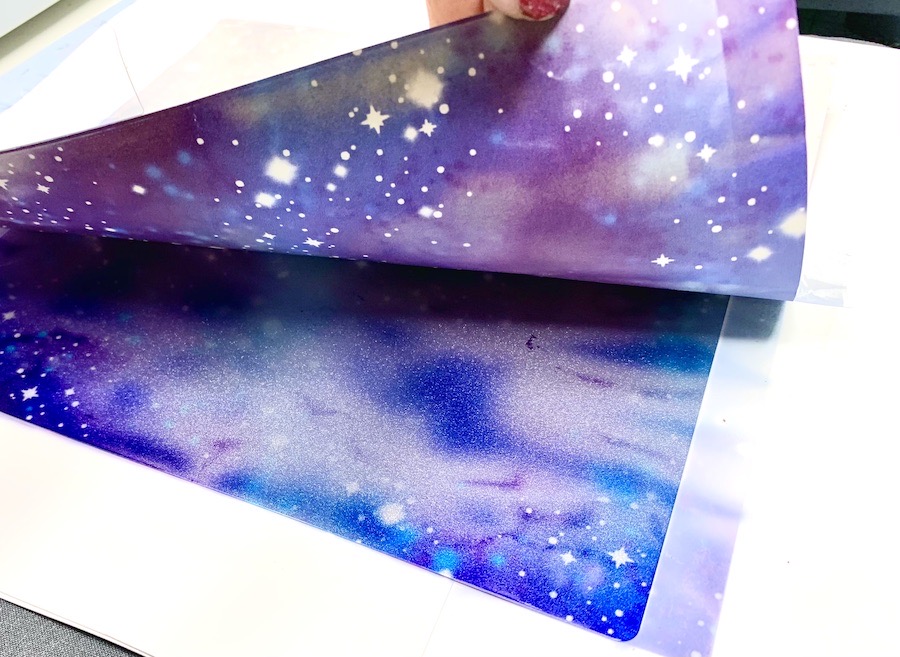
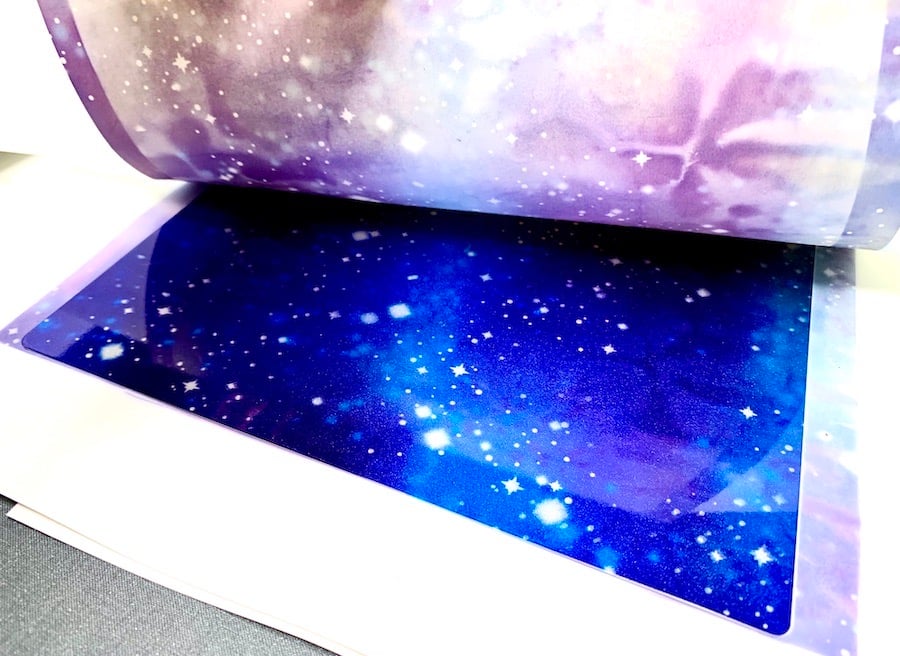
Let cool, then lift off the sheet to reveal your vibrant ink-infused aluminum! All done, now set that aside and let’s get into Design Space.
Step Four: Upload Your Engraving Design to Your Canvas
Download my FREE Keychain engraving designs from my Free Creative Resource Library to your desktop or use your own design.
Open a new canvas in Cricut Design Space and click on the Upload icon on the left side toolbar. Hit browse and grab your design. Click on the design in your Image Uploads and then on the Add to Canvas button in the lower right corner.
Step Five: Use a Simple Shape Template
Add a circle shape to your canvas from Shapes in the left side toolbar. Change the size of it to 1.36″ (or the size of your keychain blank). Then, size the design to fit into the circle.
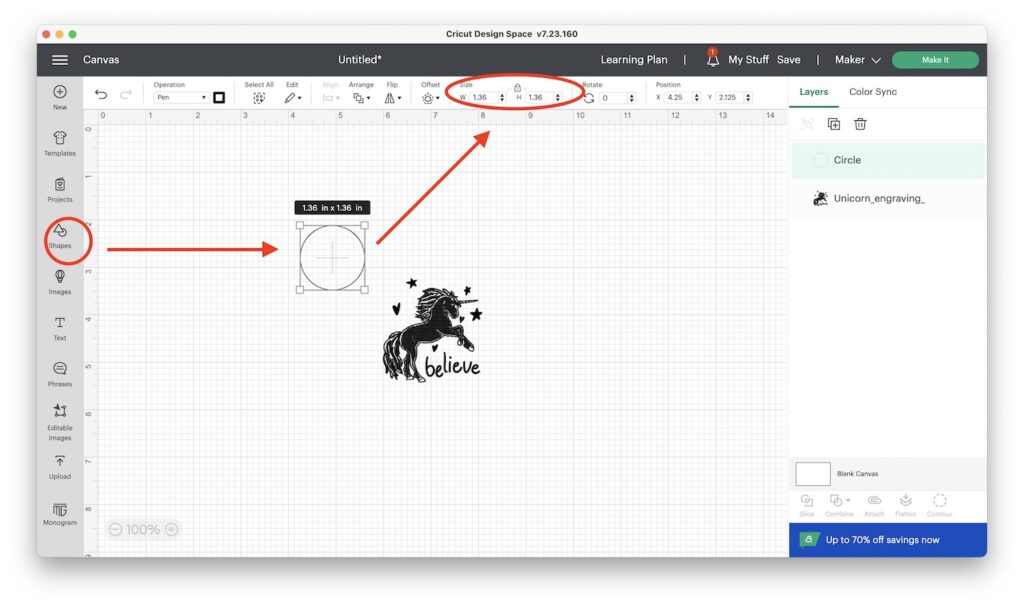
Select both the shape and the design, Align Center, and Attach.

Under Operation, change the design to Draw and change the color of both to red. This will make it easier to line up our design with the template on the Mat Preview Page.
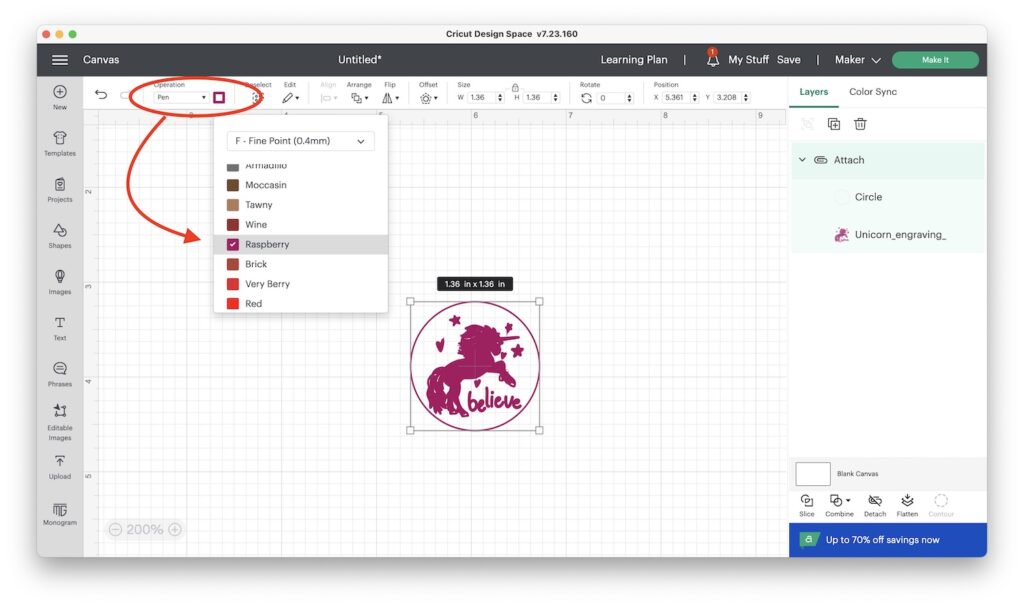
Then Duplicate just the design and change that to Engrave. Do this by clicking on it’s layer in the right side Layers Panel and then clicking the Duplicate action at the top of the Layers Panel.
You now have a red “template” that is draw and a solo design that is set to engrave.
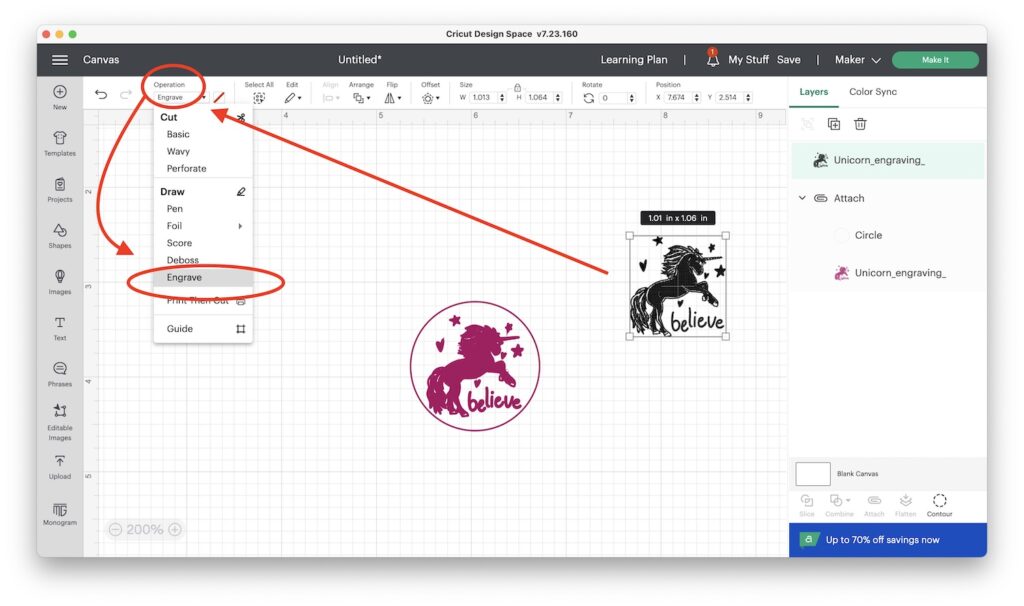
Step Six: Create a Circle Cut Out for a Paper Jig
Duplicate just the circle and change the operation to Basic Cut. We’re going to use this to cut a hole in a piece of cardstock that will help us with our placement on the mat. This will also help us keep our small blank in place so it doesn’t shift during the engraving.
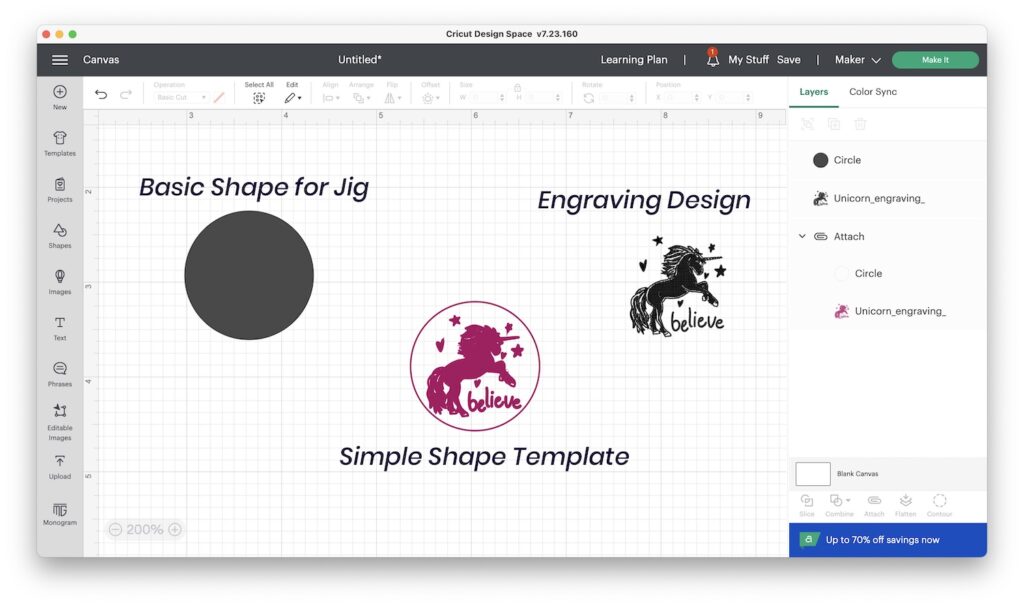
Step Seven: Save Your Project and Hit Make it
Before you click Make it, in the top right toolbar Save your project.
THEN, choose Make It to continue to the next screen.
Engraving tools and materials
Remember- You can see all of these steps in the YouTube video!
Step Eight: Use the Template to Align Everything
Now on Cricut Design Space’s Mat Preview page, move the template so the bottom of it is aligned to the 3″ across and the 4″ down.
Stack the engraving design over it so that you can’t see the red anymore. Then click on the 3 dots on the engraving design and choose hide.
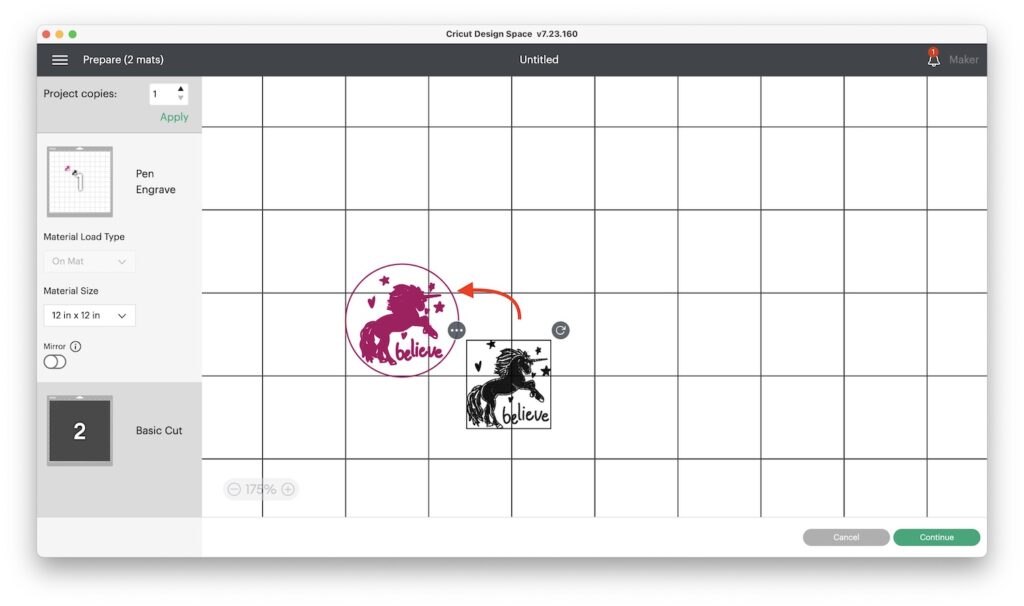
On mat 2, move the cut circle to that same place on the mat. Then we’re going to check our placement!
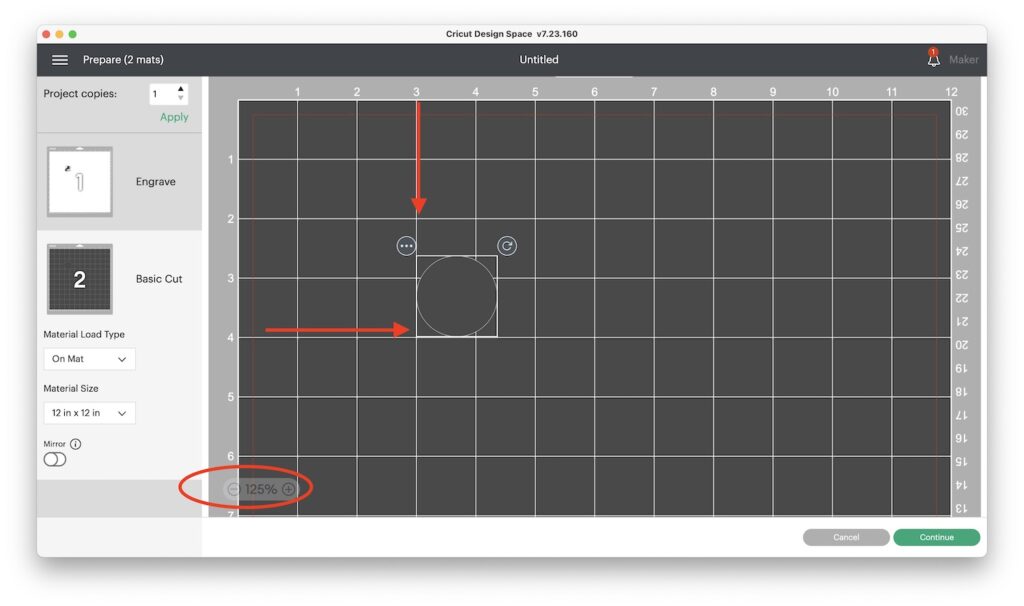
To do this, click the 3 dots to hide the circle. Repeat with the template. Then click at the bottom of your screen where it says Hidden, and click on the cut circle to make it visible again. This helps you visually check to see if they’re truly lined up.
Click on mat 2 to select it and then hit continue in the lower right corner.
Step Nine: Cut the Circle
Place the cardstock on your cutting mat. On this next page choose cardstock as your Material Setting.
Remove the circle you cut out, but keep the rest of the paper on the mat.
Step Ten: Engrave!
Get ready to engrave! On your mat where the cut out circle was, place your aluminum disc ink side up. The paper helps hold the disc in the exact right position.
Click on the Select Aluminum Sheet as your material. Load your mat into the machine, with the Load/Unload button on the machine.
Make sure your engraving tool is in Carriage B, and your star wheels are all the way to the right side of the roller bar. Then, once the button on your machine is blinking, hit the Cricut Go button to start engraving!
NOTE: This particular design can take up to FOUR HOURS to engrave. It’s slow, but totally worth it for the glitter look!
Step Eleven: Finish Engraving
When it’s finished engraving Unload your mat.
After you’ve unloaded the mat, use the tape you peel off the sides to pick up any metal bits from the top of the aluminum sheet.
Step Twelve: Assemble Your Keychains!
This part is simple! Just peel off the cover on the adhseive on the blank and press in your engraved metal disk. Press together firmly and you’re done! Unless…. you want to do step 13.
Step Thirteen: Prep the Resin (optional)
If you’d like, you can take this a step further by applying resin over the top of your keychains. I use the ICE resin, but you could also use UV Resin. You can see how I do this in the video, or just read the directions for the type of resin you’re using.
Looking for More Cricut Engraving Ideas?
I have over EIGHT tutorials on my blog now that show you how to do all kinds of Cricut engraving projects. This summer I also literally wrote the book on Engraving Metals with your Cricut Maker. This 100+ page book helps you solve the problems and expand the possibilities of what’s possible with the Cricut Engraving Tool.
Join the Community that Makes Engraving with Your Cricut an Adventure
You can also join my Engraving Metals Facebook Group and show us your stuff, ask questions, or troll for inspiration. It’s a wonderful group that is mostly adventurous beginners who are willing to try anything. It’s pretty awesome!
Love this? Share it!
If you found this tutorial helpful, I would LOVE to have you share it on Pinterest, Facebook, or another social media platform! It really does make a HUGE difference.❤️
Thank you for reading,


