
One of the biggest challenges with engraving on metal with your Cricut Maker is that it can be hard to see your design. You may think it needs to be deeper, but what you need is contrast. Usually, you would do that by adding black ink or enamel to darken the engraved area. But there is a flip solution, which darkens the metal around your engraving. In this post, I give the full step-by-step to spray paint metal for engraving with a Cricut so that you know what happens if you don’t let it dry long enough, how to test your dry times, and what to do to prep the metal so it bonds to your metal.
Below, I show how three different spray paint colors can really add variety to the look and feel of your final product. And although I wouldn’t recommend painting types of metal like brass, bronze, copper, or gold (because of their natural patina), I LOVE using this with aluminum step flashing.
So that’s what I’m concentrating on in this tutorial!
The Pro’s and Con’s of Using Aluminum Step Flashing to Engrave
Never use aluminum step flashing? It’s a thin sheet metal that’s found in rolls or sheets in the roofing section of your local home improvement store. Using this industrial metal to craft with has a lot of advantages, but there are disadvantages too.
Recently, however, I found some workarounds for some of the cons on my list that now make aluminum flashing one of my favorite metals ever to craft with!

In the past, I mostly used aluminum flashing for testing my engraving designs before I engraved on the more expensive servers, spreaders, spatulas, or other blanks that are my finished product.
Pro’s to Using Aluminum Step Flashing
- It’s easy to find.
- Aluminum is a softer metal making it more malleable and therefore easier to work with.
- Step Flashing is SUPER inexpensive. In fact, at home improvement stores you can find 50’ rolls and 5” x 7” sheets for crazy cheap prices. This gives me a better profit margin.
- Cutting it is a cinch with a guillotine cutter or a pair of jeweler’s shears.
- People feel like metal is worth more than paper products (perceived value.)
- Because it’s not a common crafting material and not everyone is familiar with how to work with it, anything made from metal stands out from other crafts.
Con’s to Using Aluminum Step Flashing
- The perceived value compared to other metals is low because so many cheap things are manufactured from it.
- The shiny aluminum doesn’t have the look of quality but rather of inexpensive or “cheap” metals. Because so many inexpensive things are made from it.
- The step flashing feels lightweight which translates again to “cheap” for a lot of people.
- The engraving can be hard to see on aluminum step flashing.
How to Work Around the Con’s of Aluminum Flashing
#1 ) Weight- Since one of the problems is that it feels too light to be quality, you can try gluing two sheets of flashing together. This adds to its weight and boosts the perceived value.
#2 ) The Metal Looks Cheap- That too shiny finish can be altered either mechanically or with paint. Using a texture hammer, or steel wool you can make aluminum appear to be more of an artisan metal. You can try adding it just to the edges and then it won’t distract from the engraving design. Paints, like the spray paint in this demo, can also add color, patina, and even texture to simple aluminum.
#3 ) You Can’t See the Engraving– Paint also solves the problem of not being able to see the engraving because when you use a darker or a contrasting color it boosts the contrast between the surface of the metal and your engraving design.
My Recommendations for Spray Paint
Spray paints come in a variety of metallic colors, including gold, aged silver, dark bronze, and copper. There are several different brands, just make sure that the paint you choose will bond to metal. Valspar has a line that I’ve experimented with and really like. But there is one line of paint that I love more than any of the others I tried. My favorite?
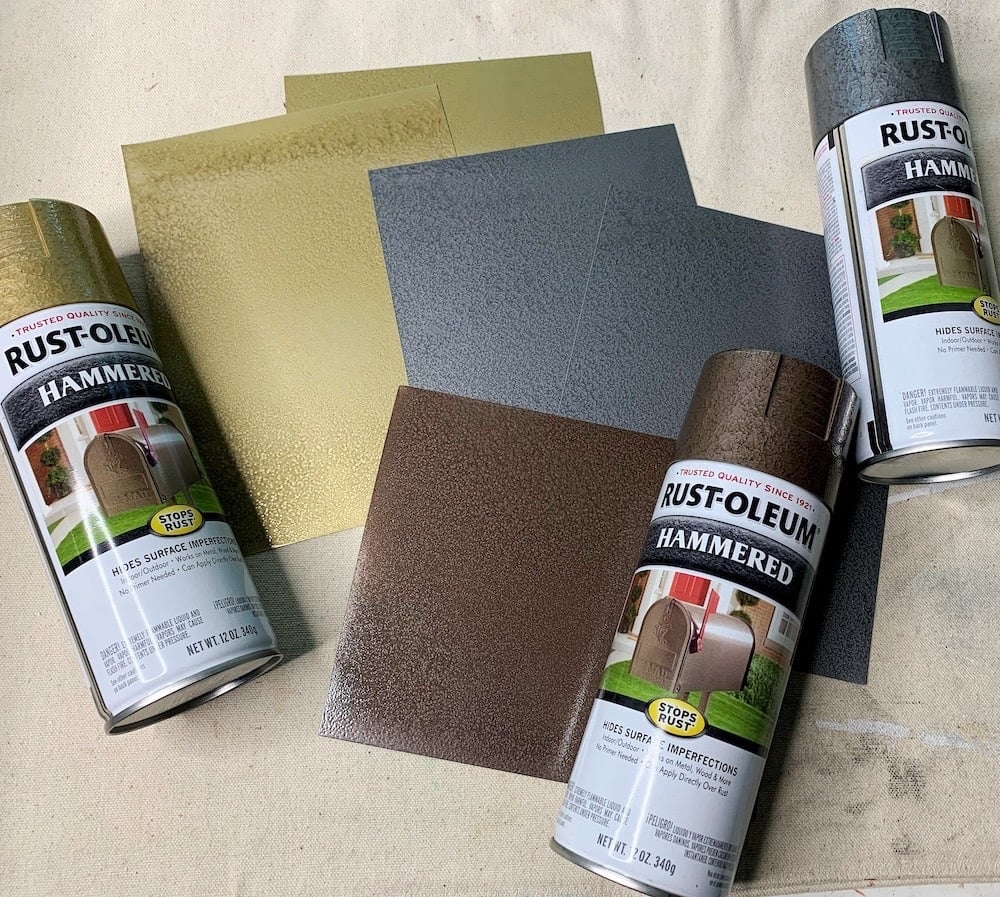
Rustoleum’s Hammered Metal Line of Spray Paints
Not only does it alter the surface color of the aluminum, but it adds a texture to the surface both of which alter the perceived value of your finished product.
So with these discoveries, the cons of crafting with aluminum step flashing don’t matter much anymore.
What remains is an incredibly engravable, inexpensive, and easily accessible metal that we can craft with.
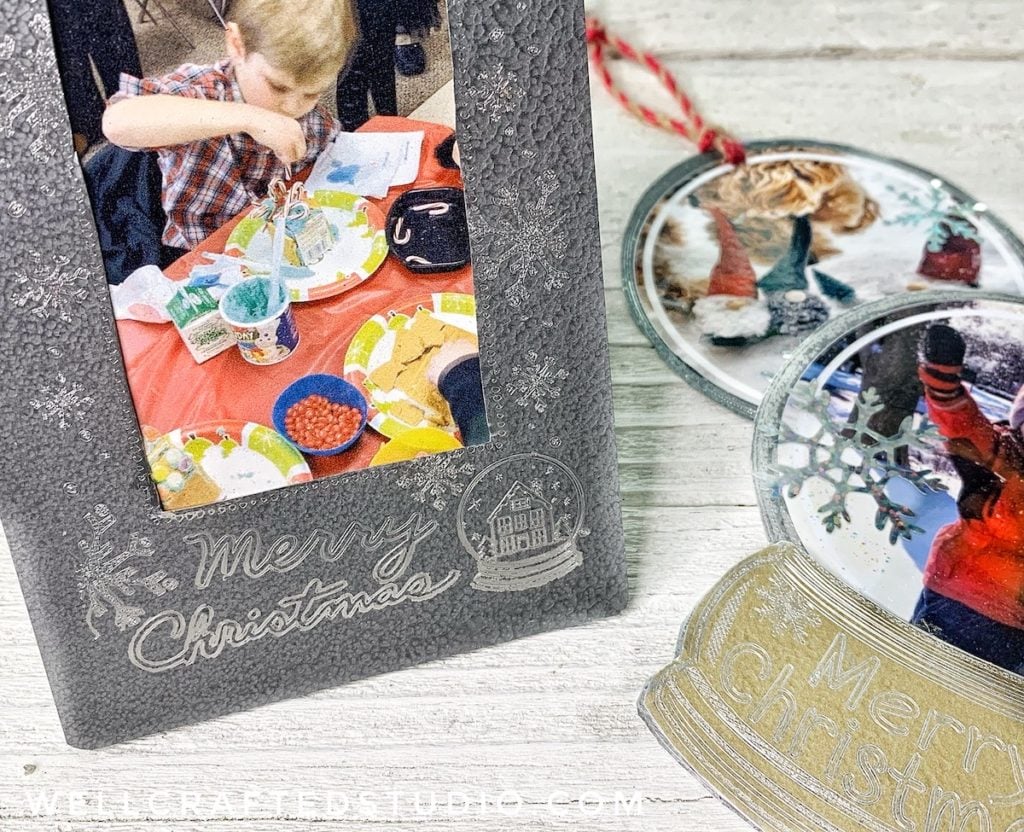
And it’s the PERFECT metal for my engraved holiday photo frames and ornaments! But there are some tips and tricks I wanted to share when you decide you want to spray paint metal for engraving.
Important Safety Tips for Handling the metal
I feel like I really need to call out that the metal IS sharp on the corners or jagged cuts. But if you round the corners and make sure the edges are flat (nothing curling up) then it’s safe to handle.
That’s why you need to be sure you round off corners and it’s important that you use flat nose pliers to flatten any edge that is curling up at all.
AND the little bits that you cut off ARE sharp so be careful that they don’t end up on the floor. DO NOT use your hand to clear off your work surface.
If you’re unsure about handling it before you’ve done either of these two things then you should wear safety gloves.
How to Spray Paint Metal for Engraving with a Cricut
Supply Links
- Aluminum Flashing Sheets (5″ x 7″) * (Important- Don’t get galvanized!)
- Aluminum Flashing 8″ Rolls *
- Rustoleum Hammered Metal Spray Paints
And here are the alternative supplies if you aren’t spray painting.
Directions
Step One: Prep the Metal by Cleaning It
Wash the aluminum with dish soap and water to cut through any oil on its surface. Then wipe it all with some isopropyl alcohol. This is important because the oil on the surface of the metal can prevent a good bond with the paint.

Step Two: Spray the Metal
Make sure you follow the instructions on the can. Use a mask, and spray outdoors. Cover it well, make sure you get the edges, and the optimal distance to spray seems to be about 18-24″ away. This is personal preference though, below you can see what the different textures look like on the metal when you vary the distance and amount of spray paint coverage.
Tip: The hammered texture is more apparent with a slightly heavier coat, try experimenting with this.

Step Three: Dry Time
Allow drying 12-18 hours approx. This does depend on the humidity, the heat, etc. I would suggest you spray a test piece and see how easily the paint scrapes off. You don’t want it to be super easy or you’ll get a chippy look when you engrave.

Step Four: Engrave the Metal
Important!!! Do not wait longer than 24-36 hours to engrave. The paint will bond to the metal within 48 hours. And if the bond is too strong then you’ll get poor engraving results just like when you engraved before it was dry enough. The engraving won’t look crisp, as too much paint will have come off.
Note: When this first happened to me I thought that my blade was dull. Not the case!
Step Five: Clean up Your Engraving and Your Cricut
Although you can do multiple passes with the Cricut when engraving through paint, you do NOT need to do more than two passes usually. When it finishes the engraving it may look like it didn’t engrave clearly but that may just be the debris that engraving through the paint leaves behind.
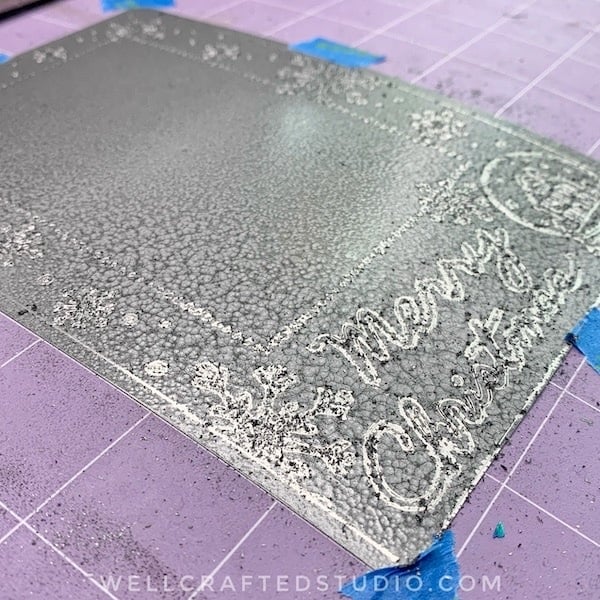
To remove the debris from your engraving you can either use the tape you held your object down with, or you can use a small paintbrush to brush it away.
The debris from engraving through the paint that you found on your metal sheet is also on your engraving tip and in the carriage of your machine. I keep a small paintbrush handy so I can easily clean it up.

Why this Method to Spray Paint Your Metal for Engraving is SO GOOD
When you spray paint metal for engraving with the Cricut you’re solving several problems. You’re making an inexpensive metal look great with different color options and texture.
AND your engraving designs are easier to see because engraving through the painting ups the contrast between the two. Y
ou also get the bonus of finding a really awesome, inexpensive, and easy to work with metal that will up your profit margins as well as the perceived value of your projects!
Although it can get a little tricky to get the timing right when engraving through spray paint, I think the finished results are well worth a little experimenting to get it to work for you. But remember, you can sub the anodized aluminum with gilder’s paste too.
An Alternative to Spray Painting the Metal for Engraving
While I really think you’ll love the results of this method for increasing the value and contrast of your project, I know there are some that don’t want (or can’t use) spray paint.
An alternative to spray painting is to wipe on the gilder’s paste and darken the inside of the design instead of the outside surface to create contrast. You can see that in the image below.

With the bee keychain below, you can purchase black anodized aluminum sheets and apply gilder’s paste to the surface for a similar-ish look. I’ll add a source for these into the links below!

What do you think? Are you willing to try to spray paint your metal for engraving?
I’d love to see what you make! Tag me on IG or FB with #wellcraftedstudio. And if you have any questions, I’d love to help. ❤️
Want More Info on Engraving Metals with Your Cricut Maker?
I have SO many posts! I’d love to have you check them out. Step-by-step tutorials demo how to engrave Stainless Steel Pie Servers, Cheese Spreaders, Cookie Spatulas, and more. Visit the posts for links to YouTube video tutorials on each as well.
AND the best resource I can recommend is my book, Engraving Metals with Your Cricut Maker. I wrote it to answer ALL your questions, to solve the common problems people experience, and to show you just how much is possible when you engrave with your Cricut!
Love this? Share it!
If you found this tutorial on how to spray paint metal for engraving with a Cricut Maker helpful then I would LOVE to have you share it or pin the image below. Thank you!!


