
Crafting for the holidays and seasons is one of my favorite ways to feel inspired. But I LOVE challenges too! And both of these led me to make a layered mandala egg. When I checked my texts yesterday morning I saw this from my friend Amy- “Hey! Wake up! Jennifer Maker wants you to make an egg mandala today.” Me- “What? Me?” Amy- “Yes you”.
It was a little out of the blue. But it was a legit challenge. Jennifer Maker planned to post a video tutorial on an egg mandala today and saw an awesome egg mandala design that my friend Maggie had posted in her Facebook group. SO TODAY she’s linking to BOTH Maggie’s Layered Egg Mandala and my mandala designs. Seriously, amazing. Which gives you the combined opportunity to make FOUR different layered designs.
Here’s the deal though, I had NO CLUE how to make a layered mandala. Zilch. Maggie talked me through it and even sent a rough video she’d made.
Cute little drawings are my jam so I opened up Procreate first and made some designs to work with. A bunny, carrot, egg, and Easter basket to inspire me. If you’d like to know more about drawing in Procreate I have some video tutorials.
Next, I opened up Affinity Designer for iPad and started to create the egg design. And then I spent another 4 hours trying to figure out how to make a layered mandala design. It wasn’t until about 9 pm AFTER I finished testing the image that I realized that it WASN’T A MANDALA.
Fail.
Challenges are amazing for pushing us out of our comfort zones. So this morning at 4 am I woke up with an idea of what a Bunny and Egg Mandala could look like.
I am thrilled to say that after I learned so much yesterday that today’s mandala design took WAY less time. And hopefully, you’ll love having TWO designs to play with. I walk you through how to cut the Bunny and Egg Mandala below, but the Happy Easter Layered Egg is almost the same process.

How to make the Bunny and Egg Mandala (+ Layered Egg Design)
Tools and Resources
- Bunny and Egg Mandala—- These are NOT zipped files. So when you click the link in the library it will open an image. That is the SVG file. Just save it as a download and you’ll be able to open it up in Cricut Design Space.
- Layered Egg Design– This is the design that Jennifer Maker demo’d today on her facebook live!
- Paper 12″ x 12″
- Cricut Cutting Machine (or Scissors to hand-cut)
- Fine Point Blade
- Light Blue Cutting Mat
- Foam Tape or Dots
Step One: Download the SVG Design to Your Computer or Tablet
Hop on the link above to get your free layered designs from my Creative Resource Library and download it to your computer. Click on the link in the library and it will open the file as an image. Then, you can left-click or double-click to download.
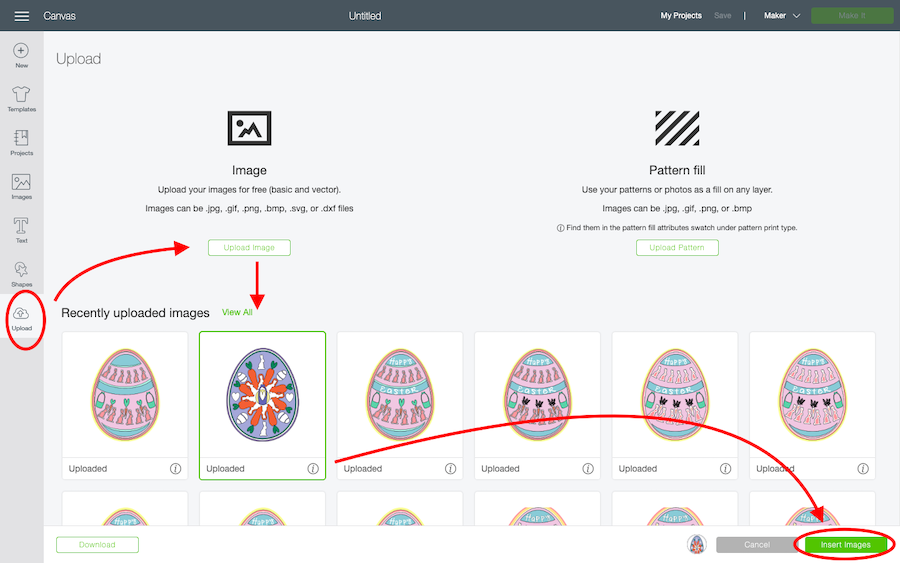
Step Two: Upload the SVG Design to Cricut Design Space
Then, open up a new canvas in Cricut Design Space and click on the Upload button. This opens up a window that asks you where you’d like to get your design. Choose files. Then, click on the Browse button to find your download. Once the image is saved to your Uploaded Images Page you can click on the image to select it and insert it into your canvas.
Step Three: Size the Design and Ungroup the Layers
Select the design and change the height in the toolbar to 11.5″ Or whatever size you’d like. If you’d like to make it from letter-sized cardstock then you would want to size it small enough to fit.
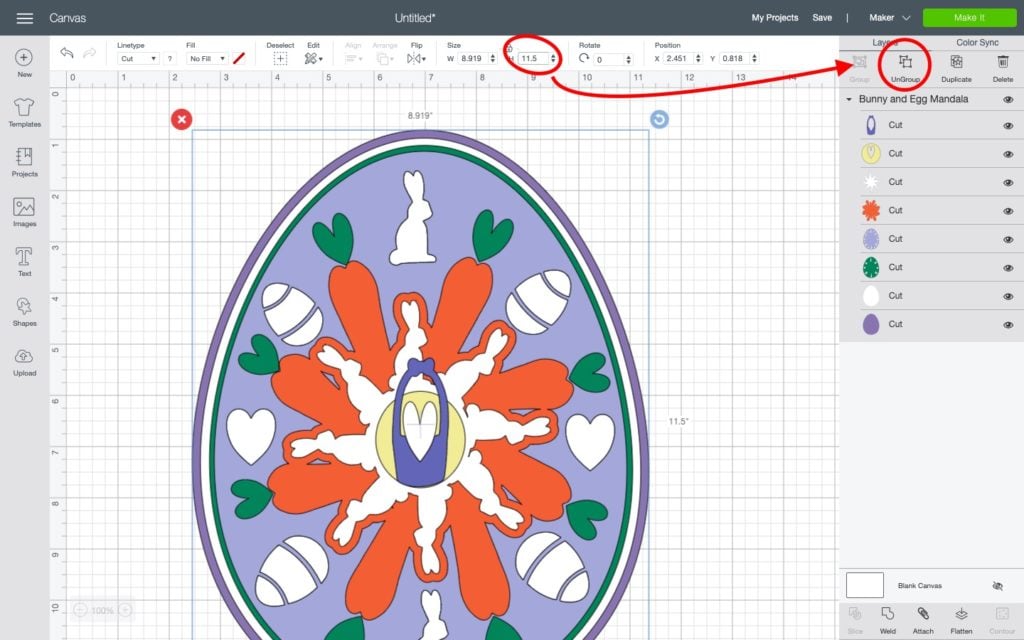
With the image still selected, hit the Ungroup button at the top of your Layers panel on the right side of your computer screen. This allows you to move the layers around and they’ll cut separately. You can also change the colors to match the paper you’ll be using. This really helps me when I’m loading my mats with paper before cutting.
Step Four: Synch the Colors
The design has three different purples. I only had two different purples so I decided to cut two of my shapes from the same piece of cardstock. To do this just click on the Color Synch tab in the Layers Panel. This shows you the colors each layer is. I clicked on the Easter Basket and dragged it over the last egg layer so that they’re now the same color.

Step Five: Save Project and Make it!
This is the fun part! Save the project if you’d like, and then hit the Make It button in the top right corner of the screen. This takes you to a page that has each mat laid out for you by color along the left hand side of your screen. If it all looks good press continue in the lower right corner.

Step Six: Select Your Material Setting
Choose the Material Setting that works best for your materials. For this project I was using 80 lb. colored cardstock so I used the Medium Cardstock setting.
Step Seven: Load Your Mat
On a light blue or green cutting mat position your paper as show on the screen. Press the load button on your machine, and then when prompted load your mats as shown.
Remove the extra material off your mat with each cut. I really love the Cricut spatula tool for this!
Step Eight: Assemble the Mandala Pieces

Using a glue stick or double stick tape adhere the layers together as shown. But what I used was a double sided foam tape. I love how much depth it gives my egg designs.
And Ta-da! That’s How You Make a Layered Mandala for Spring!
I hope you enjoyed this project. Don’t forget to check out the video and blog post on Jennifer Maker and grab Maggie’s amazing Layered Mandala too!

Love this? Share it!
If you found this helpful then I would LOVE to have you share it! Thanks for reading and if you need any help then I would love to talk with you!
Stay Crafty,

Want to Remember WHERE You Saw the Directions to Make this Cool Design? Pin it!


cant seem to find the svg for the mandala eggs
Hi Cindy! They are in the SVG section of my Free Library and titled Happy Easter Layered Egg and Bunny and Egg Layered Mandala.