Love Stickers? Then you may be a child of the ’80s. Stickers were legal tender in the elementary school classroom where kids would trade the really cool stickers for other stickers (or even lunch). Recently, I discovered some name stickers that I had squirreled away somewhere. The stickers feature unicorns and rainbows, and it took me back right to my childhood to see them again. And when I also happened on Silhouette’s new Holographic Dots sticker paper, I knew exactly what to do with it- make my own Personalized 80’s Name Stickers on Procreate! And with this tutorial, I’ll show you how easy it can be to create your own custom stickers with the FREE set of Procreate stamps I’ve created to make this easy for beginners. I hope you have fun with this flashback challenge!
This Procreate Sticker Tutorial will…
- Show you how to use Procreate’s QuickShape and Drawing Guide to make perfectly straight and custom-sized shapes.
- Use the Transform Tools with QuickShape to make Rainbows and butterflies.
- How to use the Automatic Selection tool to quickly fill in areas of your drawing like magic ✨.
- Add Text and shape it- so you can make stickers with YOUR name on them.
- Organize and Group Layers like a pro.
Like Easy? Get the Stamps Set!
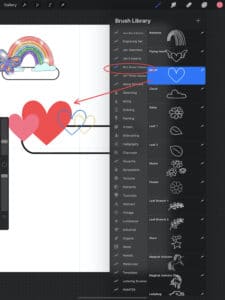
Get the FREE 80’s Sticker Stamp Procreate Brushset in my Free Library! This stamp set is a free download of digital brushes that will do the drawing for you.
You can also grab other Free resources like my Procreate Sticker Border Brush and the Procreate Color Palette I used for these stickers. All free for my email subs! So sign up today in the sidebar!
Watch the YouTube Video!
If you prefer video tutorials, I do have one for this post. You can check out this step-by-step guide on How to Make Retro 80’s Name Stickers in Procreate on my Well Crafted Studio YouTube Channel below!
Want to Print then Cut Your Stickers?
Because the Holographic and Iridescent Sticker Papers are so glossy and reflective, the Print then Cut Sensor doesn’t always register the registration box. I have a post on How to use the Silhouette Sticker Papers with a Cricut that includes a couple of hacks that you can use with shiny sticker papers as well as the custom material settings you’ll want to know before you print and cut.

How to Make Retro 80’s Name Stickers in Procreate
Get the Free Download from My FREE Resource Library:
- A Free 80’s Sticker Stamp Brushset for Procreate
- Free Sticker Border Procreate Brush
- A Free Solid Ink Procreate Brush
- And the Free Procreate Palette for these Retro 80’s Stickers
What I Use:
- Procreate App (under $10 in Apple App Store) Not available for Android but you can try something from this list or try Adobe Fresco.
- iPad Pro 12.9 (2019) or iPad 10.2 or newer*
- Apple Pencil, Second Generation (optional- you can just use your finger too.)
- PaperFeel Screen Protector- I love this just because it reduces my hand strain bc the added friction of the screen keeps my stylus from sliding. It also gives me a more natural stroke so that drawing on my iPad feels like drawing in my sketchbook. It’s so awesome!
If you’d like to get the Holographic Dots Sticker Paper or the Iridescent Sticker Paper you can find them on Amazon or at your local craft store. You can see the post on how to use this with a Cricut here.
*Find out which iPads are compatible with this list.
Directions
Step One: Open a Custom Canvas on Procreate
In the Gallery, the top right of your screen will give you canvas options. Use the + to create a new canvas. I like to make one for my Cricut Stickers that is 6.75″ x 9.25″ because that’s the largest size you can Print then Cut with a Cricut. Set the dpi @ 300 and title Cricut Stickers and you’re done!
Step Two: Use Quickshape to Make the Oval for the Name
QuickShape means that you create a line or a shape and if you don’t lift your stylus off the screen it will correct the lines to create a perfect shape. Then at the top of the screen, you’ll have the option to edit the shape.
In the top toolbar, under the wrench icon, select Canvas. Then, from the drop-down menu toggle on the Drawing Guide and then edit the Drawing Guide to 2D (see below). Move the grid size to max. (Procreate has an option where you can tap the screen to get your line to snap to the horizontal but it’s not always accurate. This drawing guide method is!
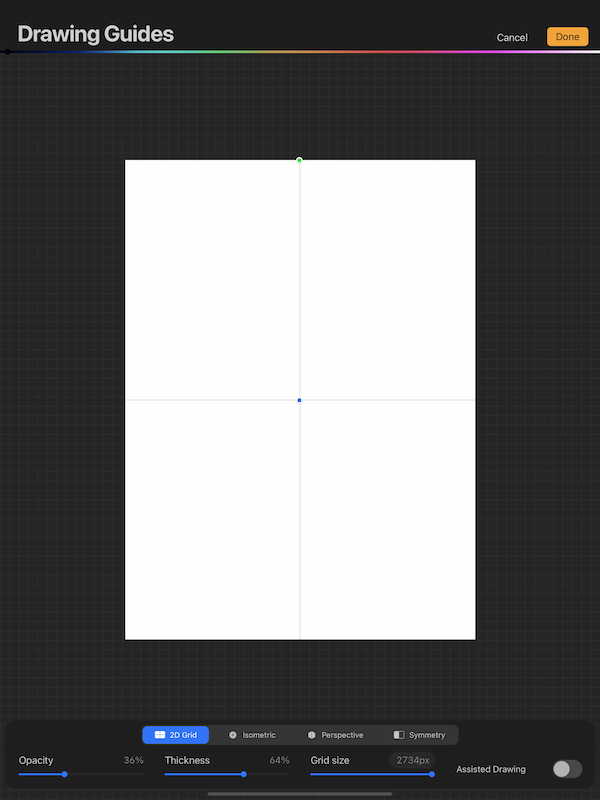
Choose Done, and then back on your canvas, create a line. On a new layer, Duplicate the line and move below the first, to the width desired for your oval.
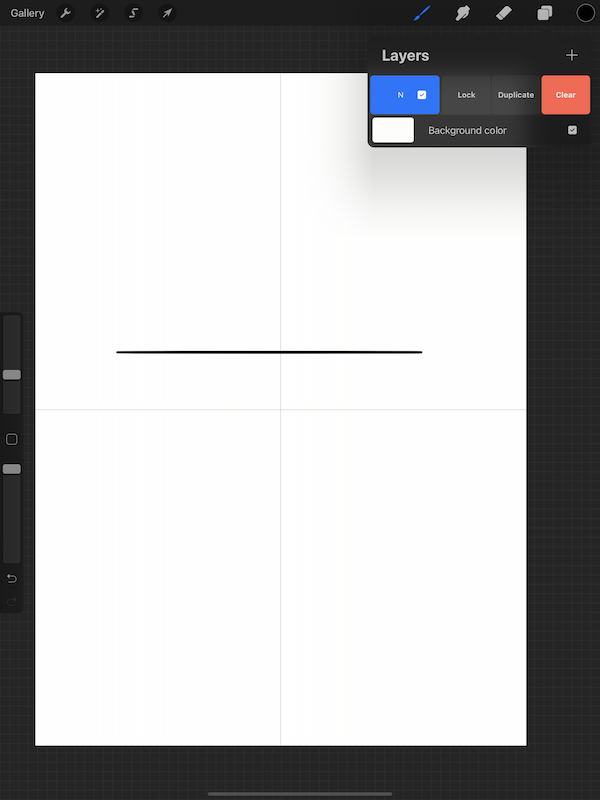
Then in the top right corner of the screen, you’ll see the layers icon (two overlapping boxes) and tap on it to create a new layer. Then draw an oval (ellipse), and keep the stylus down until QuickShape is turned on. Then move the blue nodes to align the oval with your lines. You can see this in the image below.
Go back to one of your line layers and select the line, and with Snapping/Magnetic turned on it will be a breeze to select the line and move it to perfectly connect to your ellipse shape. Erase the circle where it’s not needed. Combine all three layers.

Duplicate the layer twice and then select one layer and in the Transform Panel choose Flip Horizontally. Slide across to the length you want for your largest shape. Merge the layers and rename Large oval. Repeat for medium and small shapes.
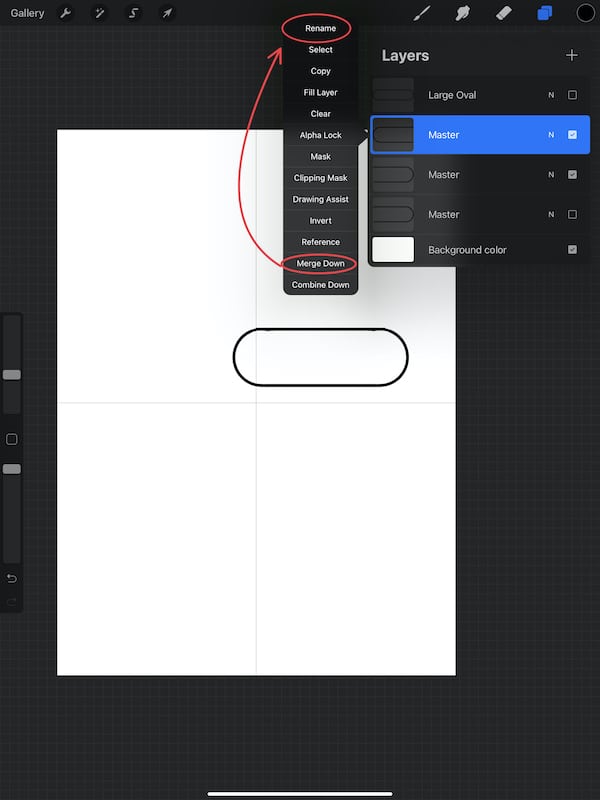
Group the 3 oval shapes by sliding right on each layer to select, then Group. Rename this group Original Shapes.

Duplicate the large oval and move out of the group then click off the visibility of the group so it doesn’t distract from what you’re working on.
Step Three: Draw the First Sticker
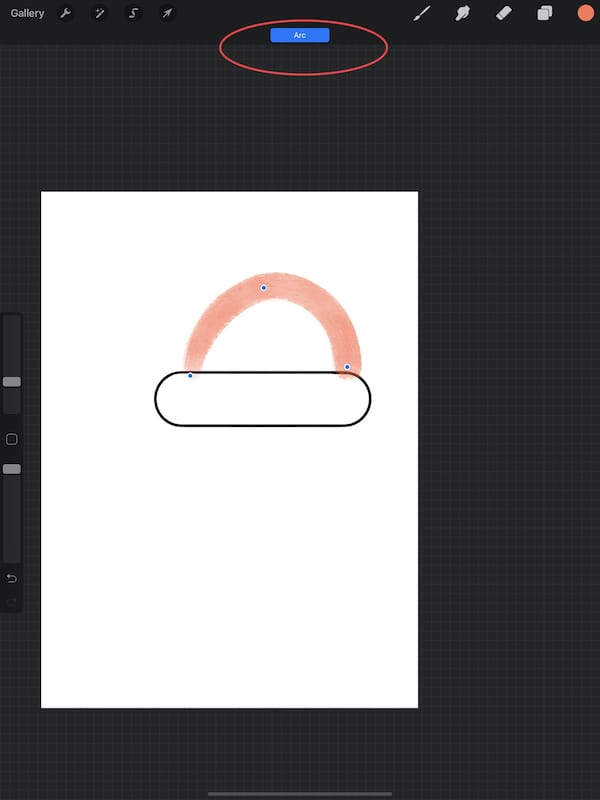
With a gouache brush and using the color palette, create an arch keeping the tip of your stylus on your screen so it creates a QuickShape arch or ellipse. Repeat with the other colors of the rainbow, adjusting the nodes (blue dots) as you go.
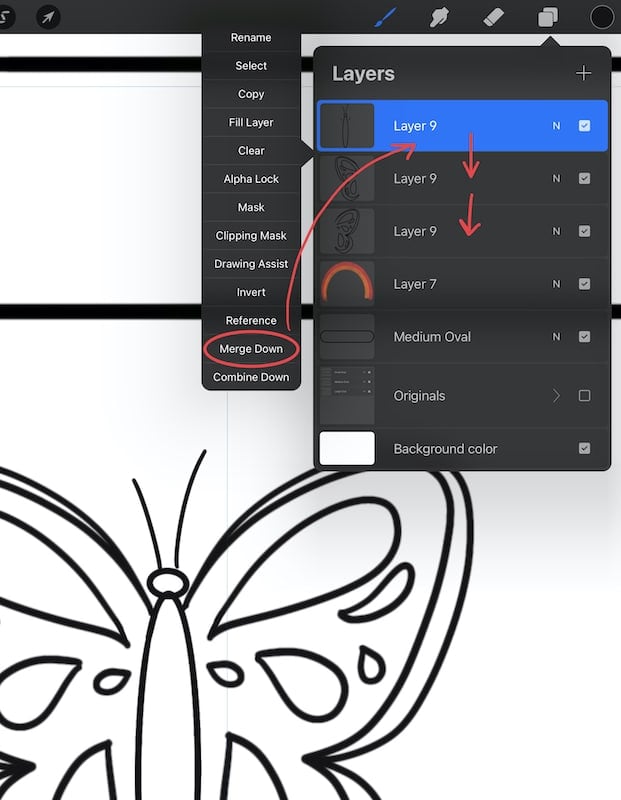
Use a monoline brush or my FREE Solid Ink Brush (free in my Free Library). Draw one of the butterfly wings, and then Duplicate the layer.

With the layer selected, touch the Transform arrow in the top toolbar. In the Transform panel flip the layer horizontally. Slide two wings together and on a new layer create the body of the butterfly. When it all looks good, merge the three layers.
To fill in the butterfly quickly, tap the Selection (ribbon) icon in the top toolbar. In the Selection panel choose Automatic Selection. Then tap on the parts of the butterfly you’d like to fill in (they’ll turn blue). Then go up and tap the Brush Icon without deselecting.
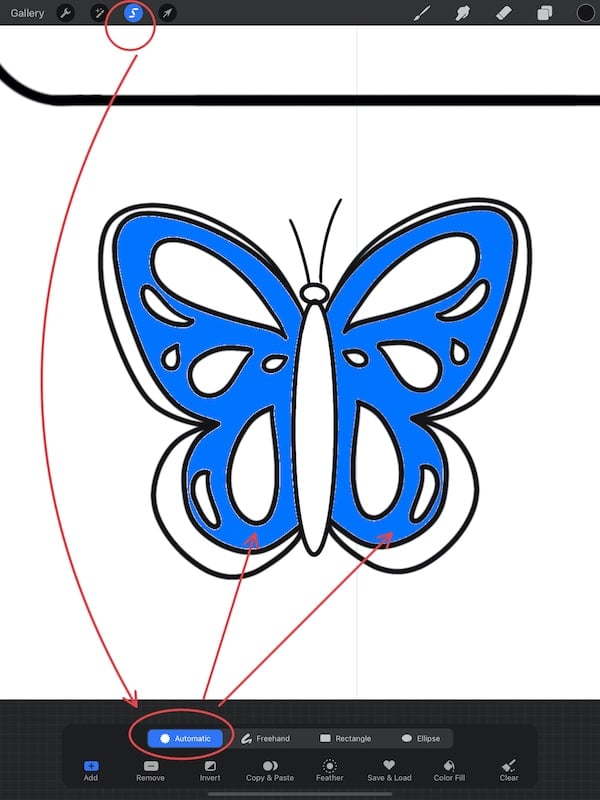
In the Layers Panel, create a new layer for your color. Using a gouache brush, fill in the selected parts of your butterfly. Repeat for the other areas and other colors. When you’re happy with the results you may want to move the ink layer above the color layer to see the crisp black outline of your design.
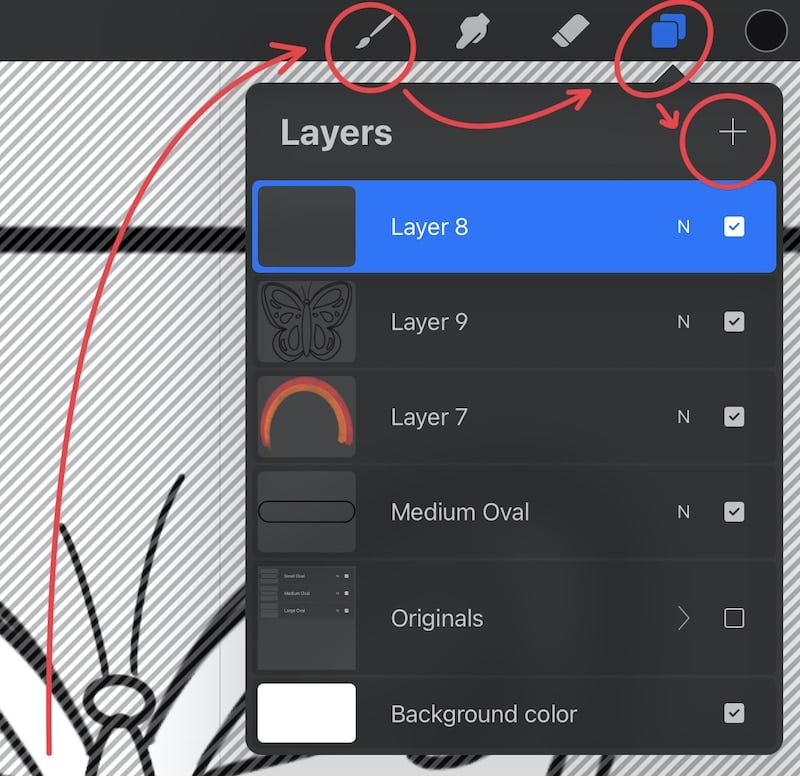
Create a new layer for the sparkles. And using the glitter or the flare brushes in the Luminance Brushset (native to Procreate) add some magical sparkles to your design.

At this point you should have-
- The Sparkle Layer
- An Ink Layer
- The Color Layer
- The Name Oval
- And the Group of Master (Original) Shapes
Repeat for the rest of the stickers on your sticker sheet. Play around with the look of your sticker sheet, but remember to allow room for the white outline that you’ll add as the cut shape for your stickers.
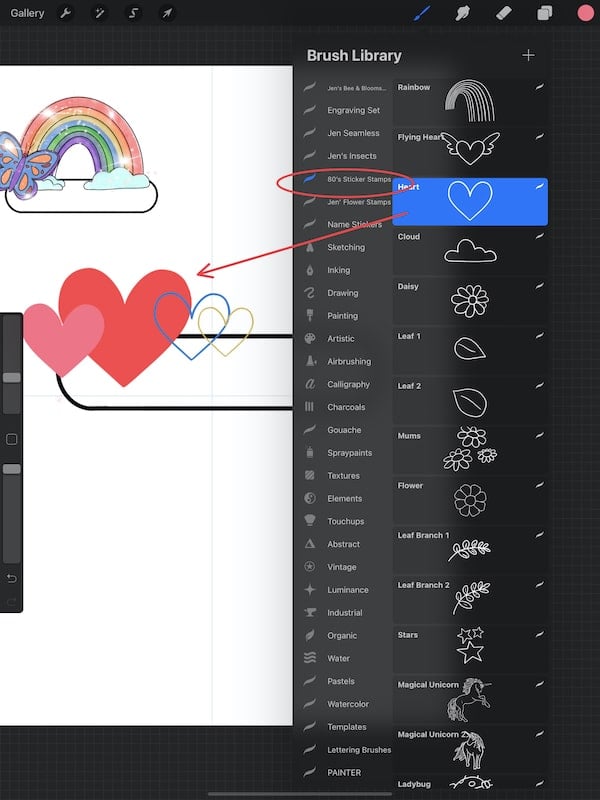
Don’t Forget the BONUS FREE 80’s Sticker Stamp Set: IF you would like to follow the same prompt that I did and base your sticker designs on the retro 80’s stickers I have a pic of the vintage stickers above. And you may want to use the FREE 80’s Sticker Stamp Set for Procreate that I have in my Free Library. Just click to download and save to your files. It will automatically import and open in Procreate when you tap on it in your files.
Step Four: Grouping Layers and Renaming them
Slide right on the first 4 layers (all except the Master Shapes) and Group. Tap the Group layer and Rename with your sticker name.

Organizational Tip- Arrange the stickers on the sheet and then reorder the groups by moving them in the Layers panel.
Step Five: Adding Text* and Shaping it
Under the wrench tool in the top toolbar and then choose Add Text.

Type the text you want and then in the Font Panel, change the font, size, and kerning (this is the distance between the letters). Duplicate the text layer for as many stickers as you have. Then move each text layer to each one of the stickers. Play with the fonts for each!

To warp or distort the text you can use the Transform tool and then choose the action. For warp, you can also use the Advanced Mesh to get super funky results. This is seriously a BLAST.
Note: Using the Transform tools with the text changes it from an editable text layer to a raster layer. So if you’d like to play it safe you can duplicate your text layer and play on the duplicate.
*Text can be added in Cricut Design Space, but in Procreate you have the option to transform your text and get funky with clipping masks as well. Try adding a clipping mask layer of glitter for instance and make your names sparkle!
Step Six: Adding the White Border Outline
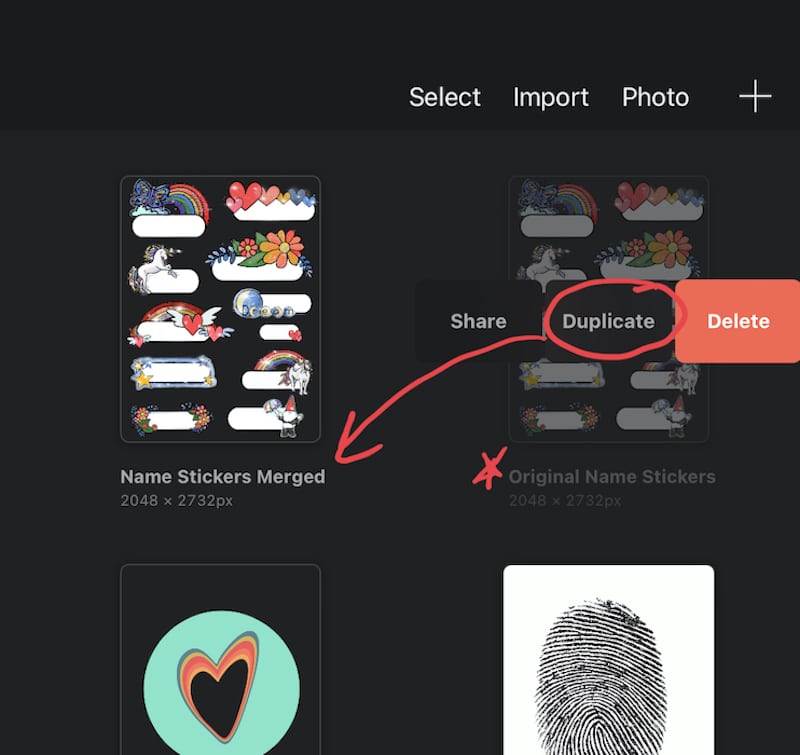
In the Gallery, rename your sticker canvas Original Canvas, then Duplicate it. Rename the duplicate canvas and in that canvas merge all your sticker layers. If you’d like a version that doesn’t have the names be sure to keep the name text on a separate layer that you can uncheck before you export.
Option 1- See video or post on How to Add Borders to Stickers- Super Fast for this method using the Automatic Selection tool.
With this tip, there is a high likelihood you’ll have to clean up the extra Gaussian blur from creating the white background and maybe some spray sparkles. To do this quickly make sure you check out my quick clean-up hack in the post I just linked to!
Option 2- Or for the traditional method I’ve used check out my post on How to Trace Photos for Stickers in Procreate.
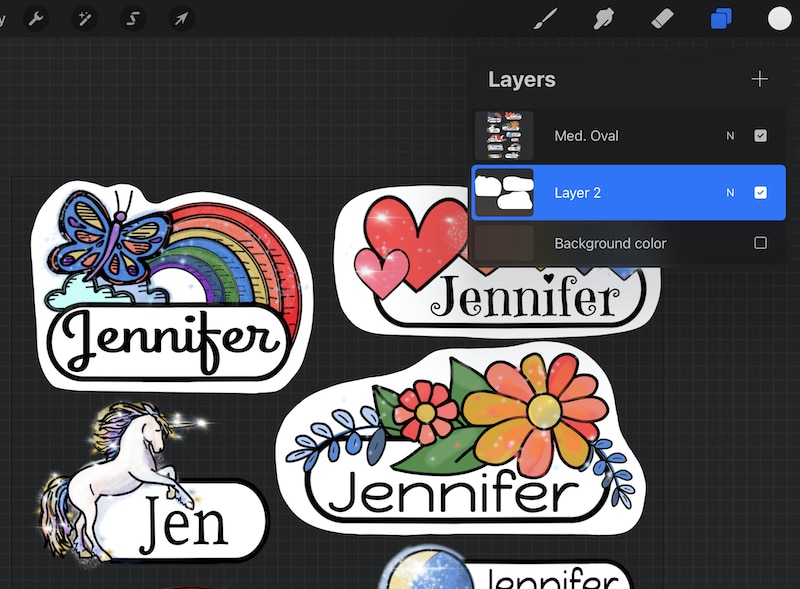
And remember you can get the free Procreate Sticker Border Brush from my Free Library. This is the brush I created for my own use that is streamlined, doesn’t taper, and has a hard edge so there are no extra pixels that need to be removed later.
Step Seven: Export the Design
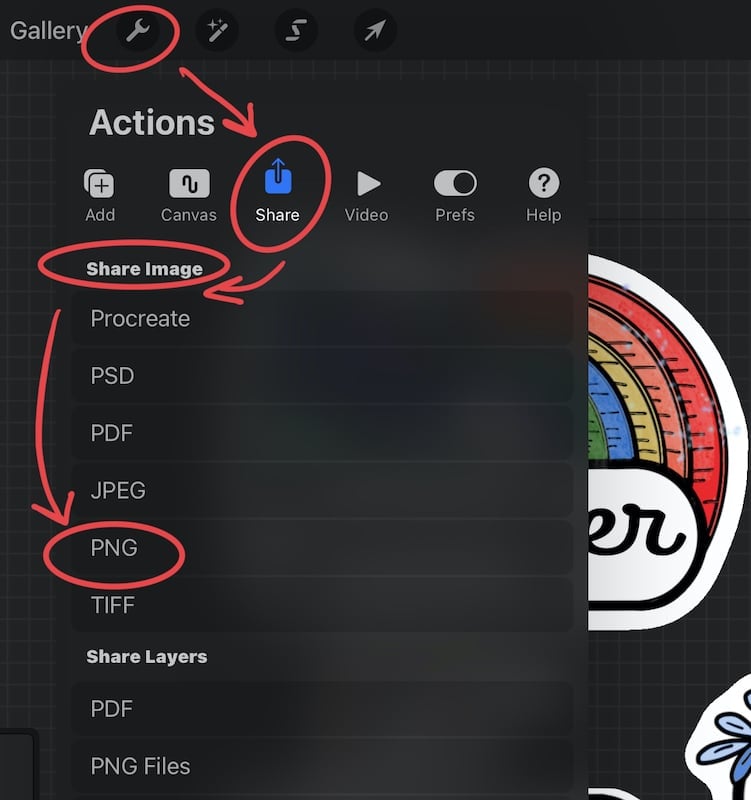
To Export your sticker sheet, you need to make sure your Background Layer in the Layers Panel is clicked off. Then go to the wrench icon in the top toolbar and tap the Share icon. Then under Share Image in the drop-down menu choose PNG. Save to your photo library or go ahead and airdrop to your desktop.
And That’s It! You’re Ready to Print then Cut Your Stickers!

You can stick with the digital version of these stickers for digital planner stickers. I would still add the white background first though.
OR you can print then cut the stickers on a Cricut with my post, How to Print then Cut Stickers with a Cricut.
BUT if you’d like to use the Silhouette Holographic Dots Sticker Paper or the Iridescent Sticker Paper then you’ll want to make sure you watch for my tutorial on How to Print then Cut on Glossy, Holographic, or Shiny Sticker Paper. There is a trick to getting your Print then Cut Sensor to work with these papers and I show you what it is in this post!
Love this? Share it!
If you found this tutorial helpful I’d love to have you pin the image below, or share it on social media! For Instagram use the #wellcraftedstudio and I’ll be sure to see it. OR you can comment below!
Stay Crafty,
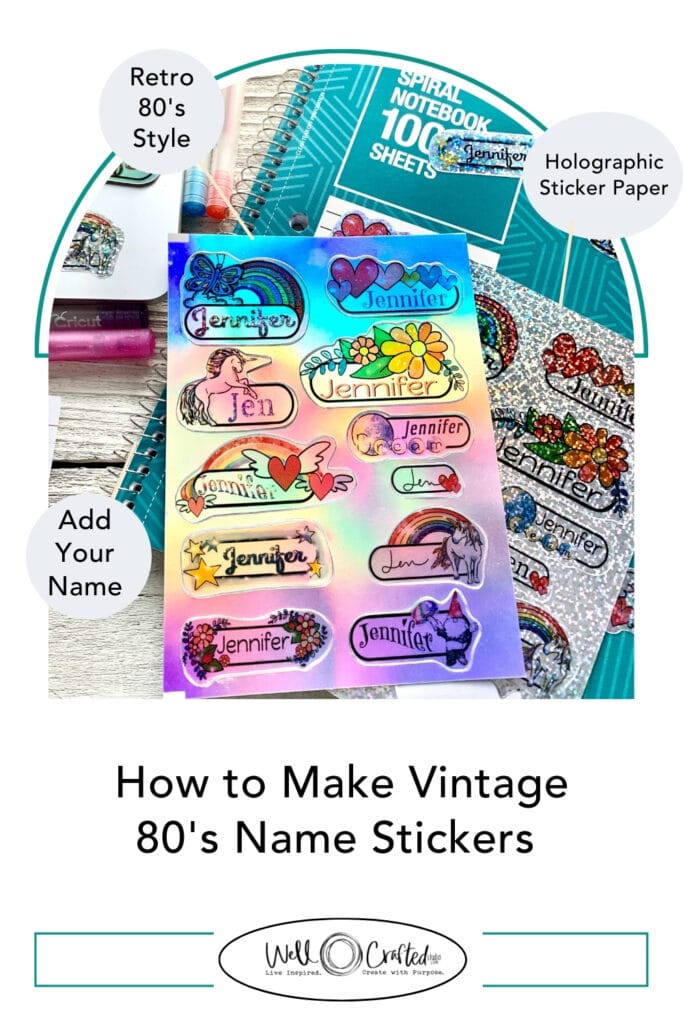
Want to Remember this post on How to Make Retro 80’s Name Stickers on Procreate? Pin the photo below! Thanks!



![How to Draw Snowflakes in Procreate [Symmetry Tool]](https://wellcraftedstudio.com/wp-content/uploads/2019/11/How-to-Draw-Snowflakes-square-1024x1024.jpg)

