It may be the mad scientist in me, but I love to experiment with art and craft supplies. “Will it blend?” sort of questions are totally my jam. But instead of throwing sneakers in a Vitamix for fun, it’s more along the lines of what bonds metal and wood or what paint adheres to plastic. Adhesives? Love them. “What if” and “what’s possible” are two of my favorite questions to ask. So when the Engraving Tool came out for the Cricut Maker, my mad scientist took over. The results? This tutorial, How to Engrave Spoon Bookmarks with a Cricut Maker is one of my experiments with alternative engraving surfaces. I hope you’re as amazed as I am and as excited by the possibilities!
Note: This post was written in 2020 and has been updated for 2022.
No Cricut? No problem- you can use the same metal stamping techniques from my last project post, How to Make Key Necklaces to create these bookmarks I have a photo of how that looks at the bottom of this post.
Rather Watch than Read? Watch the YouTube Video!
Get the Free Downloads with the links in the Tools and Materials section below!
Experimenting= Trial and Error
I love vintage, and creating with vintage is a great way to repurpose items from the past. So I’ve hand-stamped spoons, forks, and knives for a few years now. And have made them into everything from rings and bracelets to windchimes. However, much like I found that I could deboss my leather cuffs instead of stamping them using the Cricut Debossing Tip, I found I could engrave my spoon bookmarks with the Cricut Engraving
Where to find Silverplate Flatware
Over the years, I’ve sourced my silverplate flatware from friends, garage sales, thrift stores, flea markets, Craig’s List, and eBay. Of them, eBay was by far the most convenient and I could usually find the specific styles of flatware I wanted (I never knew what I would find at the other places). I could also purchase mixed bulk lots pretty cheap. Just make sure if you purchase that you’re not buying stainless steel which is will not work for this project.
Flattening your Spoons for Engraving with Cricut
To prep your silverplate spoons for engraving, you first need to flatten your spoons. For years I used the “wrap it in a cloth and beat it with a mallet” flattening technique. I did try to come up with other methods to flatten them. (Including putting them between two boards and running over them with my car).
But unless you’re creating these in bulk the old tried and true method of pounding them flat works great. Rather than showing you that in my video, however, I’m just going to point you to a video on YouTube that I think does an excellent job demo-ing it.
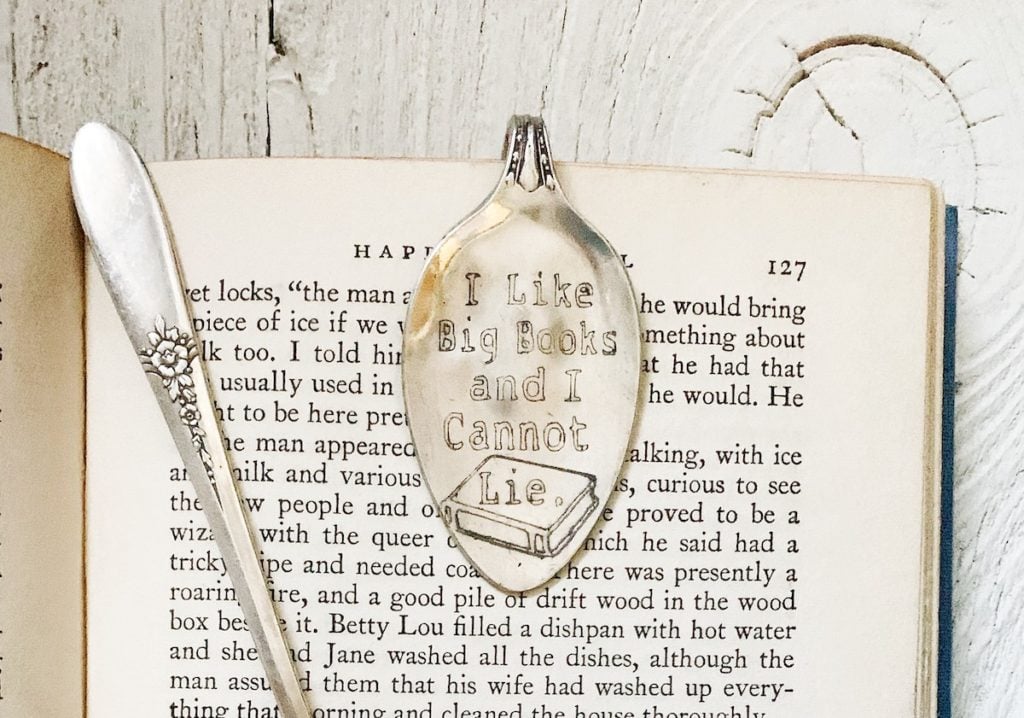
Note: There are some other basic tools needed for this tutorial on how to engrave spoons to make bookmarks project, but none of them are crazy rare or expensive. I purchased many of the tools at Harbor Freight very inexpensively. I’ll post links for either Harbor Freight or Amazon to the products below (because who wouldn’t want to get an anvil with two-day shipping, right)?
What’s Been Edited for 2022
This was my VERY FIRST Engraving tutorial. Ever. And since then I’ve learned a lot about adding line fill, positioning your handle off the edge of the mat, and more.
I also updated the original lined design to have a line fill added that looks pretty darn awesome (see pic below). ALSO- my friend Karen Lentz, of ExceLentz Designs has added some of her bookmark engraving designs to my Free Library as well! Have fun!
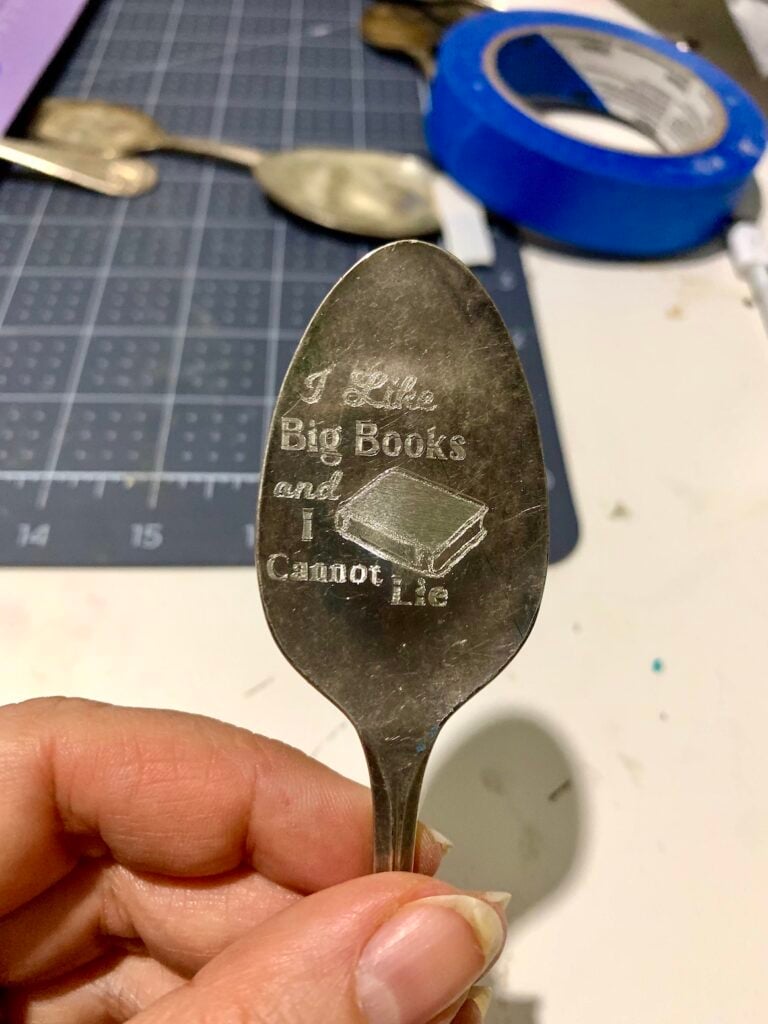
How to Engrave Spoon Bookmarks with a Cricut
Tools and Materials
Free Downloads
- Spoon Centering Template (free in my Creative Resource Library).
- Silverplate Spoon PDF
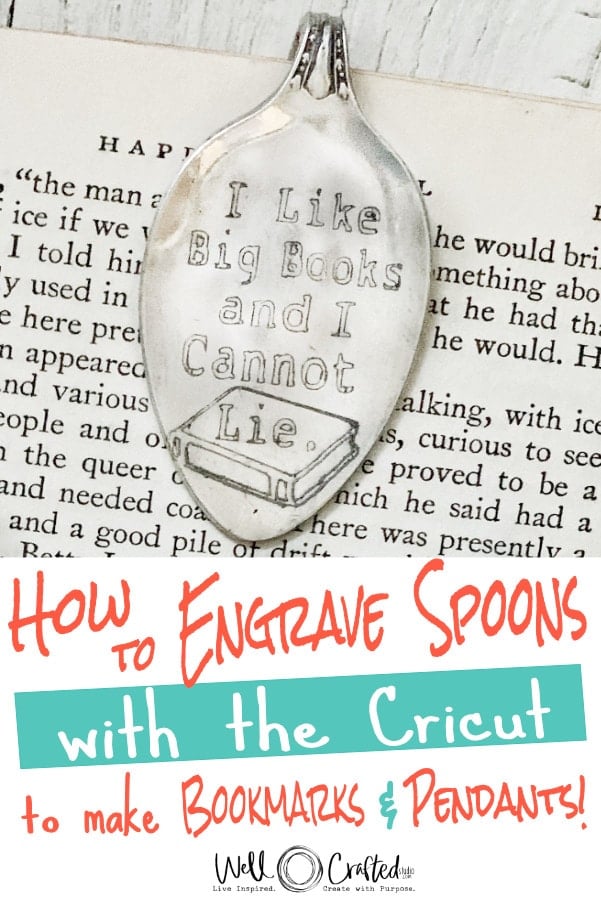
- I Like Big Books Engraving Design or the UPDATED (2022) I Like Big Books Engraving Design that has line fill added
- Flattened Silver Plate Spoon (not stainless steel and see this video to flatten).
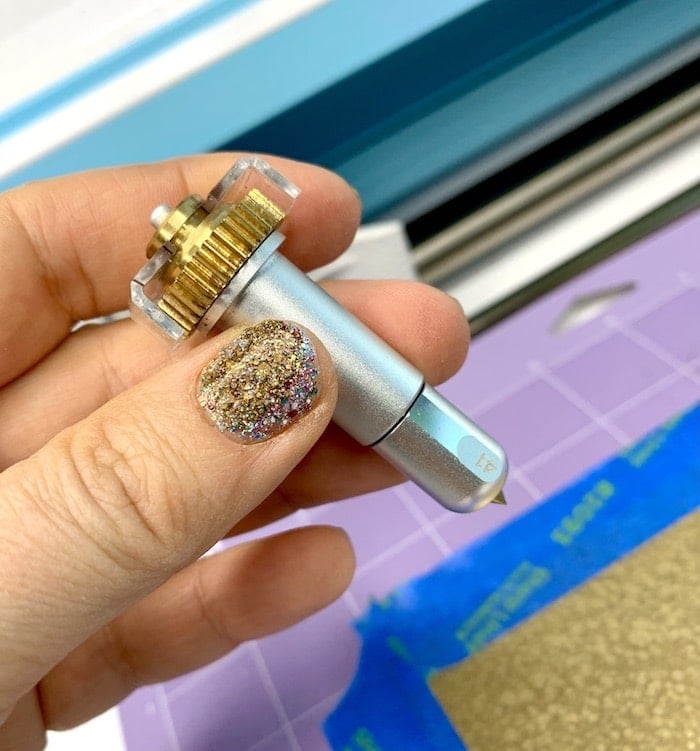
- Cricut Maker with Engraving Tip (with housing or the tip if you already have the quick swap housing)
- Purple Strong Grip Mat
- Masking or Painters Tape
- Impressart Enamel Pen (with a paper towel)
- Bolt Cutters
- Mini grinder, rotary tool, or metal files
- Anvil or Metal Block
- Ballpeen Headed Small Hammer
- Pliers
- Polishing wheel and bars (optional).
- Twine (if you’d like to turn it into an ornament).
This post contains affiliate links. Thank you for supporting my small business.
Directions
Step One: Get the Spoon Template and the PDF Template, then upload in Design Space
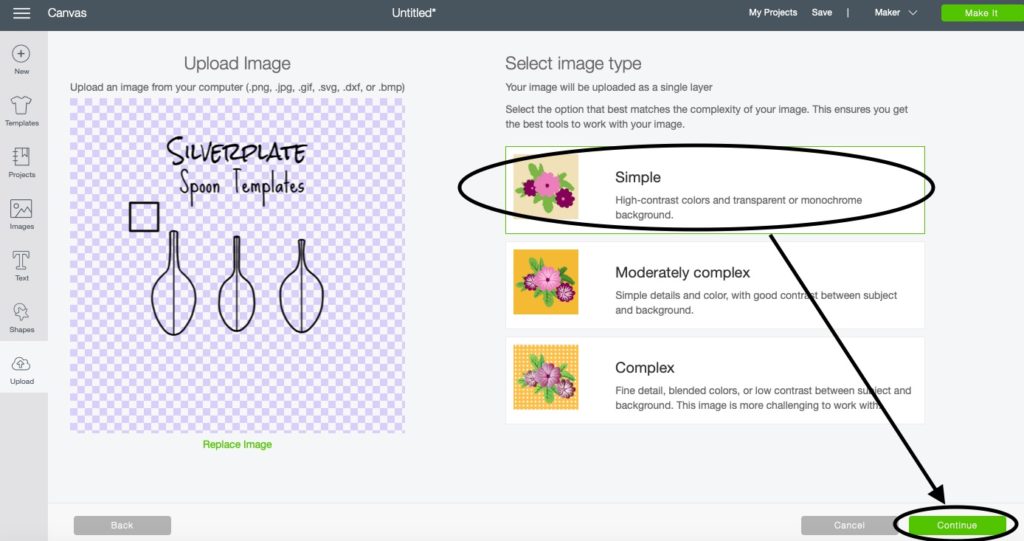
All files listed are FREE downloads from my Creative Resource Library. I’d love to have you subscribe and grab them! Download the Silverplate Spoon Template .png file and the Silverplate Spoon PDF from my Creative Resource Library.
Upload the .png file to Cricut Design Space by opening a new canvas and then touching the “upload” icon in the toolbar on the right side. This will prompt you to “browse” which then will allow you to upload your image. Because it is a .png file you’ll have to process it as an image file. Just choose “Simple” then “Continue”.
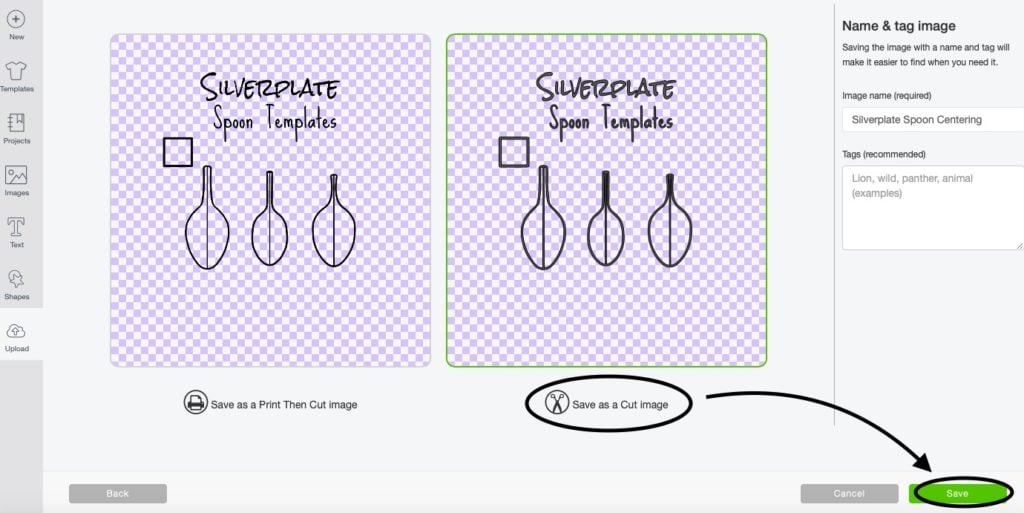
On the next screen choose Continue again, then on the next screen choose Save as Cut Image. The image will then be uploaded to your uploaded images page.
Step Two: Insert the Template into your Canvas
Choose the template from your uploaded images and click on Insert images to upload it to your canvas.
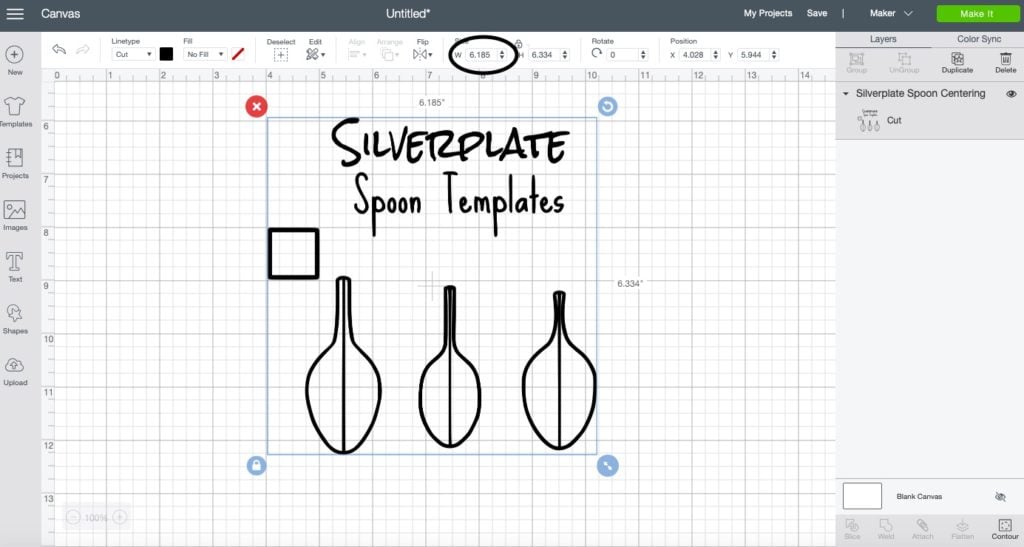
Step Three: Size the Template
Match the small 1″ x 1″ square to a 1″ x 1″ square on the canvas. Decide which spoon drawing on the template most closely resembles the size and shape of your spoon.
Which flattened spoon shape matches yours the best? You don’t have to guess! You can print out the PDF that I provide in the Creative Resource Library as a cheat sheet that you can lay your spoon flat on top of.
The image you choose will be the image you align your text to in Design Space.
Step Four: Insert your Text
Open up a new canvas in Cricut Design Space. I do have the “I Like Big
Edited to Add 2022: I do have a new I Like Big Books Design with a line fill added. You can see it in my Free Library. I also have a post on How to Use Offset to Add Line Fill in Cricut Design Space that works great if you want to add your own text.
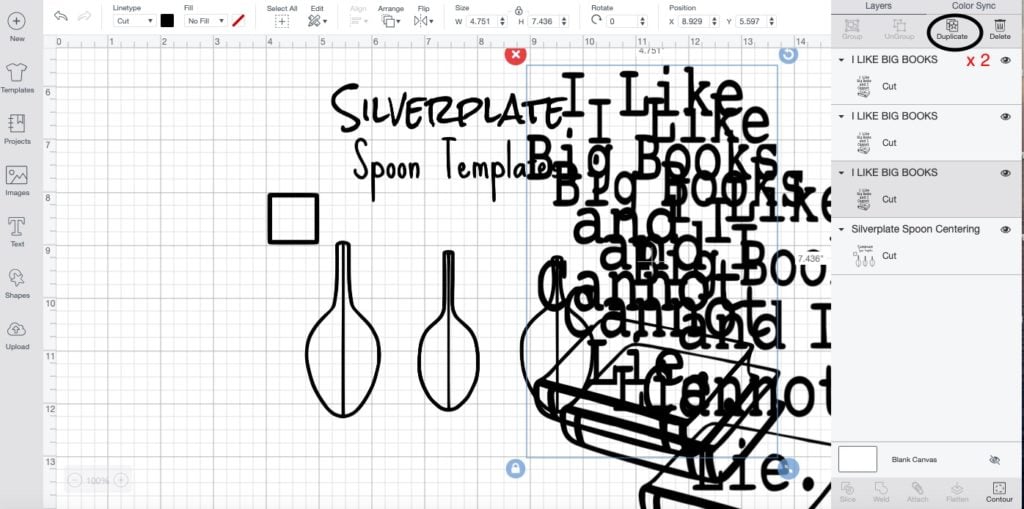
Step Five: Duplicate, Align Center, and Attach
To engrave a little deeper, I duplicate my text 2x and then stack them on top of each other by using Select all and using the center align feature in Design Space. Then, Attach all.
Note: I do NOT do this if the design has a line fill added as it isn’t necessary to make the design more visible. It already shows up great. So for the 2019 engraving design, I do this, but for the 2022 design, I do not.
Step Six: Size your Text
Using the Template size your text so that it fits within the spoon image and is centered. Take note of how it lines up. For instance, in my example, the “B” in books has the centerline running right through it. This is just a way to remember later how you had it lined up.
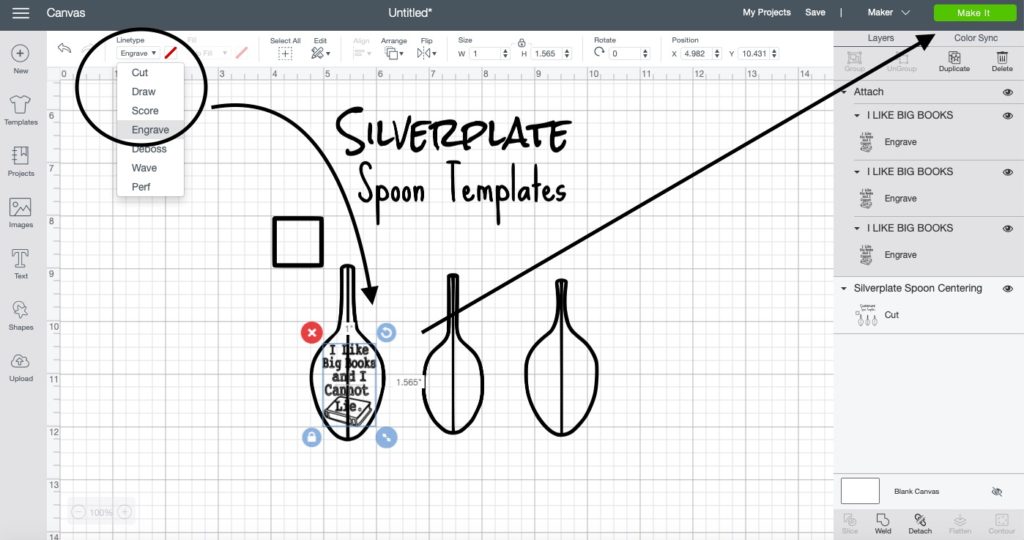
Step Seven: Change the Operation to Engrave
With the text selected, go to the Operation and change it to Engrave.
You may see a pop-up that says that there are no engraving qualities. If you do, just ignore this and continue on. And if Engraving isn’t an option at all you may have to check that your machine choice is Maker and not Explore.
Save your project if you want to and then click the Make it button. This will take you to a screen with a mat where you can position your images.
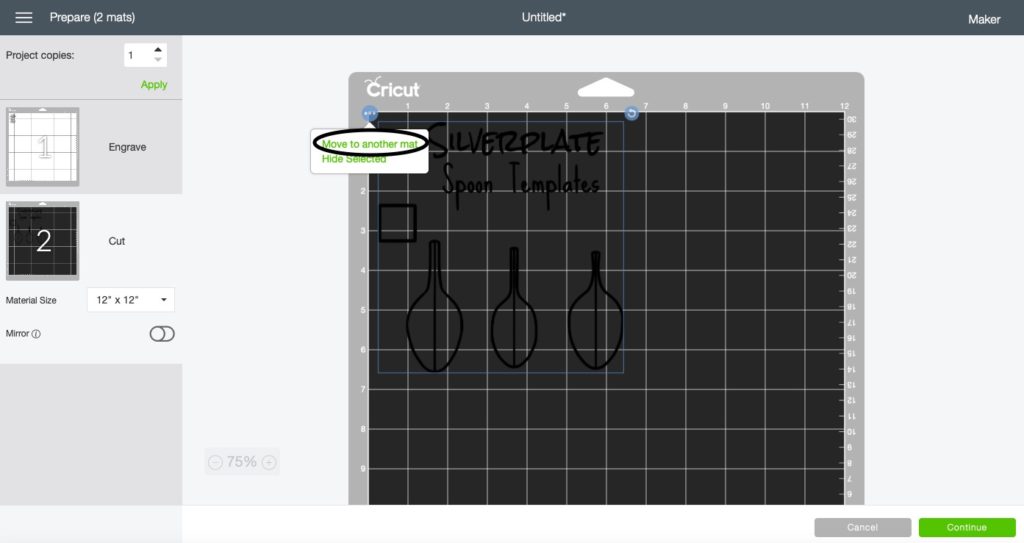
Step Eight: Get Both Images on the Same Mat
Select the image on mat 2 and click on the three dots in the upper left-hand corner. This will give you the option to move it to another mat. Choose mat 1 and continue.
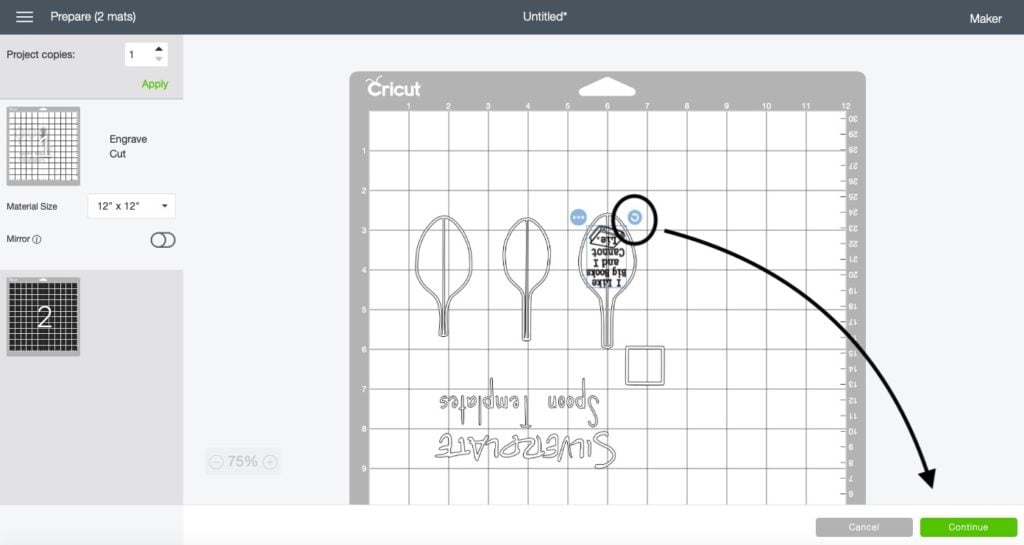
Step Eight: Rotate your Images and then Align
Rotate the designs so that they are upside down by selecting them and using the green arrow handle. Make sure they are straight.
Problem: The handle of the spoon often sticks up slightly no matter how flat much you flatten the bowl of the spoon. Solution: By positioning the spoon upside down (as shown) the handle is less apt to shift position or potentially catch.
Then align the template so that the spoon image that most closely matches your spoon, is aligned on the center line and placed in the middle of your mat. Position the text image in the center of it.
EDITED to Add 2022- This was my FIRST engraving tutorial and after this, I realized I could engrave at the bottom of the mat with the handle hanging off the edge of the mat. This means the handle doesn’t have to go under the rollers. You can see how this looks in the image below.
Step Eleven: Tape the Spoon to your Mat
Position your spoon on the purple strong grip mat so that it matches the placement on the screen. Tape it down on all sides with blue painter’s tape. Make sure you press down on both the tape and the spoon, so you have strong adhesion.
Tip– If your mat is older I recommend even putting a piece of double-stick tape under the flattened part of the spoon to keep it securely in place.
Remember, it’s a good idea to position your spoon upside down at the bottom of the mat with the handle hanging off the bottom.
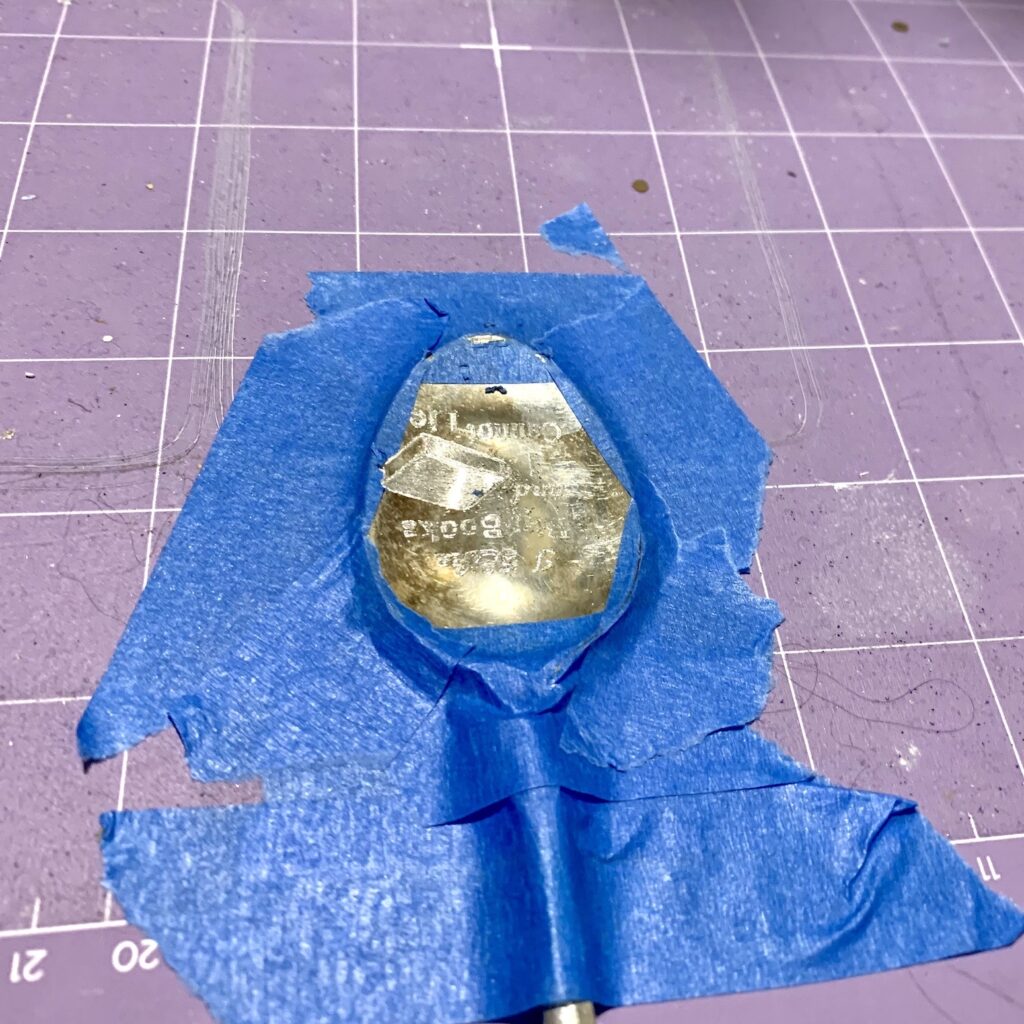
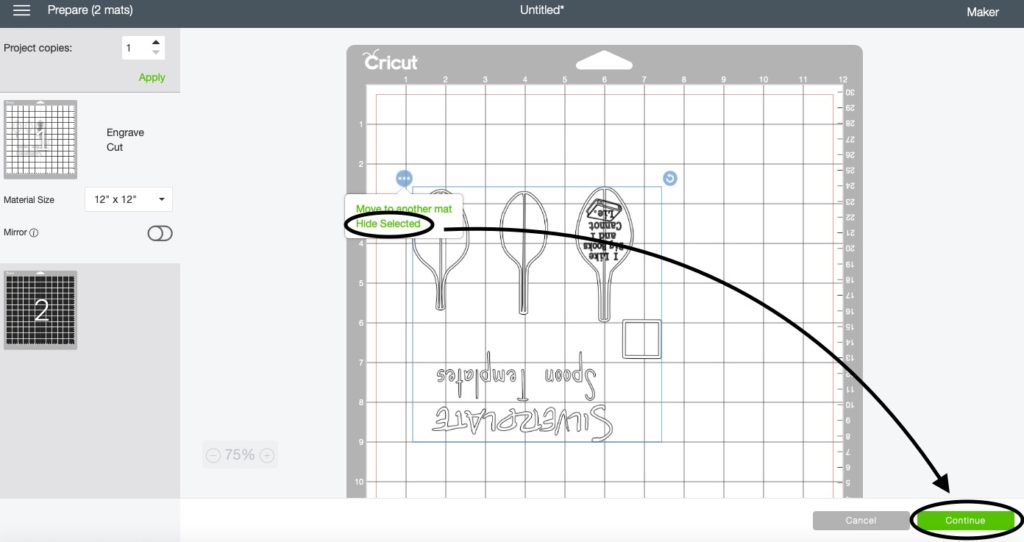
Step Twelve: Double Check your Placement and Hide the Template
On the screen, double-check that your spoon’s position on the mat matches the position of the image on the screen. Make any necessary adjustments.
Select the template only and then the three dots in the upper left corner. Choose “Hide Selected.” This will make the template disappear from the mat. Choose the “Continue” button on the lower-left corner of the screen.
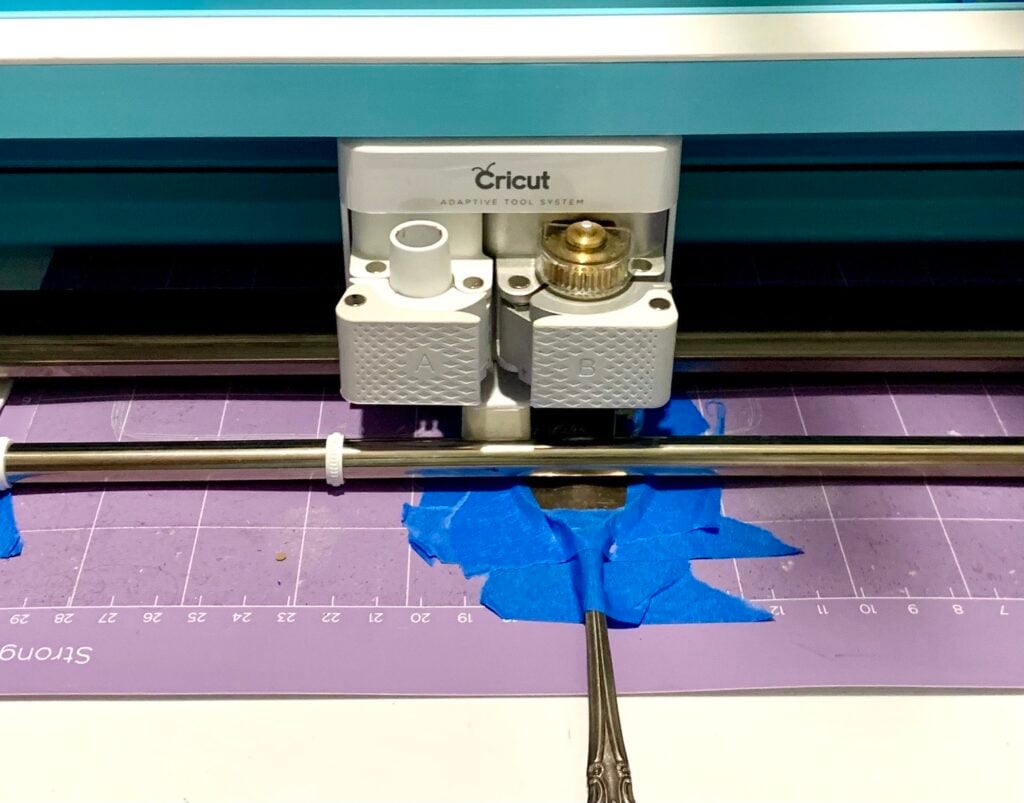
Step Thirteen: Prepare to Engrave
Load your mat into your Maker. Follow the prompts on the screen, choosing “Stainless Steel” as your setting. Make sure you’ve inserted your engraving tip.
Step Fourteen: Engrave your Spoon
On the Cricut, press the flashing go button. Then watch it engrave! Once it’s finished, you can unload your mat.
Tip– Use the tape you peel off to pick up the engraving debris. Don’t use your hand to wipe across the surface as you could end up with embedded bits of metal in your hand.
Step Fifteen: Darken the Engraving
I like to use the black Enamel marker from Impressart. I prefer the look of the enamel so I recommend it, but a black Sharpie does work as well. Cover all your engraving with the black enamel and then let it sit on the spoon for 3 min or so. Using a paper towel, wipe across the surface of the spoon.
We want as much to remain in the engraved lines as possible. You can repeat this process for a slightly darker look or if you wiped it too aggressively and need to reapply it.
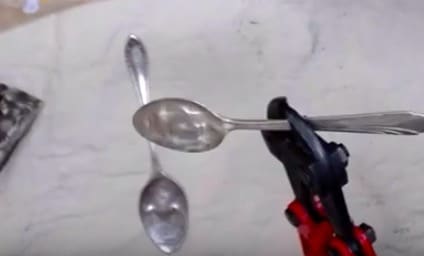
Step Ten: Cut the Spoon Handle
Using a heavy-duty bolt cutter cut off the end of the spoon about 1 1/2″ or so from the top of the spoon bowl.
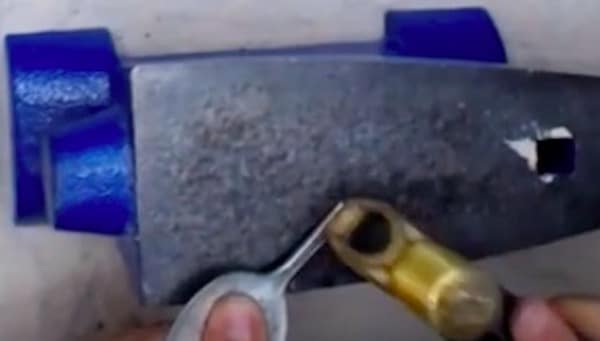
Step Sixteen: Finish the Handle
Using a jewelry hammer with a ball-peen head and an anvil, hammer the cut end of your spoon handle flat. Then use a mini grinder or hand files to smooth away the rough edges. I have links to both of these in the supplies list above.
With pliers, grip the spoon handle near the top of the bowl and create a bend in the spoon. When you have the bend greater than 90-degrees you can use a small hammer or mallet to bend down the rest of the spoon handle.
Be sure to leave some room between the handle and the back of the spoon so that you can slip some pages between them.
About Metal Stamping
And you’re done! IF you are interested in learning more about Metal Stamping (a super easy craft to try) then you’ll want to quickly check out my last project post, How to Make Stamped Metal Key Necklaces. Love jewelry? You can also substitute the engraved spoon pendants for the keys in the Key Necklaces.
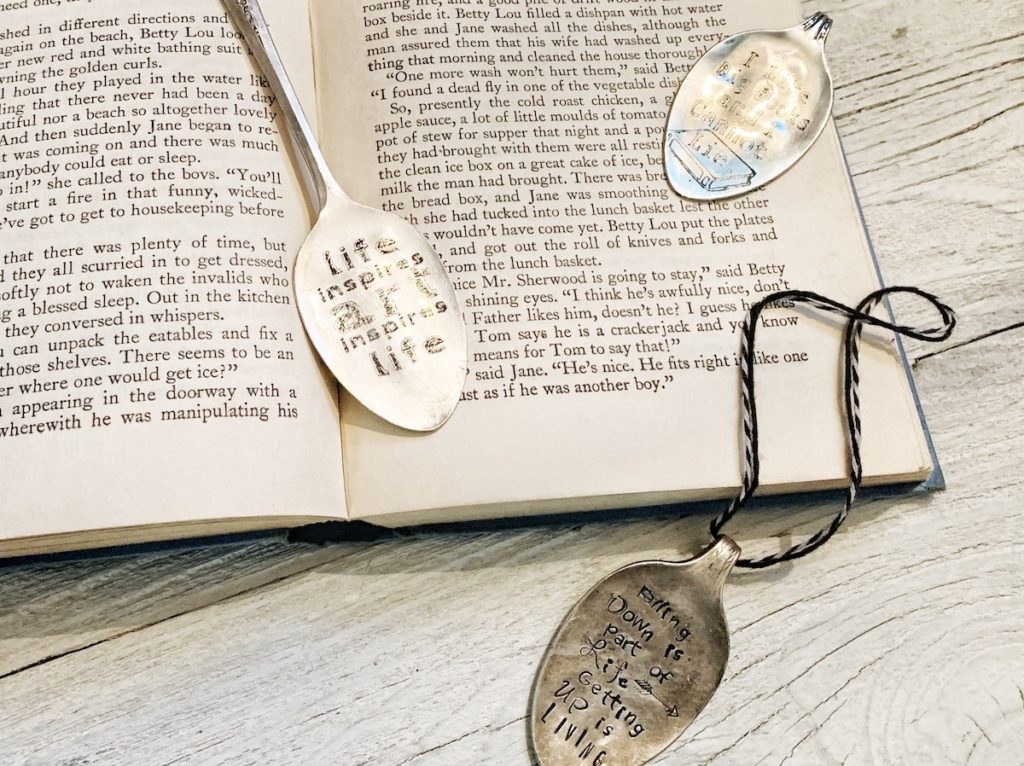
Ready to know more now that you’ve tried this tutorial on how to engrave spoon bookmarks with a Cricut?
If you love this project, you can totally run with it. Engraved silverplate spoons, for example, can also become pendants, stir sticks, hanging wind chimes, and ornaments. My mom just gave me some of my grandma’s silverware service so that I can make memory rings and Christmas Ornaments for the family. You could totally do that too!!!
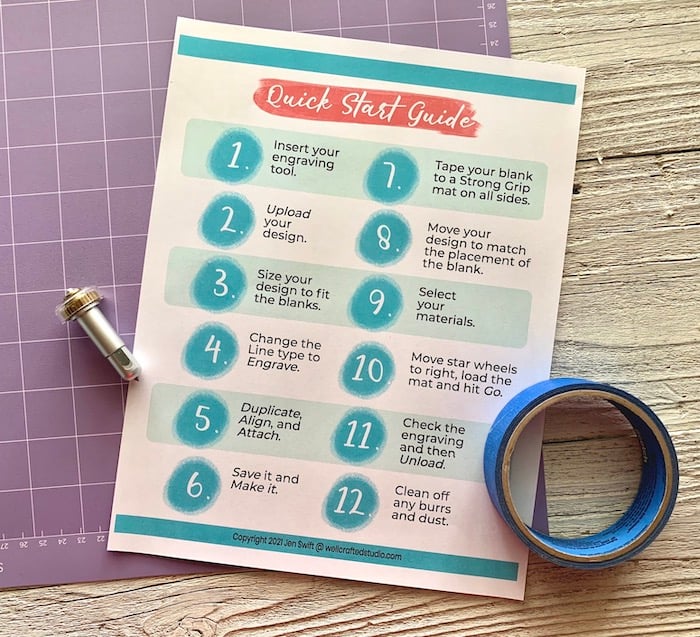
Check out my post on How to Start Engraving with a Cricut! It does a great job of answering your beginner questions and linking to other posts. I also have a printable cheat sheet you can download that will help you as you start engraving.
For More Inspiration…
One of the posts that I looked at when I was prepping for this video was Engraving with the Cricut Maker: How to Center Your Text and Add Fills for Bolder Engraving. Abbi Kirsten’s Cricut tutorials are really excellent. I highly recommend you check her out!
Another post I looked at was Hey! Let’s Make Stuff’s How to Use the Cricut Maker Engraving Tool + Metal Bracelet Tutorial. She’s another great reference if you’d like to know more about the Engraving Tip or really anything Cricut-y as well.
Join the Facebook Group
For more projects like these, encouragement and inspiration, join the Engraving Metals Facebook Group. We LOVE to experiment and try new things. It’s kind of like a hive mind where people share their successes and failures. We’d love to have you join us!
Love this? Share it!
So what do you think you’ll make first? If you found this tutorial helpful please LIKE, or COMMENT on the video above. It helps SO much! And if you don’t mind sharing it either on social media or by pinning the image below to Pinterest. I really appreciate your help with this! Also, if you have any questions about this technique please ask by commenting on this post or through my contacts email. I’d love to help!
Thanks for Reading,



I love your medal engraving tutorial!
Thanks Auntie Connie!
thanks for sharing this, I was wondering have you tried engraving silicon bands using cricut?
I haven’t but it sounds super fun to try!!! I’m wondering how you would get it flat enough without cutting it though.Thanks for commenting!
Thank you for the engraving tutorial!
WOW! What a great job. Thank you for the tutorial, I wouldn’t have known how to begin!
I love this tutorial and am about ready to get started. Can you point me in the direction of where I can find the mentioned Silverplate Spoon PDF? I can’t seem to locate it. Please and thank you!
Hi Dee!, It was a little buried in the Engraving Designs in my Free Library and just said “template” so I added the file type to it so you could find it more easily. I’ll email you directly with a pic of it so you have a visual reference. I’m so excited you’re going to make these!
Jen