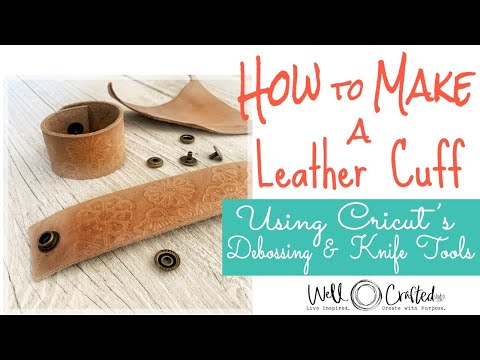
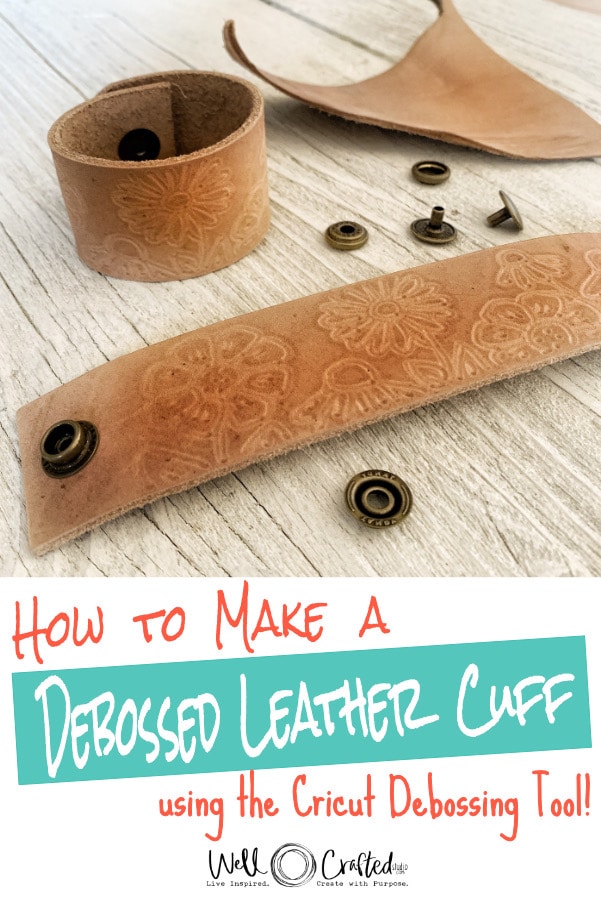
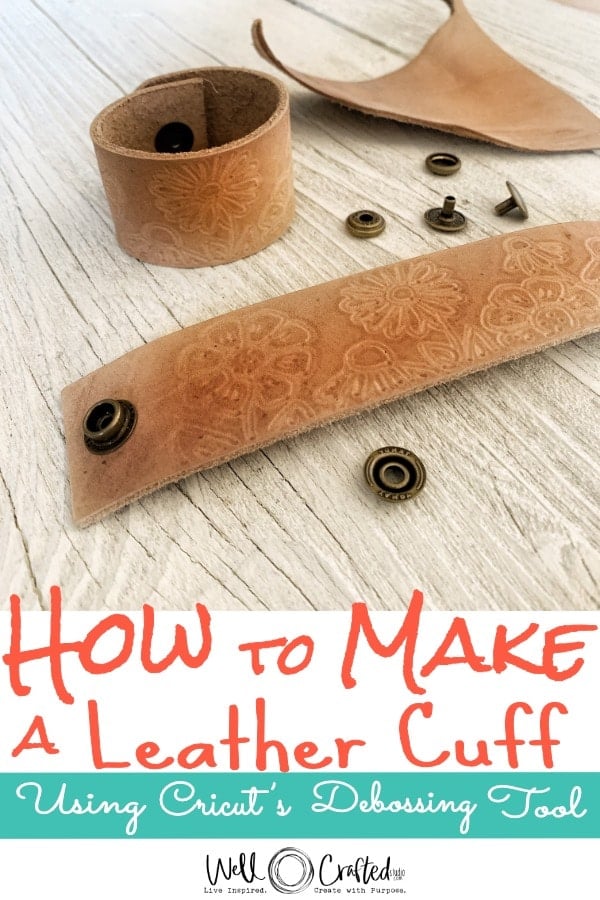
When we craft, we make basic decisions that add value to our work. What type of material we use is one of the most impactful of those decisions. For instance, we place more value on items made from metal or leather than we do on items made from paper or fabric. A simple way to begin working with leather is with this tutorial for how to make a DIY Leather Debossed Cuff using the Cricut Maker and its debossing tool.
Emboss vs. Deboss
Wondering what deboss means? I had to look it up. 😂Turns out that to deboss means to lower the design from the surface of your material and emboss is to raise a design from the surface.
Many of us have actually been debossing when we thought we were embossing. Shocker, right?
To manually emboss paper, we usually flip the piece over and press into the back of it with a small tool. This causes the front of the paper to be raised. But that action of pressing down is actually debossing. While paper displaces its shape, when you press into leather, you are compressing its shape.
Debossing leather with the Cricut is similar to stamping leather in that both press the design into the surface of the leather.
You may be wondering if you can emboss the leather by debossing on the backside of the leather piece. But because you compress the leather to get the design it has to be done from the front side of your leather piece.
Debossing for the Win!
If you are someone who has tried stamping leather but been put off by the cost or limits of pre-made leather stamps but would like to make your own leather bracelets it’s pretty thrilling that we no longer have to rely on manufactured stamps. We can design what we want and use the Cricut Maker and Design Space to deboss that design onto leather. The design I’m using in this project was actually designed in Procreate, an iPad app. And the tutorial below is the perfect project for the debossing curious to begin with!

How to Make a DIY Leather Cuff Bracelet with Cricut Debossing Tool
Supplies and Tools
From the Free Resource Library:
- Wildflower Garden Deboss Design (.png) – Creative Resource Library
- Leather Cuff SVG Cut File – Creative Resource Library
To Deboss and Cut the Leather Cuff:
- Cricut Maker
- Cricut Quick Swap Debossing Tip (you can purchase just the tip if you already have the quick swap housing).
- Strong Grip Mat (purple)
- Cricut Knife Blade + Drive Housing
- Painters or Masking Tape
- Cloth Measuring Tape (to measure the width of your wrist)
- Slightly Damp Paper Towel
- Piece of Leather- Tooling Leather 6-7 oz. (I got mine at Tandy Leather but you can find this at Hobby Lobby or some other craft or hobby store too)
- Rotary Cutter
- Cutting Mat
- Cutting Ruler
To Add the Snaps:
- Line 24 Snap Setter Tool Jig (optional) or Snap Setting Tool (may come with your snaps)
- Line 24 Snaps (4 pieces) for snap closure
- Rubber Mallet (rawhide or plastic work best)
- Hard Surface to Work On
Directions
Step One: Download the Cuff SVG Template and the Debossing Design
Open up the Creative Resource Library. For access to the library, you’ll need the password. You’ll get that instantly when you sign up through one of the opt-ins on this page. Scroll down until you reach Project Templates. We want Leather Cuff Template Cut File and the Wildflower Garden Deboss Design. Download these files to your computer and unzip them.
Note: Although you can reuse an old belt to make leather cuffs- if you plan to deboss or tool your cuff then you need tooling leather (it hasn’t been sealed yet).
Step Two: Upload the Design Files into Design Space
Open up a new canvas in Cricut Design Space. Click the Upload option from the toolbar on the left side of the canvas. Choose “Browse.” This should open up your files.
I check “recents”, and both files are there, titled Leather Cuff SVG Cut File and the Wildflower Garden Deboss Design. Choose the design file to work with first.
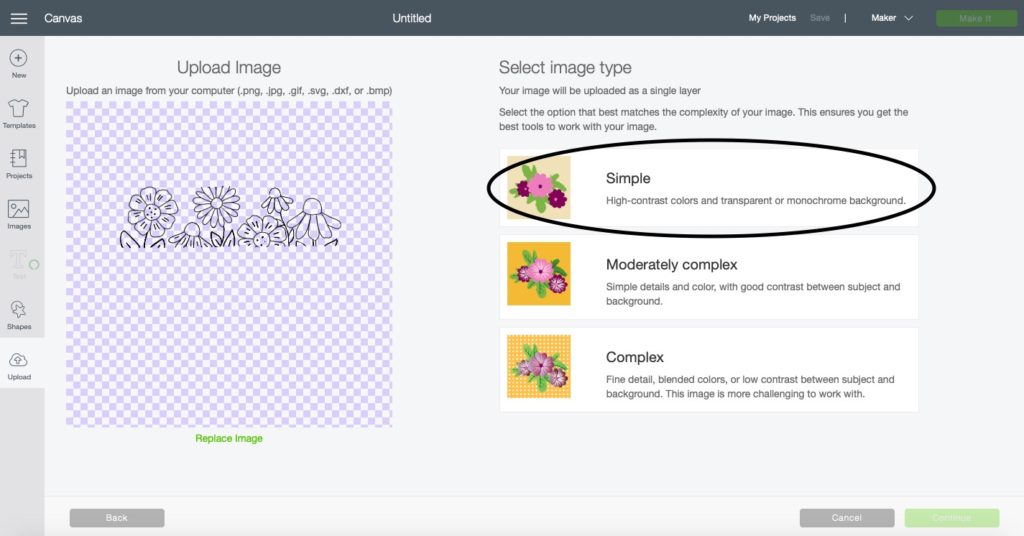
Step Three: Upload Your Design and Process the Image
Design Space will open the Wildflower Garden Deboss Design file, and a screen will appear that will ask you to select an image type. Choose Simple and then Continue. The next screen will ask you if you want to clean up the file. It should be fine to use, so you can click Continue.
ProTip: If there are ever any stray marks on your files, you can click on the magic wand and then touch the squares on the background. That will automagically clear your background. It’s pretty neat.
On the next screen, you’ll be asked how you want to save your image. You want to choose “Save as Cut Image.” Name the file and save it to your uploaded images.
Repeat this process for the second file, Leather Cuff Cut File.
Step Four: Insert Images and Change Operation
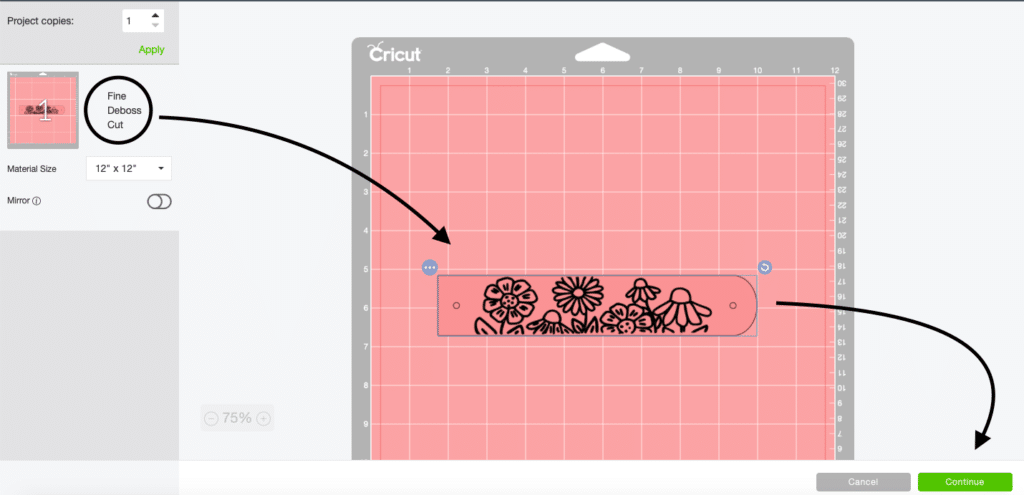
In your Uploaded Images click on the Leather Cuff Cut File file we just uploaded and then choose Insert Images in the lower right of the screen. This will open it up into your canvas. Change the color of the cut shape by going to “Operation” (this is no longer called Linetype) and click on the square of color to the right of it. Choose a lighter color to make layering easier.
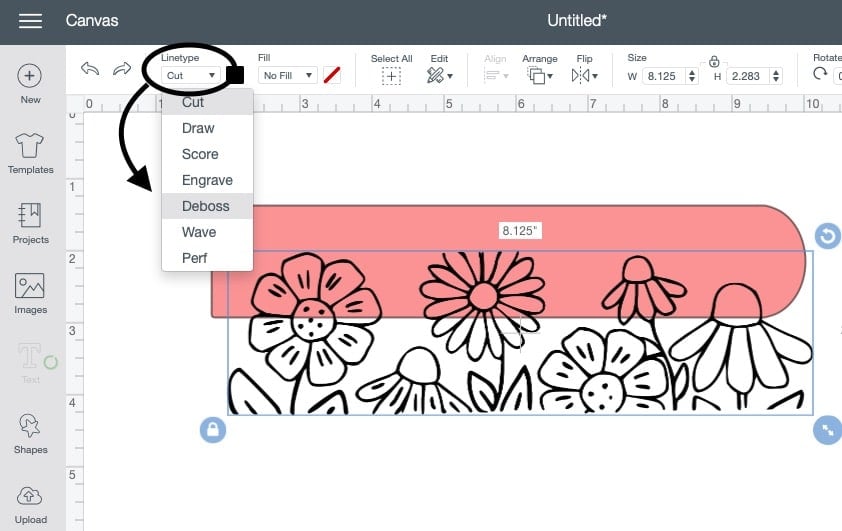
Next repeat with the Wildflower Garden Deboss Design file. With the image selected go to the Operation menu again and in the drop-down menu choose Deboss from under the Draw section.
Step Five: Size the Files to the Right Size of Your Wrist
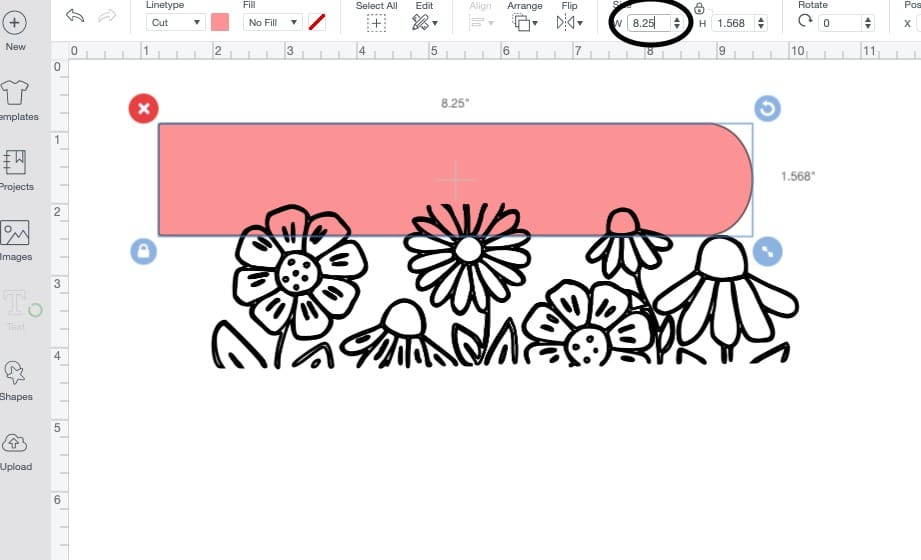
Select the Leather cuff image, and in the Size boxes (in the toolbar at the top of your screen), type in the length you want your cuff to be. This will depend on the size of your wrist. This will keep the constraints so you can change it if you’d like to make a wide cuff or a small cuff. If you have a small wrist you can use the Slice tool to cut off the end of the cuff design without changing the width.
For a wide cuff, I usually do 8.25″ as a female size and 9″ for men. You can use a sewing measuring tape to loosely measure your wrist. Once you type in your desired width for the design, it should automagically adjust the height to keep the proportions correct. But you can change this to whatever you desire. I like to have my cuffs about 1.5″ wide.
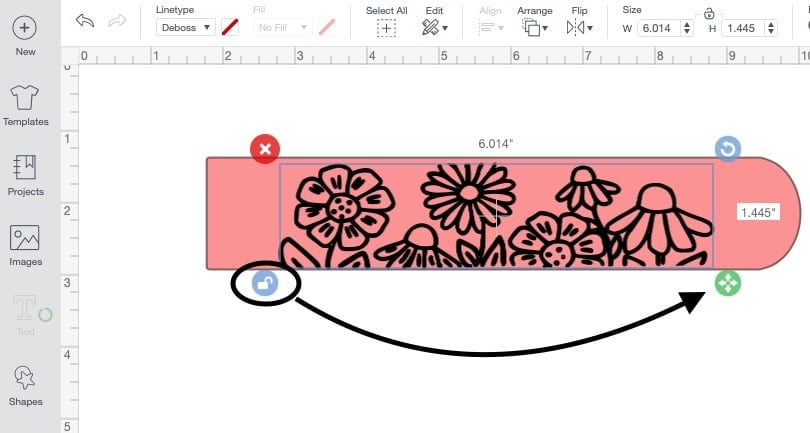
Select the Debossing design and drag it over your cuff shape to Layer the designs. (You may have to use Arrange in the top toolbar to move the Debossing Design forward so it goes over the cuff shape).
Adjust the size of the Wildflower Design as needed to make it fit inside the cuff by unlocking the constraints and dragging the anchor point. This will depend again on the width and height you decide to make your cuff. Select All.
Step Six: Add Circle Cut Outs for Your Snaps
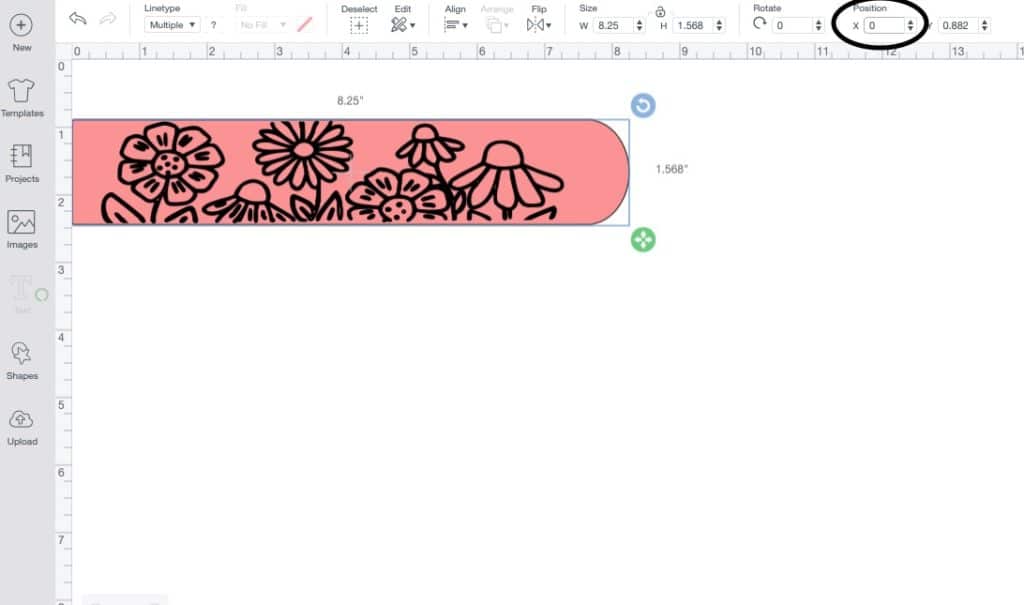
In the “x axis” box (in the top toolbar) change the number to 0. This will move your shapes all the way to the left side of the toolbar.
Next, find the Shapes icon on the left-hand side of your canvas. Choose the circle and then change the width in the size box to .157. That will resize the circle smaller. Go to the Edit option (top toolbar) and in the drop-down menu choose Copy and then Paste. Or you can just right-click on the selected circle and choose Duplicate.
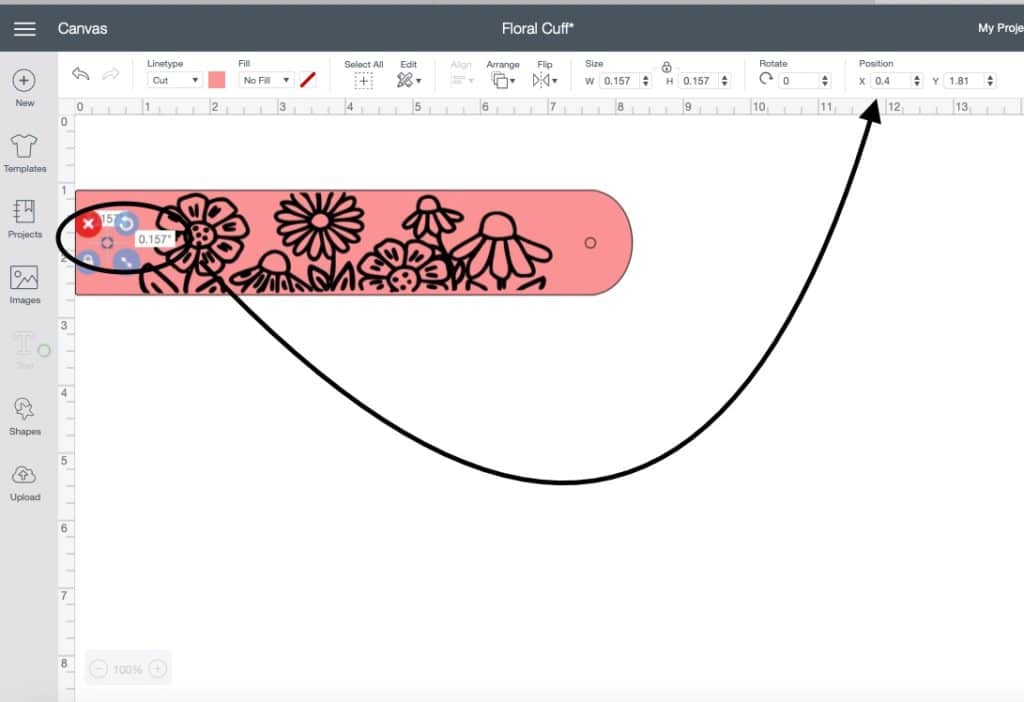
Select one of the circles and position it along the center horizontal axis of the cuff template. With the circle selected, type into the x axis .4 (the y axis should stay the same). That should position the circle 1/2″ in from the left edge of the template.
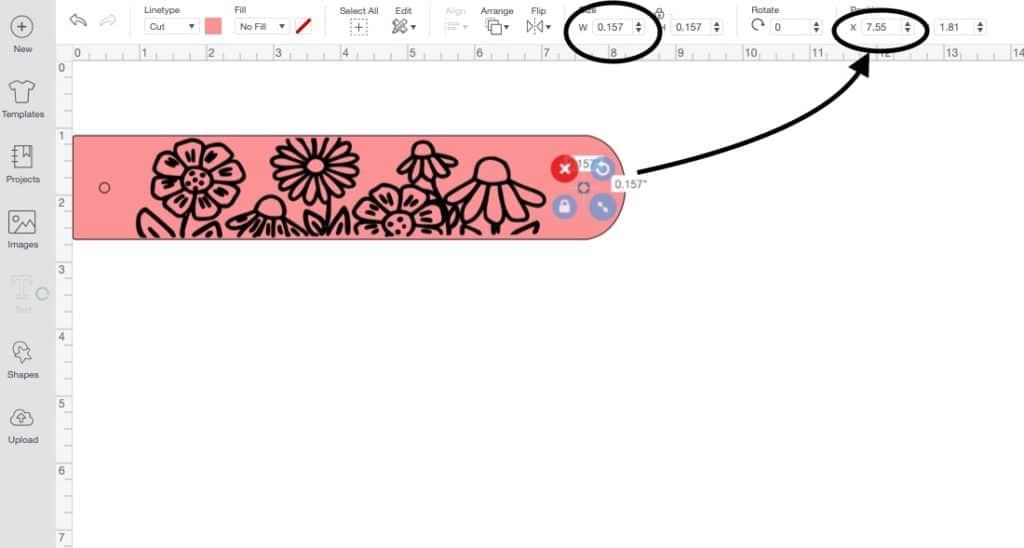
Repeat with the second circle except change the number for the x axis to 7.55. That number will change depending on the length of the cuff you make. Just don’t get any closer than .7 from the right side of the cuff. You need to leave room for the cap of the snap.
Make sure both circles say Basic Cut as the Operation.
Step Seven: Align and Attach Your Images
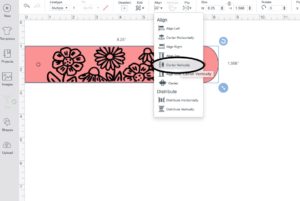
Select everything. Using the Align tool (on the top toolbar) choose Align Horizontally. It’s like magic! Finally, take a good look at your project, and if it looks good, go ahead and (with everything still selected) choose Attach from the options at the bottom right of your screen.
Step Eight: Save Your Project
Before you click the Make it button, go ahead and Save your project by choosing the word Save at the top right side of your screen. This will prompt you to name your project and add any tags you’d like. Click Save and you’ll find it later under My Projects.
Now, in the upper right corner of the screen hit the Make it button. We’re getting there!
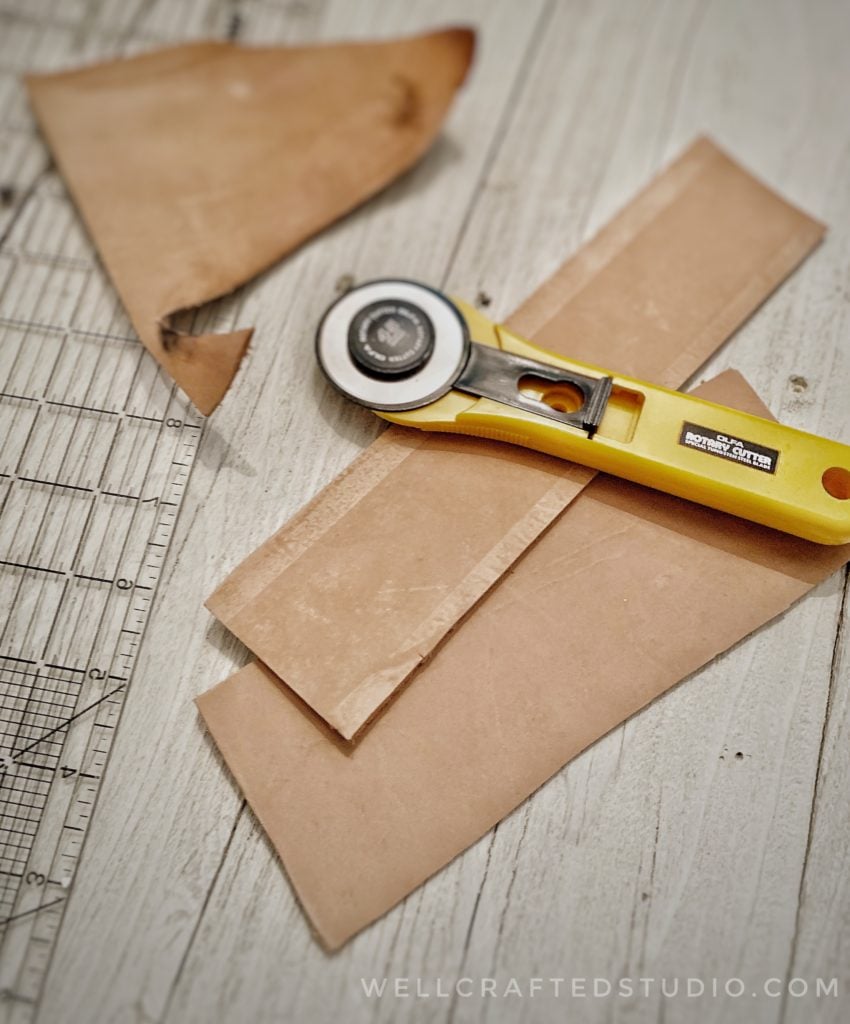
Step Nine: Get the Leather Ready to Cut
Cut a piece of tooling leather approximately 1″ longer and wider than your cuff size. I find it’s super easy to use a cutting mat, cutting ruler, and a standard rotary cutter.
Lightly wipe a slightly damp paper towel onto your leather. Wipe it off right away so that it doesn’t soak in too deeply. It will slightly change the color. Let it sit a few minutes until the leather returns to its normal color. It should still be slightly cool to the touch.
This step allows the Debossing Tool to compress the leather more deeply.
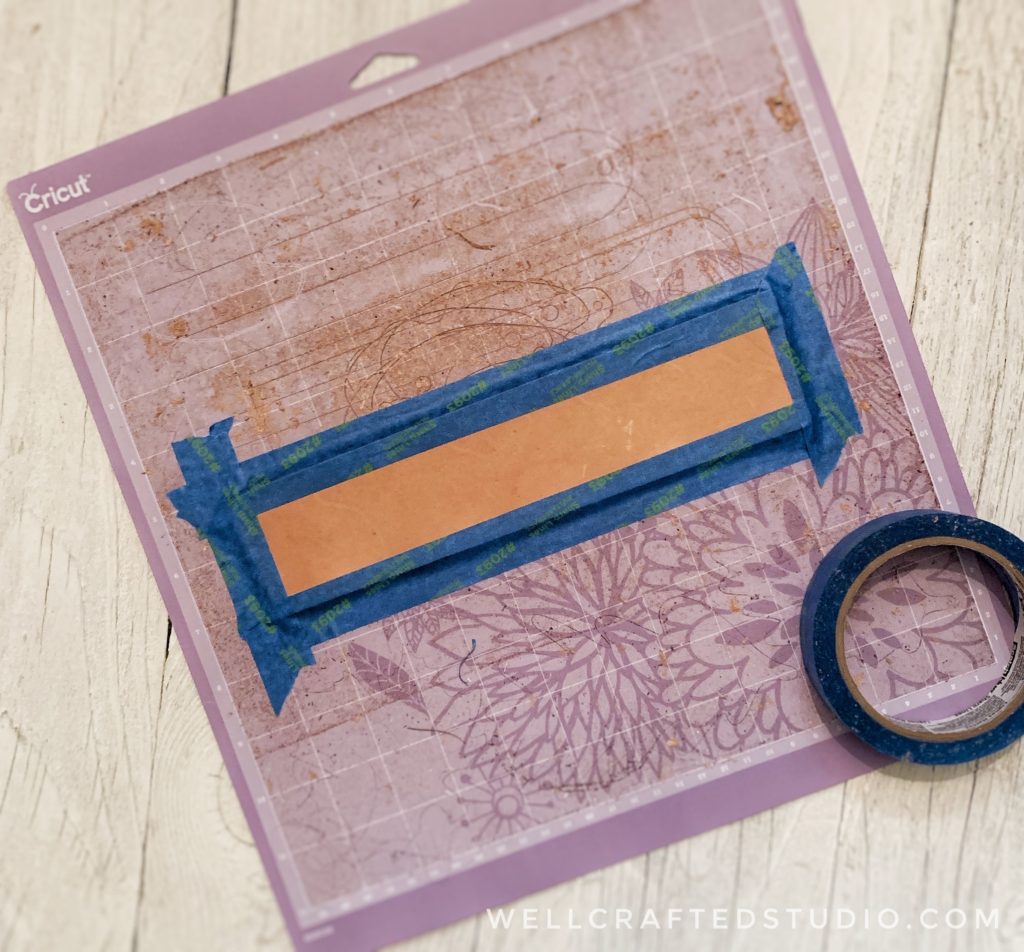
Tape the leather down in the center of your strong grip mat with painter’s or masking tape. Try not to overlap the leather too much with the tape. The tape can damage the surface of the leather so you don’t want to tape where you’ll be cutting.
Press down securely on both the tape and the leather. If your mat is well used, then go ahead and use a brayer to make it just a little more secure.
Pro-tip: If the leather is too damp, the debosser may get stuck in the design. That’s not terrible. Unload the mat, cancel the cut, and wait for the leather to dry a little more and then try again.
Step Ten: Position Your Design
On the Mat Preview Page in Cricut Design Space, click on your design on the mat. Move the design so it’s in the same place as your cut piece is on your mat. (OR if you’d rather you can take advantage of the snap mat feature on the iPad.)
Step Eleven: Get Ready to Deboss like a Boss
Select Tooling Leather as the Material Setting. Move your Star Wheels all the way to the right or it will mar your leather.
Load your mat. Place Debossing Tool with the QuickSwap housing in clamp “b” as prompted.
When ready, press the “Go” button on your Cricut Maker. Woohoo!!!
Step Twelve: Cut the Leather Cuff Shape
Once it’s done debossing, the machine will pause and you’ll be prompted on-screen to switch out your debossing tool for your knife tool.
DO NOT UNLOAD THE MAT. Just switch the tools and then press the Cricut Go button on your machine again.
Fair warning- the Cricut will make approx. 16 passes with the knife blade.
Note: In my experience, my Cricut quit a couple of times before it completed all of the passes. But each time it had already fully cut the shape. (It’s as if it knows it doesn’t have to keep going). So don’t worry if this happens. IF you find your snap holes didn’t cut cleanly you can use a craft knife to finish the cut.
Remove your Cut and Debossed Leather Cuff Bracelet from the cutting mat. Yup! It’s that awesome and easy!!!
Step Thirteen: Assemble the Snaps and Setting Tool or Jig
Gather the pieces you’ll need for a set of snaps. There are four pieces for each set of snaps. Refer to the photo below. The cap pieces are on the left and what we’ll work with first.
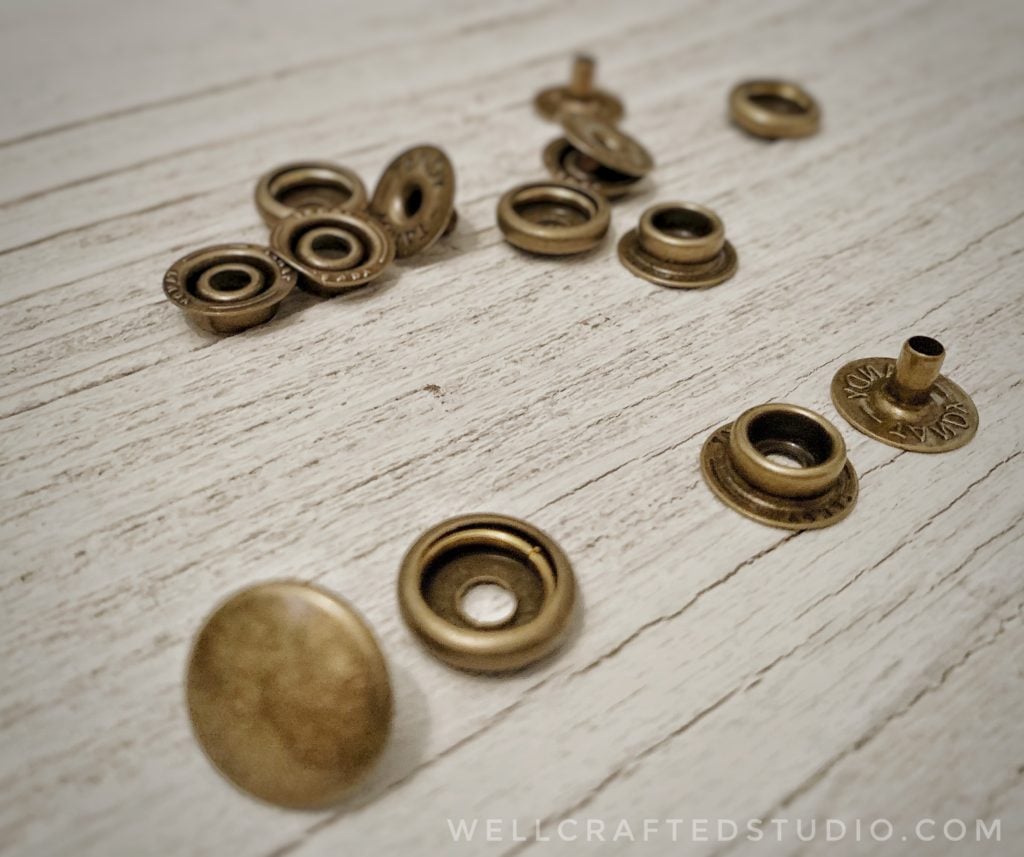
Next, assemble the snap setting jig or snap setting tools. Both of which are pretty simple tools. And often when you buy snaps a basic setting tool set is inlcuded. You can totally use this tool set, but I prefer the jig because it’s pretty much foolproof and I LOVE foolproof.
Note: The jig is nice because it makes certain you hit the snaps at a 90-degree angle. This ensures a nice strong connection. There’s nothing worse than your snap falling apart.
Step Fourteen: Add the Snaps (Watch the Video Below for Step-by-Step)
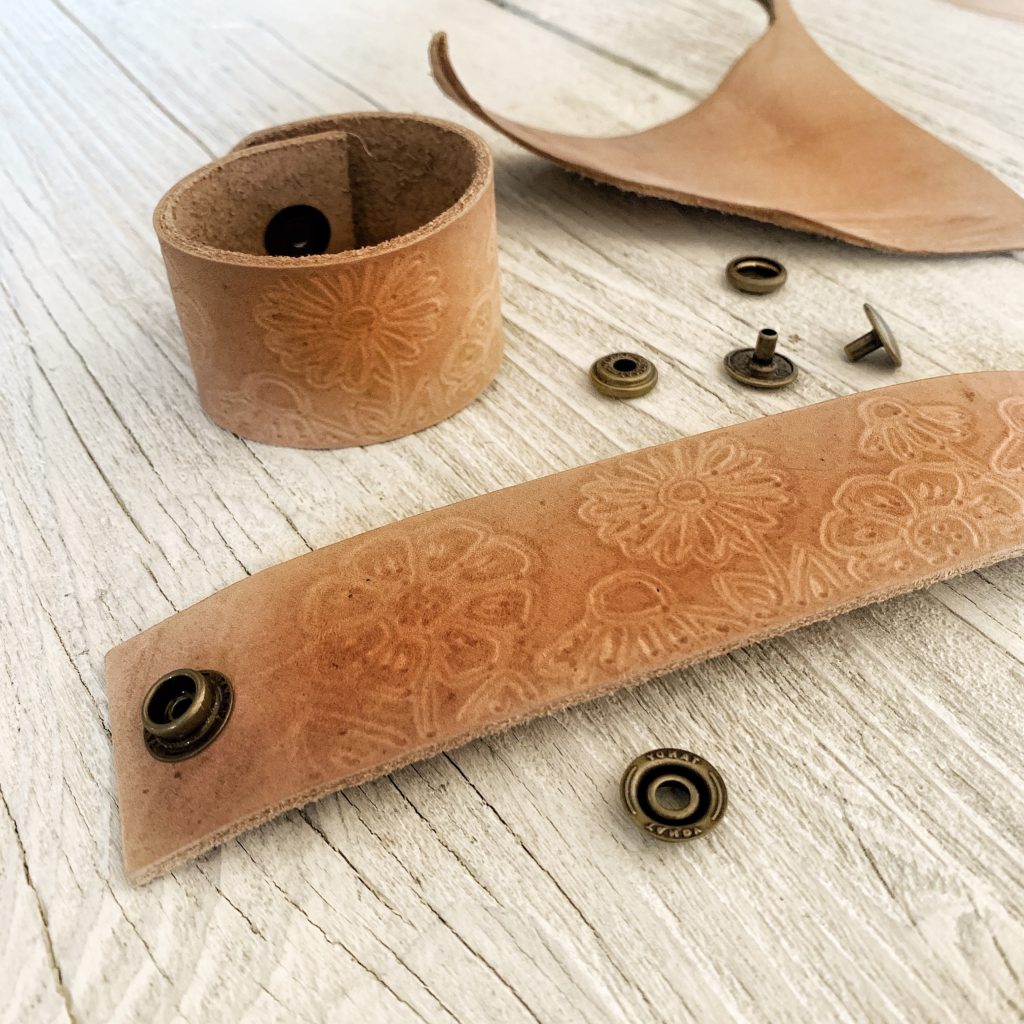
One of the best tips for adding snaps that I have found is to strike on a hard surface that doesn’t have any “give” to it. Using a piece of granite, marble, or a metal stamping plate works great. Working on a workbench, a counter, or over the leg of a table works best.
Next, on the concave part of the snap tool layer the cap, the leather, and the other part of the snap. The leather should be debossed side down.
Position the setting tool in the center of the tube. Hold the mallet and strike with a straight up and down movement in the center of your tool.
Continue until the center post has mushroomed down and is holding the leather securely. There shouldn’t be a much give with all of the pieces pressed tightly together.
Repeat with the second side, but flip the leather so the debossed side is up, and the correct part is in the jig.
Note: After you’ve done both sides, first thing, make sure you test it a few times by snapping and unsnapping it. Then, you can put it on your wrist and admire it for a while.
WHOO-HOO You Just Figured Out How to Make a Debossed DIY Leather Cuff Bracelet with a Cricut!!!
If It Doesn’t Work the First Time…Troubleshooting Your Cuff
Learning new skills always takes a bit of practice.
So if it doesn’t work the first time, don’t fret! You can usually just remove the snap and re-do that set. If two pieces are stuck together- use pliers to grip one side and then wiggle them apart. Rarely will you accidentally damage the leather but you will have to replace the snap.
Because of the possibility, however, when I teach this class, we usually do the snaps before we spend time painting or finishing the cuff.
Also- I feel like I should point out that there are other closure methods you can use that don’t involve snaps. Like using leather lace and tying the ends closed. But for a pro look snaps are the way to go.
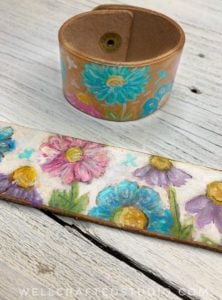
Ready to Indulge Your Creative Side?
The second part of this project will show you how to paint the leather in two different ways, finish the edges of the leather professionally (so they don’t rub against your arm), and how to seal your cuff.
For More Inspiration…
Interested in more leather projects to make with the Cricut? I have a tutorial for a simple leather hair accessory in How to Deboss a Leather Hair Barrette with a Stick. The project for the post is the cutest little paint palette that’s held in your hair with a paintbrush. I’d love to have you check it out!
And, if you’d like to know more about crafting with leather- LeatherCrafted: A Simple Guide to Creating Unconventional Leather Goods by Caitlin McNamara Sullivan.
Also, if you would like to know more about what the Debossing Tool can do, Hey Let’s Make Stuff has a great post on How to Use the Cricut Maker Debossing Tool. You can also check Cricut’s official FAQ page for the Debossing Tool to get all the technical information and troubleshooting help.
Love this? Share it!
If you found this post and video on how to make a DIY Debossed Leather Cuff helpful, please take a minute to share it on social media! And if you have ANY QUESTIONS, I would love to have you leave a comment below. Also, if this post has gotten you excited to try debossing, or you’re wondering about the Cricut Maker, I’d love to hear about it in the comments section for this post!
Thanks for reading,

Love this? Share it!!! Pin this to your Cricut Projects DIY Board!


I did this as a younger teenager at camp. This project is so much fun! Thank you for sharing as it has reminded me to want to do it again!
Absolutely! I love that you’re going to do it again- lots of my favorite projects today bring back memories from when I was a kid too. ❤️ Thanks for commenting Samantha!!!
Excited to give this a try. Will the Cricut Leather work for this project?
Hi Ranee! Unfortunately, no. You need tooling leather in order to deboss. It’s usually vegetable tanned leather that has not been dyed or sealed, which means it can still be stamped, tooled, or debossed. You can find it at craft stores pretty easily in their leather crafting section, or I got a partial hide of it from Tandy Leather for not a lot of money.
Great question though! I hope this helps and let me know if you have any other questions! I’m excited for you to try this. ❤️
Jen
I wish I had seen this before I tried it-but I did a debossed keychain piece (did not wet the leather though-but it looked okay at first)and now a few months later the design has disappeared! I’m not sure if sealing it was needed or if maybe I didn’t use tooling leather? (Not sure, as the package didn’t say either way)
This sounds like a great project to get started on… but, on another leather project, my Maker would not cut with a deep knife. I was informed that I needed a Deep Point tool. What is the difference between them? How is it that tooled leather can be cut with a deep knife and thinner leather needed a deep point tool?
Hi Gilda! Great questions, part of the answer is that the Knife Blade is only for the Maker and is newer, whereas the Deep Point Blade was developed first, and is for all machines. Some projects require one of them rather than the other bc that’s what the project creator was using. Also, when Cricut created the Maker it added a bunch of materials that couldn’t be cut before, and made them “maker only” materials. Tooling leather is considered “maker only” and requires the Knife Blade that is only compatible with the Maker. Faux leather is thinner and can be cut with the deep point or even the rotary blade I think. The difference between the knife and deep point blades is that the knife blade (besides being Maker only) is thicker and really looks an awful lot like an exacto knife. Whereas the deep point blade is basically the fine point blade with a deeper cutting angle.
The Maker will cut the tooling leather, but would rip right through the more delicate faux leather. I hope this helps!