
If you’ve ever wanted to use Grandma’s signature to make custom gifts, use pics from your garden to make stickers, or use last summer’s vacation photo to make mugs- then the new automatic background remover feature from Cricut is for you. In this post, I walk you through how to use the Automatic Background Remover feature, when you shouldn’t use it, and its options. After you read this article, you’ll have everything you need to use the Cricut Automatic Background Remover to create with!
It’s the big question people have asked for a while now- “How do I remove the background in Cricut Design Space?”
Or “How do I make the background transparent in Cricut Design Space?”
Before now, the answer was to use the clean-up magic wand to click on the background. But as of yesterday, the answer is- with the new Cricut Automatic Background Remover!
What is the Automatic Background Remover?
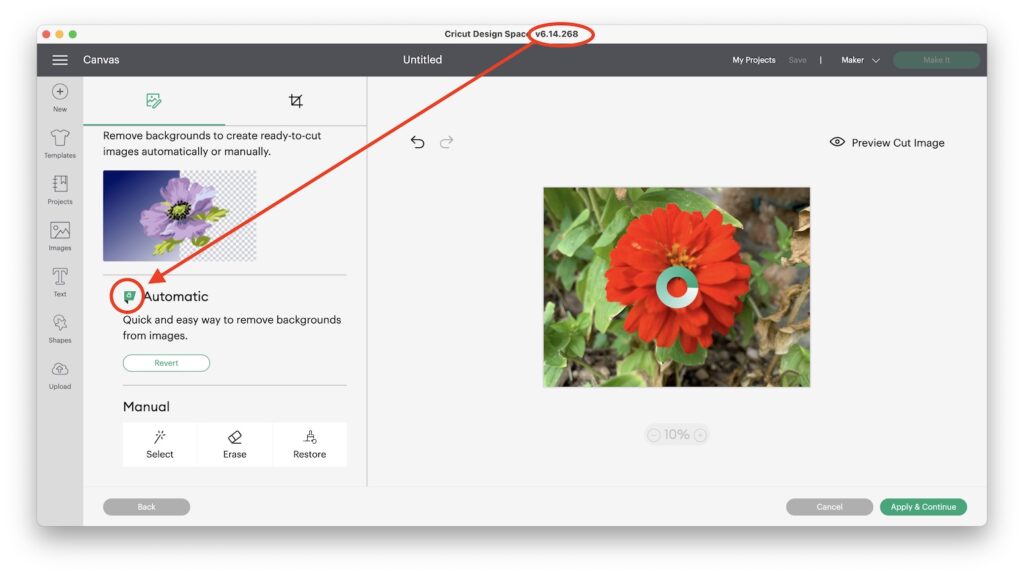
This new feature for Cricut Design Space shows up as part of the Image Upload process on your desktop version of Cricut Design Space.
It removes the background from your raster photos or images. A raster image is a pixel-based image vs. a vector-based image. Images that end with .png, .jpg, .bmp, and .gif are all file formats that are raster based.
How Does it Work?
Background removers usually use an algorithm or AI to identify the main focal point of an image and cut it out, creating a new image with the background removed.
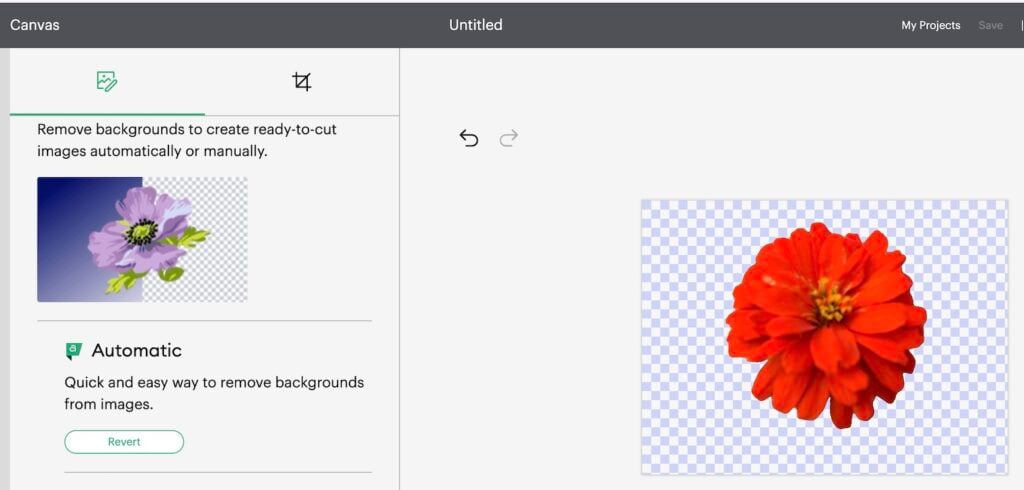
When you remove part of your image, that area becomes transparent. This is represented by a checkered pattern, a common way to identify transparency in many graphic design programs.
When Would I Use the Background Remover?
Removing the background is great if you want to turn a photo into a print then cut image, but you only want part of the image. Rather than using crop, which just cuts out a shape, a background remover will cut out the focal image, uneven edges and all.

How Do I Get the Automatic Background Remover in Cricut Design Space?
First, you would need to have updated to v16.4 and higher. If you have this update but don’t see the feature, it may still be rolling out to you. Cricut is doing this gradually to all its members.
You also have to be a Cricut Access member. If you’re unfamiliar with Cricut Access, it’s a monthly (or yearly) subscription from Cricut. If you choose to purchase monthly, it’s about $9.99.
*These lists are from Cricut’s official website.
Is the Cricut Automatic Background Remover Free?
No, you must have a paid membership to Cricut Access to use this tool. However, you can get a trial membership and try it out for free.
Is there a Free Automatic Background Eraser?
Yes, there are free background removers available online. Cute Cutter, RemoveBG, and Snapseed all have free tools.
Additionally, there are really helpful apps that don’t cost much money.
After trying several, I found the Magic Eraser app was the easiest and gave me the quickest results. This iPad or google play app is $13 a year, so just a little over $1 a month. In my tutorial, How to Remove the Background of a Handwritten Recipe to Create Crafts, I walk you through this app on the iPad.
Can I Preview the Feature?
Yes! If you do not have Cricut Access, you’ll see a preview of the feature and a “Subscribe Now” button.

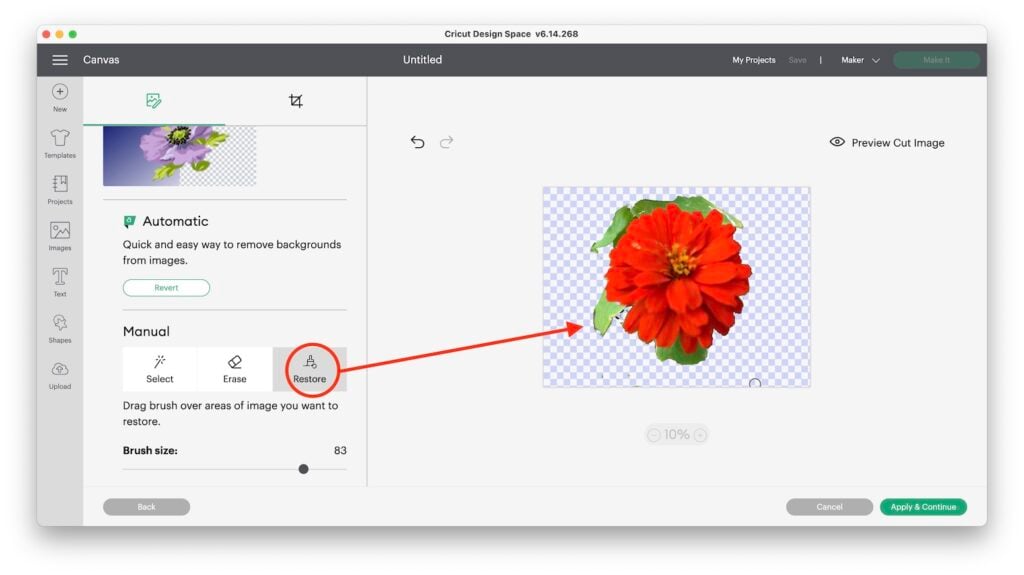
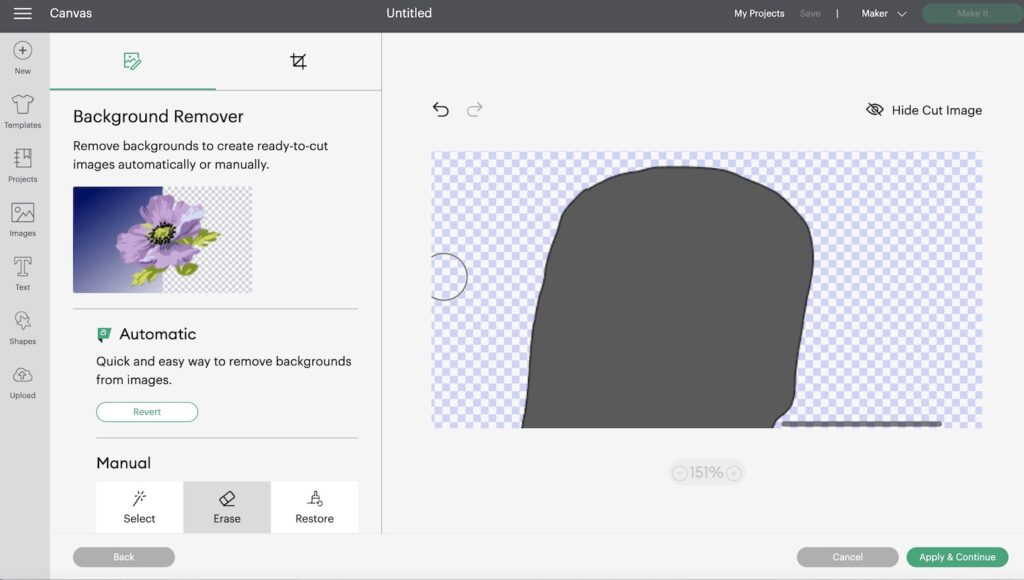
What is the Restore Brush?
The Restore brush tool allows you to “restore” parts of the image that have been erased or removed. This tool is on the left side of your screen next to the Select and Erase brushes. This is a GREAT addition to Cricut’s image processing tools.
When Would You Use the Restore Brush?
So, for instance, if you were trying to erase part of an image and erased it too much, your only option in the past would be to undo that action.
But what if you’re several actions in before you realized your problem? The restore allows you to “bring back” any of the original design at any time.
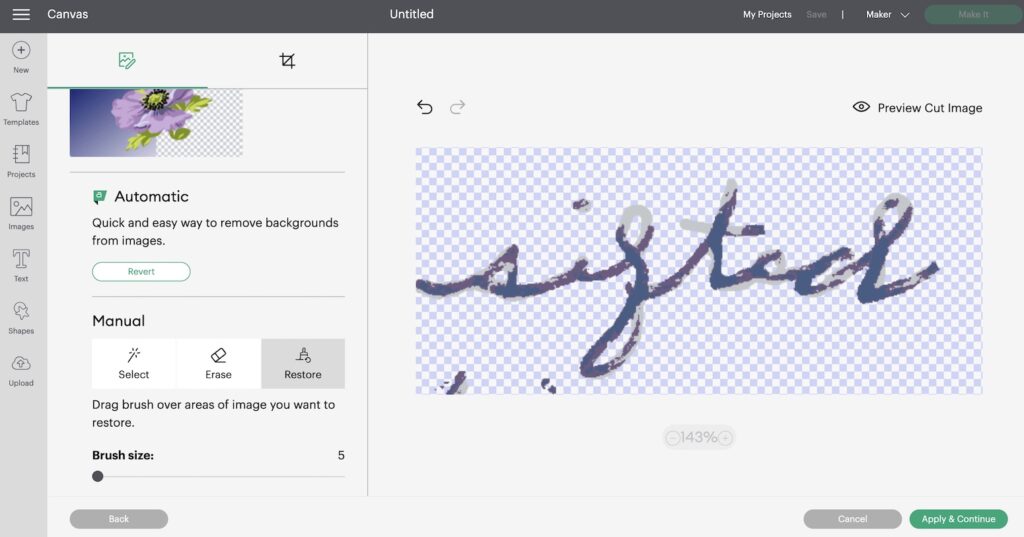
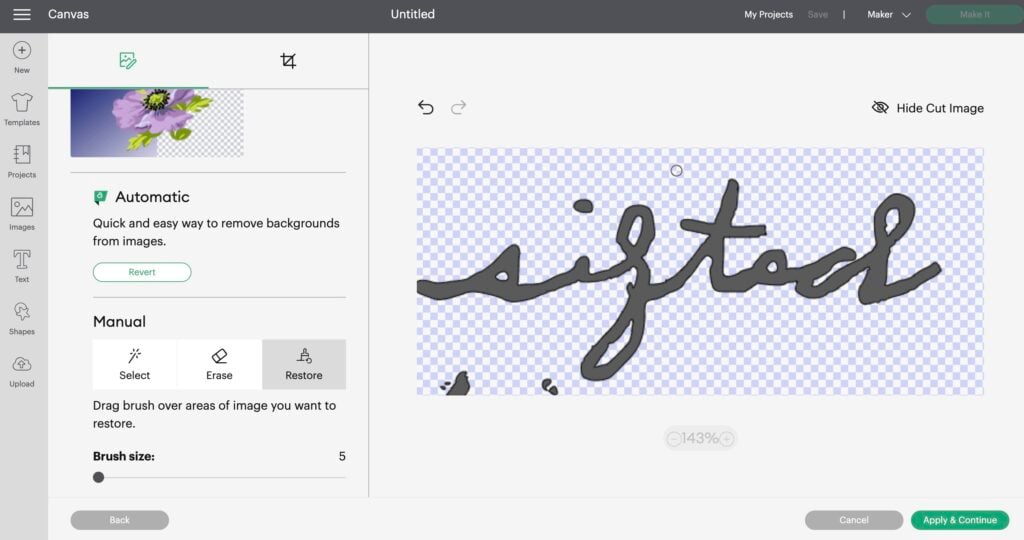
The restore option is also useful if you’re trying to clean up a handwritten image, but part of the writing isn’t clear.
For instance, if the ink has faded and you can only see part of a letter. You can “fake” the writing by reviewing the area with the Restore Brush. You can see what I mean in the image above.
What if I Don’t Have the Background Remover or the Restore Brush?
- You probably don’t have the updated download for Cricut Design Space. It has to be v.16.4 or above.
- You may not be a Cricut Access Member.
- Or it could be as simple as quitting Design Space and then opening the app again.
If none are the reason, remember that Cricut isn’t rolling out the release to everyone all at once, but everyone should receive it within the first few weeks.
You can always contact Cricut Member Care as well.
How to Remove the Background of Your Image in Cricut Design Space
Step One: Select Your Image
On a new Canvas, click Upload on the side left toolbar. This will open the Image Gallery. Hit the Browse button to fetch your file from your computer’s files. You can also drag and drop the image from your photos.
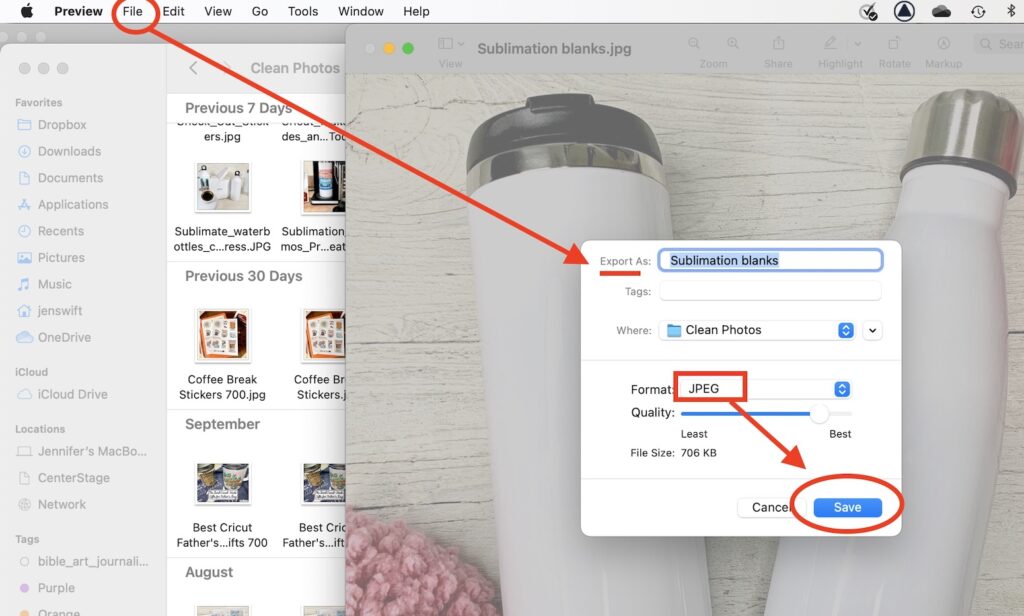
Tip for Apple Users: Remember your image or photo has to be in one of the file formats above. It can not be a .heic image. If you have a .heic image, you’ll have to Export it as a .png or .jpg. Then you can upload that image. You can see how to do this with Preview on Mac below.
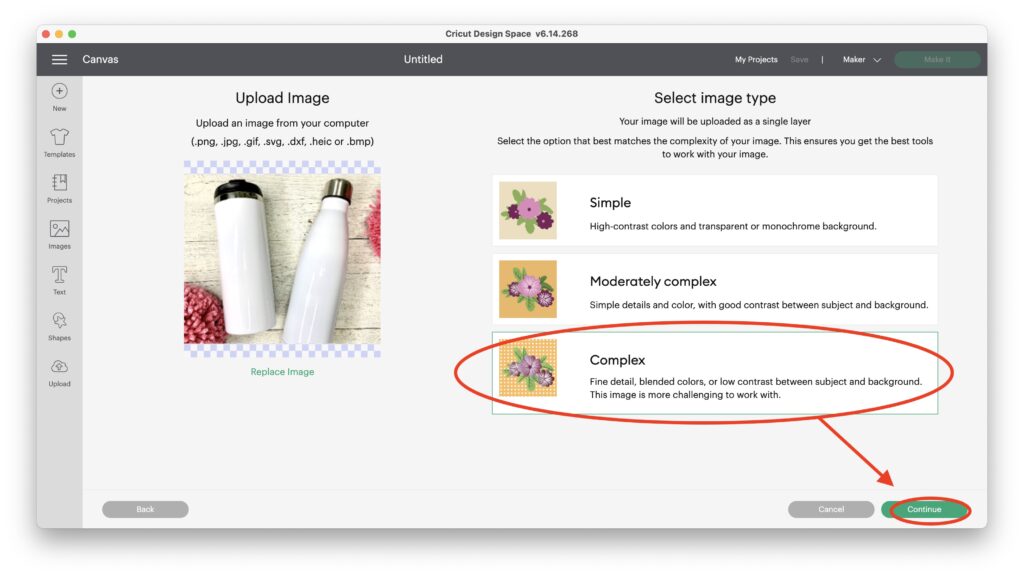
Step Two: Choose the Complexity of the Image
The first screen asks about the image type as you process the image upload. For any raster image, always choose Complex. Click continue.
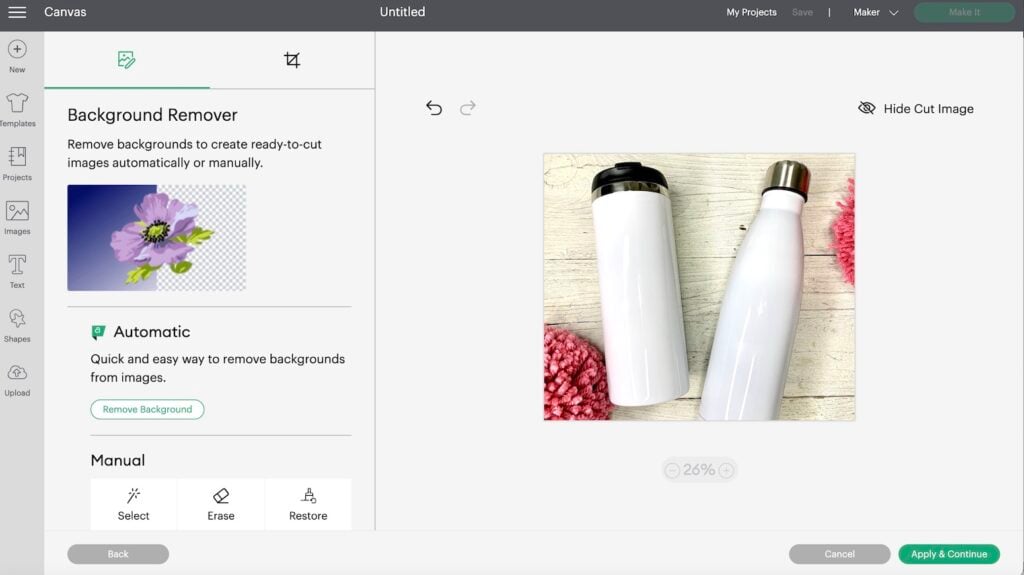
Step Three: Remove the Background
In this newly designed image clean-up panel, click the Remove Background button. It’s pretty automagic!
Step Four: Do Additional Clean-up with the Manual Tools
After you remove the image’s background, you’ll notice it may not be super clean. Of the images I tried, some were perfect in one go, but others took additional Design Space tools (like those below) to completely remove the background.
You also have three manual image clean-up tools in Cricut Design Space. They are the Select Tool, the Erase Tool, and now the Restore Tool.
1) The Select tool is the magic wand tool.
Just click on what you’d like to remove. This works well when you use the Options to adjust your color selection to 2 or 3.
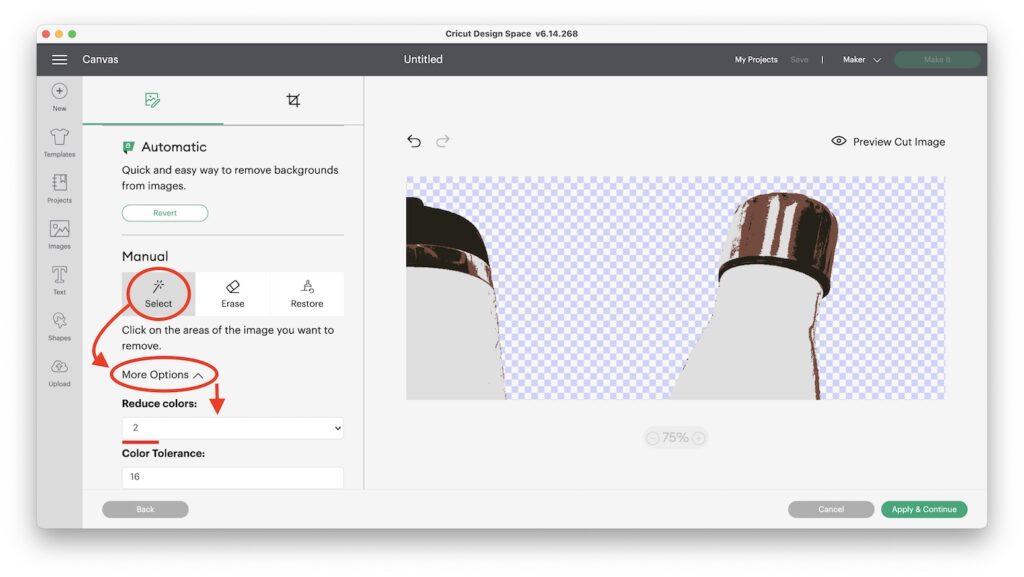
2) The Erase Tool allows you to remove parts of the image by hand. You can change the size of your brush with the slider below it. For detail, zoom in on your image and then make the brush size as small as possible.
3) The Restore Tool will allow you to recover parts of the image you may have lost in the automatic background removal.
You’ll also see an “options” drop-down menu. These are options for the clean-up tools. I will often change my colors to 2 (if I’m trying to create a cut image) to simplify the image.
Inside of Closed Letters- If you look closely at your image, you may still have the centers of your closed letters. Just use the Select Tool (magic wand) to click and remove the centers.
Jagged Edges- The easiest way to see if you have jagged edges on your image is to switch to the Preview Cut Image view. You’ll see this feature in the top right corner of your screen.
Missing Part of the Image- If you’re straight up missing part of your photo, you can use the Restore Tool to bring it back. This also has a slider for the brush size.
The Restore Brush works great with old faded text where you may have to fake part of the writing.
Step Five: Preview your Image as a Cut File
Double-check how your photo of the image will look like as a Cut Image to see what your restored text or image looks like. When you’re happy with how it looks, click Continue.
Step Six: Save Your Image
On the next screen, you’ll see your options for saving your image. You can choose Save as a Cut File or Save as a Print then Cut image. Then click on the Upload button in the lower right corner of your screen.
Save as a Cut Image means you plan to use the solid shape of your image to do any of the following operations.
- Cut (Basic, Wavy, Perforated)
- Draw (Pen, Foil, Score, Deboss, or Engrave)
Save as a Print then Cut Image keeps all the image information so that you can use your image to print and cut your design. Not just the outline of it.
Step Seven: Insert Your Image into Your Canvas
And that’s it for Image Processing! You’re now ready to click to select your image in the Image Gallery. Next, click the Upload button in the lower right corner of your screen. This will immediately open up the image in your canvas.
Troubleshooting the Cricut Background Remover
The Entire Background isn’t Removed
There are a couple of reasons for this. First, Cricut’s algorithm has to look at your image and decide what the background and focus images are.
I noticed that when I took a pic of a recipe on a tabletop the background remover removed the table. But not the paper of the recipe.
Cropping your photo helps Cricut decide what the background is.
Too Much of the Photo is Removed
That’s where the Restore tool really shines. This is a manual brush that restores the original image. You can change the size of the brush with the slider beneath it.
I Can’t Get a Clear “Cut Image” with My Text No Matter What I Try
Sometimes, when using the automatic background remover, I would just lose the bottom of the letters of my printed font because it is too thin. (This would be a nightmare to weed as well).
A workaround is to erase the text entirely and substitute a better font. Once you’ve uploaded the design to your canvas, you can do this with the Text tool (left side of the canvas). This doesn’t work with handwritten text, as you wouldn’t want to substitute text for something handwritten.
This is Taking FOREVER. How Can I Save My Progress and Finish Later?
You can’t save your image in progress, but you can keep the program open. If you need a new canvas, you can open a second one through the File>New Window at the top of your page.
Is Cricut Access Worth It?
With your Standard Cricut Access Subscription, you’ll get*-
- Unlimited use of 100,000+ covet-worthy, cut-ready premium Cricut images.
- Unlimited access to thousands of projects and hundreds of beautiful fonts.
- Priority Member Care line (50% less wait time).
- 10% off all product purchases on cricut.com, including machines, accessories, materials, and more – including sale items! Guys, this one is HUGE! Especially, if you’re planning to make a big purchase. It also works on SALE items!
And you may not know it, but you can also purchase a Premium Cricut Access Subscription. The has extra benefits.
With the Premium Cricut Access Subscription, you’ll get everything included in the Standard subscription plus*-
- 20% off all materials purchases on cricut.com. Again, this is a HUGE discount when you use it on top of a sale on a machine. For instance, I got the Cricut Mug Press when it was on sale for $169, and then I used my 20% off on top of that to bring it down to $135.
- Free economy shipping on cricut.com for orders over $50. There is usually a free shipping coupon each month available to anyone, but I believe it’s generally for orders over $100. So the lower threshold is great if you just want to pick up some materials during a flash sale.
I Can’t Get a Clear Image from My Handwritten Recipe No Matter What I Try
Although a great step forward, Cricut’s Background Remover is flawed.
No matter what I tried, I couldn’t get a completely clear-cut image with my handwritten text. It worked well with large photo images like the zinnia photo. But it couldn’t see faded ink or low-contrast images.
For this reason, for anything super detailed or tiny, I recommend you use a different program or app like Magic Eraser.
Or use a different app for something that’s handwritten, where it is important to keep the integrity of the writing.
The Benefits of Other Background Remover Tools
- You can preview the cut image as you’re working without switching between the views.
- The Manual Brush sizes can go smaller, and your zoom is greater.
- You can save the image to your Files. Once you clean up an image in Cricut Design Space, you can’t save it to your computer. It is saved to your Image Gallery, but if you ever want to go back and re-work it a little more, you’ll start with a fresh upload. Grrr….
Here’s a tutorial I wrote on how to use my favorite background remover, Magic Eraser. How to Remove the Background of a Handwritten Recipe for Crafting

More Questions About the Cricut Background Remover?
I’d love to help! Just leave a comment below, or tag me in social media.
Thanks for Reading,


