
I think you’ll agree with me when I say that it’s super disappointing when you go to all the trouble to make handmade stickers, and your ink runs when it gets a little wet. Or the paper starts to peel, or the images fade with exposure. Knowing the best ways to protect your stickers means you don’t have to worry about how your stickers will hold up to different situations or applications. You can use waterproof stickers/decals in more places (like water bottles); as a bonus, the ink won’t fade as quickly either.
I loved the idea of making sealed stickers, but I thought you needed expensive paper or you needed to have a fancy machine. But when I looked into it, I found there were 3 methods to waterproof stickers that I really liked because they either saved me time, saved me money, or were simple to apply.
In this post, I’ll let you know what the 3 methods to protect your stickers are and give you the Pros and Cons for each so you can decide which method is best for you. I’ll let you know what materials do you need to make waterproof stickers, how to make normal stickers waterproof, and answer your questions about laminating your stickers.
Table of Contents
Why Seal and Protect Your Stickers
Protecting your stickers by sealing makes them waterproof, and longer-lasting (as they often become scratch-resistant, fade-resistant, and the ink won’t run). Cool, right?
You can confidently use your own waterproof stickers as custom car window decals, phone stickers, or water bottle stickers. You can even put waterproof stickers that are sealed in the dishwasher.
The Difference Between Waterproof and Water-Resistant Sticker Paper
If you look for legit sticker papers, you’ll see that the best you can get is water resistant. That means that if exposed to small amounts of water, the paper itself can repel it.
Waterproof is a stronger claim and means that you can do more than briefly expose the sticker to water. It’s kind of like the difference between a quick sprinkling and a dip in a swimming pool.
It’s best to start with a waterproof material as your base. Not just one that is water resistant.
Use Printable Vinyl and Add a Laminate for Super Resilient (and Weatherproof Stickers)
Sticker paper is made of paper usually, which is a highly absorbent surface. And because the ink will often run when wet, you’ll often get a soggy, water-logged, and unreadable sticker when wet.
If you start with printable white vinyl sticker paper, your sticker surface won’t absorb water but repel it. This means the sticker itself will not break down (like a paper product would) when exposed to water.
These are water-resistant stickers but are they waterproof?
Many companies say that their printable vinyl is completely waterproof and it doesn’t need any kind of sealer as long as you use uv inks. And vinyl is a water-resistant material.
However, when I tested printable vinyl with multiple washes, I found that even with printable vinyl, the ink can run.
So for truly waterproof stickers start with printable vinyl sticker paper- it’s your best option for super durable and long-lasting stickers.
This gives you a great quality product to sell.
Adding an additional protective layer (like a laminate) to the top of your custom stickers will protect the ink and make the surface more scratch-resistant (depending on the method you choose). This durable material will also make your print stay more vibrant, provide UV protection, and make it dishwasher safe!
Doing outdoor applications like custom labels for outdoor equipment like camp gear? Then using one of these methods is absolutely necessary.
Waterproof vinyl stickers are a great way to make bumper stickers, laptop stickers, school supplies boxes, food containers that are long-lasting. With this combo even a water bottle sticker or hydro flask stickers can be completely protected and waterproof.
The Three Best Methods to Protect and Waterproof Your Stickers
These are my 3 favorite methods to waterproof stickers. And they’re pretty popular ways of sealing and protecting your stickers.
There are pros and cons for all three different ways, which I’ll explain below so you have the important information you need to choose the most effective method that’s best for you and your small businesses. So you can make the highest quality stickers
Method #1
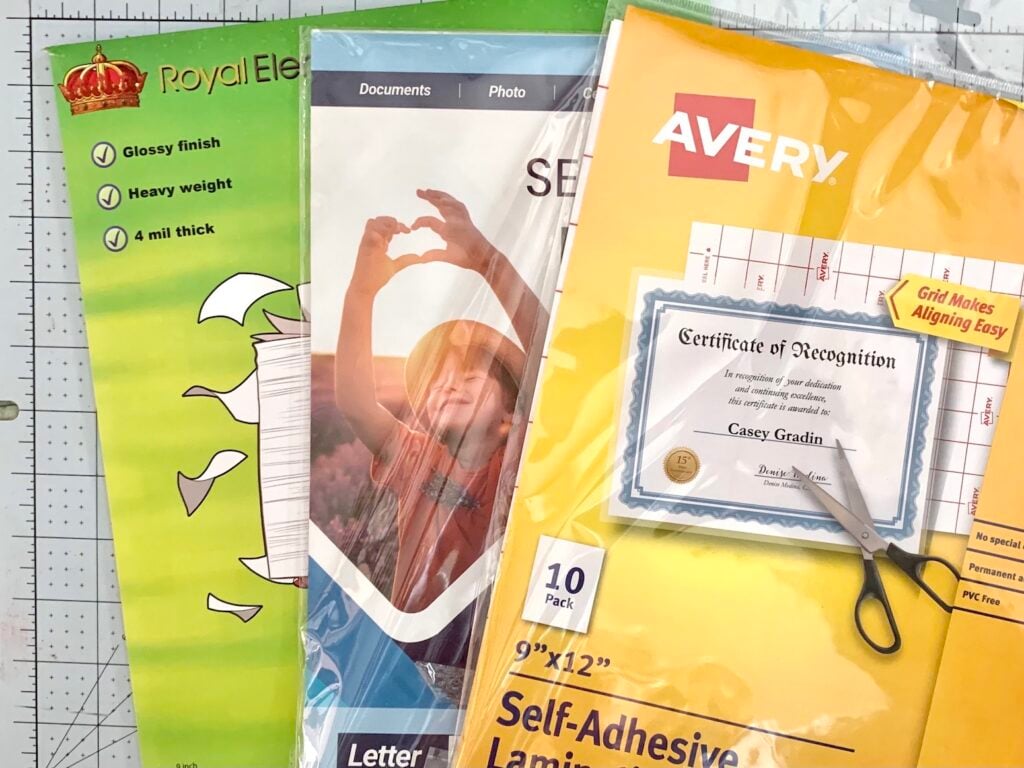
The Self-Adhesive Laminating Method
This is a clear plastic film that is adhesive on one side and will stick to your sticker’s surface thereby sealing it. You can sub clear sticker paper, but laminating sheets often are larger so they encase the whole paper giving you a margin for mistakes in your application.
I have a step-by-step tutorial for applying self-adhesive laminate sheets in my post, How to Waterproof Your Stickers [Laminate 101]. I also test three different brands of protective laminate and have recommendations so you can find the one that’s right for your custom waterproof labels or clear stickers.
Pro’s
- - Application doesn't require any tools other than old credit card + gets easier with practice
- - You can find different thicknesses (from barely there to thickness of a transparency)
- - Because these are meant as lamination they are bigger than needed which makes application less stressful
- - Can be purchased at Office Supply Store or Online
- - No heat, no odor, and no power source needed
Con’s
- -It's easy to get bubbles or folds that are hard to get out
- - It can be expensive
- - Some brands do not come clear but frosted (even if they say clear)
- - Using a scraper to smooth helps with bubbles but can scratch the surface, so be careful
- - The edges of the laminate can seem sharp w/ some brands
Tips- Make sure your work surface is clean so there is no lint on your stickers before you laminate. Align everything before you start. Go slowly and smooth the surface from center out to edges.
Method #2
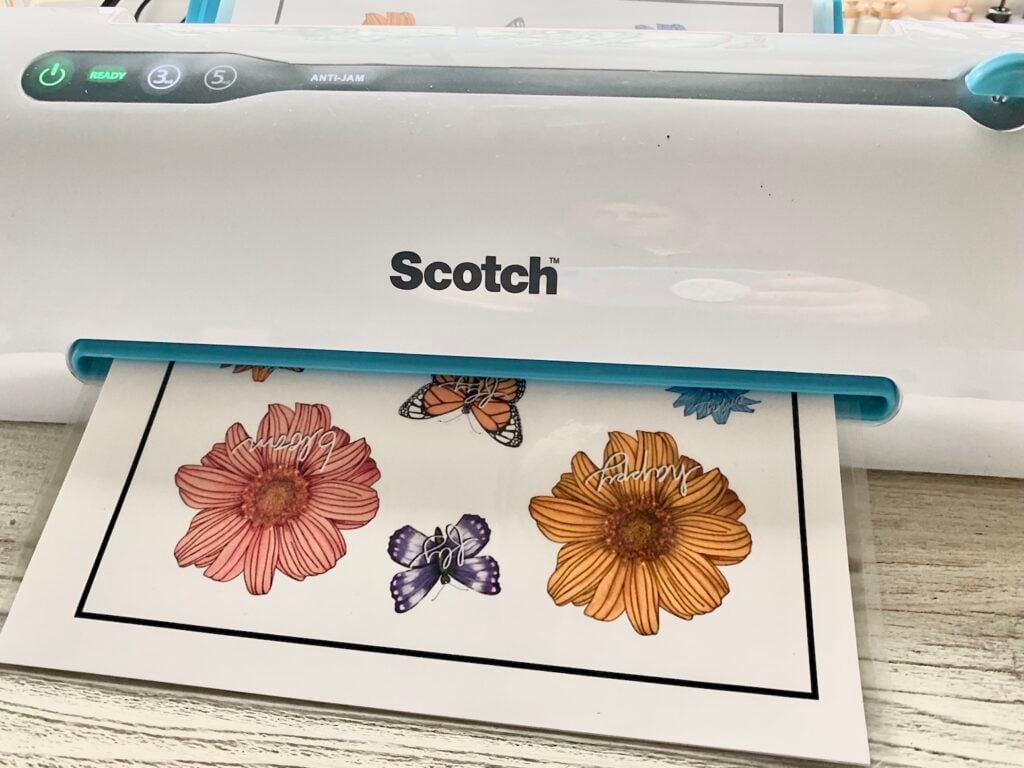
Thermal Laminating Machine
I put off getting a laminating machine for a really long time and now that I have one, I’m super glad I got it. To use it, you MUST wait until the Ready light is on but then you just put two sheets of printed stickers back-to-back and insert them into a thermal laminating pouch. Once it’s gone through the machine, you trim off the sides, and voila! Two sheets of laminated stickers in less than a minute, making this a great choice if you have to do a lot of stickers at once.
To make this method completely waterproof (for things like water bottles) be sure to use printable vinyl, not sticker paper.
I have a tutorial on how to use a laminating machine to protect your stickers in my post, How to Heat Laminate Your Stickers and Labels. In this post, I also have my product recommendations.

Pro’s
- - Super Simple Application that's Hard to Mess Up
- - Saves time (you'll laminate 2 sticker sheets at a time)
- - Clear consistent and durable surface
- - Can purchase laminating pouches in 3 mil or 5 mil
- - Pouches come in different sizes
- - Easy to find generic versions of both laminating machine and the pouches
Con’s
- -You need to purchase a laminating machine
- -Requires power source
- -You'll need space to store the machine (9" -13")
- -May take 1-9 minutes to warm up (depends on machine)
- -Can get wavy vertical lines that show at an angle
- -You may need to press flat with stack of books
- -It's SUPER IMPERATIVE you let the machine warm-up or your bond won't be secure.
Tips- Again, make sure your surface is clean before you laminate as it is a permanent application. Wait until the machine is ready to use before laminating, or you’ll get inconsistent areas that appear wavy. And I feel like it’s worth it to get a machine with auto shut-off and two rollers.
If you don’t need the auto shut-off feature the Amazon brand laminator is a sweet deal. Check the dollar store for supplies as some have found even name-brand pouches there!
Method #3
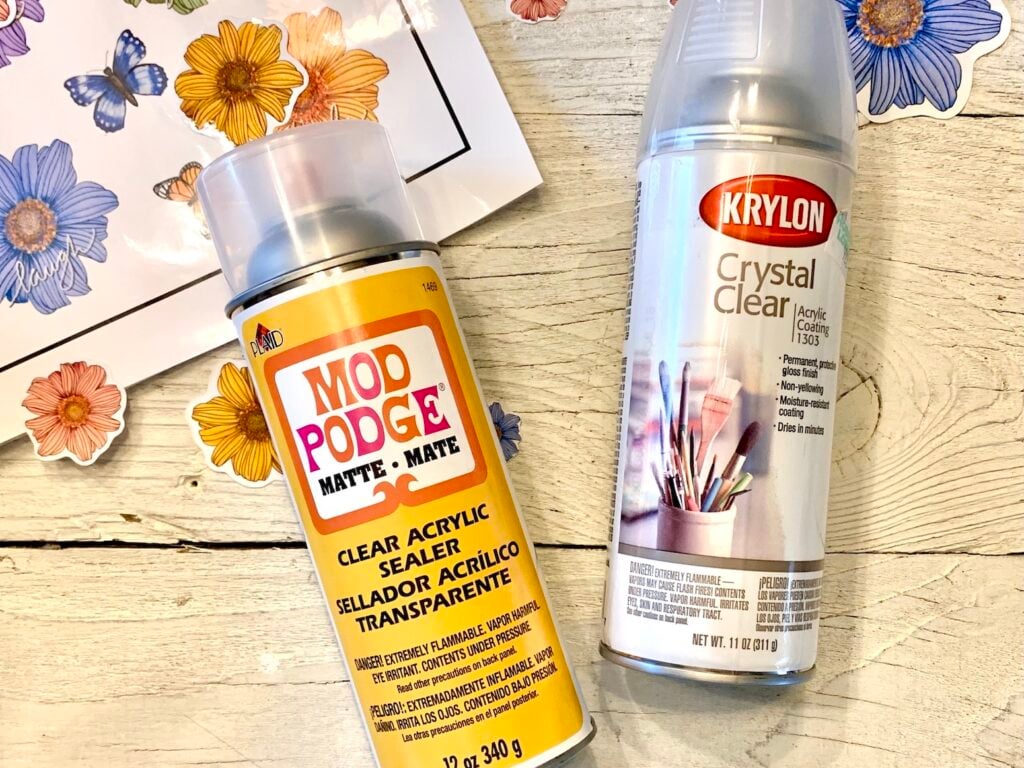
The Aerosol Spray Sealant Method
Spray sealers coat stickers with a shellac-like polyacrylic surface. If used correctly, they can add an almost invisible protectant layer over your sticker designs. It can come in glossy or matte, and there are several tried-and-true brands like Krylon, Mod Podge, and Minwax.
Be sure to wait 24 hours after you print for the ink to dry before you apply a spray sealant, and make sure you follow the manufacturer’s directions for use and safety precautions.
Pro’s
-
- Barely there so it doesn't add unwanted bulk to your stickers
- Best for kiss-cut stickers - - You can do multiple sheets at the same time
- - Comes in glossy/matte, UV protectant, low VOC etc.
- - It can be purchased at craft stores, hardware stores, or online
- - Inexpensive
Con’s
- - Straight up-> you NEED to follow safety precautions (which may include purchasing personal safety equipment)
- - Needs multiple coats and you may need to wait 10-30 minutes between coats
- - Your coverage must be full and evenly applied, you'll need to test to be sure it's working
- - Must be 18+ in some states to purchase
- - Because of VOC fumes you must have proper ventilation
- - Temperatures need to be optimal so you may not be able to spray outside at certain times of the year
Tips- I can’t stress it enough, use safety precautions. Because they are aerosols, spray sealants can be hazardous to your health if not used correctly. I place a big cardboard box out in my yard and spray several at once, then set a timer to repeat as many times as needed.

Best Options to Protect and Waterproof Stickers by Project
Best Option if You Want Barely There Results
Spray sealer wins this one because you can hardly tell it’s there, although Avery’s Self-Adhesive Laminating Sheets are super thin and don’t add much bulk or weight to the sticker. Added bulk makes finding the correct cut settings a little trickier, using a spray negates that issues.
Best Option for Quick Application: Self-Adhesive Laminating Sheets
There is no prep time for the self-adhesive sheets, you just line everything up, peel back the top like a hinge, and then pull off the backing. You do have to smooth out the sheet with a card, but this goes quickly once you have the hang of it.
Best Option for Using with a Cricut Machine
If you’re planning to make kiss-cut sticker sheets with your cutting machine, then getting the right cut setting can get tricky when you’re adding a laminate or self-adhesive laminate on top of your sticker sheet. You’ll either have to test the settings for the perfect cut, or the easy way is to use the spray adhesive for your kiss cut stickers. If you’re making die-cut stickers, the double layer isn’t as hard to get right.
Best Option for Easy Application of Multiple Sheets: Thermal Laminator
It’s so easy to feed sheet after sheet through the machine and your laminating two sticker sheets back-to-back so it goes twice as fast. Again, it’s SUPER IMPERATIVE you let the machine warm-up or your bond won’t be secure.
Best Option for the Budget-Minded: Spray Sealer
A can of spray sealer goes a long way and is cheap to begin with, but use a craft store coupon and it’s a total steal.
Best Option for Outdoor Use: Printable Vinyl with a UV Laminating Film to Waterproof Stickers
If you’d like to make a decal for something that will be outdoors in the elements then you want to think extreme wear and weatherproof, not just waterproof. So use UV-resistant inks, a waterproof printable vinyl base (permanent adhesive), and Oracal UV Laminating Film.
Best Option for Indoor Use: Self-Adhesive Sheets or Thermal Laminator
It’s more about what you want to avoid- fumes in the house that a spray sealant would cause. So either of the other two methods works better for indoor use.
Best Option for Waterproof Car Decals
Start with printable vinyl and if you can, use UV-protectant inks so that you minimize fading. Use a self-adhesive laminating sheet (with UV protection) or a thermal laminator so that you know with certainty that you have absolute coverage over your entire sticker.
Best Option for Water Bottles that are Dishwasher Safe
Printable Vinyl with a Self-Adhesive Laminate. Make sure you use a brand of laminate that isn’t too thick so that you can bend it around the bottle and get a good seal. Avery Self-Adhesive Laminating Sheets is the best product for this because the sheets are thinner and more pliable.
Just a note but Royal Elements claims that their printable vinyl is dishwasher safe without any sealer. Something to test I think!
Best Option for High Gloss Stickers
Looking for a high gloss look for your waterproof stickers? Using a spray can cause a slight cloudiness, so using a high gloss clear self-adhesive will give you the best results.
Best Option for Clear Stickers / Labels
If you are making custom product labels to go on a candle or glass jar then using a barely-there option like the Avery Self-Adhesive Labels is your best choice. You also want to use clear sticker paper or printable vinyl as your base. Be aware that most types of clear printable vinyl have a frosted finish, not completely clear.

My Personal Favorite to Protect and Waterproof Stickers:
Self-Adhesive Sheets
To make custom waterproof stickers it really was close between my top two favorites, but I think I like the self-adhesive sheets a little more. I appreciate how they come in different thicknesses and materials. Testing three different brands, Avery, Royal, and Violetta, I found that I preferred the Royal because it was a medium-weight, and it gave me a glossy sticker so clear that it makes my stickers look beautifully saturated and luminous. The cheapest, Avery is also a good choice. The Violetta feels like a transparency sheet and the edges seemed a little sharp. I didn’t love that.
My second favorite method of waterproofing is Thermal Laminating. It’s seriously SO fun to use. But, it sometimes had wavy lines where it didn’t heat properly, and if I didn’t let it warm up the full 7-9 minutes, then the laminate didn’t fully bond to the sticker paper surface. It’s also an extra cost that not everyone will be okay with spending. I know it took me a long time before I purchased one- I do wish I’d got one ages ago though!

I hope you enjoyed this post on how to create high-quality stickers and water-resistant labels. Now you can create your own custom stickers in the exact size that you want to go on your car windows, your notebooks, or even your laptop!
And if you’ve found other ways to protect or waterproof your stickers, I’d love to know! It’s always awesome to discover new ways to do things. ❤️
Thanks for Reading!


Get FREE Stickers!
Subscribe today and get the password to my Freebie Library and grab the Watercolor Daisy Sticker Designs for free.
You’ll get 3 hand-drawn sticker designs in yellow, green, and pink. In the photo I added text to the pink flower and flattened it before I print then cut to make jar labels- and you can too!


Hi Jennifer,
Thanks for the comparisons. My question is this, will the Cricut see the registration marks on the print and cut? I’ve been told that if you seal the sticker sheet with anything the Cricut won’t be able to cut the stickers out.
Hi Roseann,
Cricut cuts these options just fine. I tested them all pretty extensively. Just once with the 40 sheets of laminated stickers did I get an error and it was easy to cancel out and then start the cut over again. However, if you do have a problem with glossy paper or a seal like this, then you can put Scotch transparent tape over the registration box (the matte in green packaging). This reduces the shine just enough.
For the die-cut stickers I cut using the holographic Kraft setting and for a kiss-cut I used the Stencil .04 material setting. But you should always check your cut because it may vary according to your materials. I do have a post coming that gets into the actually products I used a little more. ❤️ Thanks so much for your questions!
Hi Jennifer!
Thank you for going into great detail! Would you mind providing the printable vinyl that you used during this process?
Thank you!
Liz
Hi Liz,
I used the Zicoto and Joyeza brands of printable vinyl. There are links in the post for each.
Thanks for your comment,
Jen
Hi, this is probably a silly question, but how do your stickers still stick after they’ve been laminated? Do you laminate them with the backing sheet still on and then cut them out? And will the thermal lamination method work if sticking them to a rounded surface like a drink bottle?
Hi Cassie,
Totally NOT a silly question. I do two sticker sheets back-to-back. That way after you laminate them in a folder you can just cut the two sheets apart and they will only be laminated in the front.
And they can be used on a water bottle. I would really suggest you use printable vinyl for your sticker paper as well.
What printer do you use?
Hi Julia! I use the Canon Crafter’s Printer. It prints 12” x 12” and has a rear feed so that I can use thicker papers without a jam happening. It’a great for stickers.
Here’s a link to it- https://wellcraftedstudio.com/go/canon-crafters-inkjet-printer/
Hiya Jennifer,
I’ve read through your series; 101 on waterproofing, and choosing sticker paper, and this one. Much appreciated!!
Spent weeks just researching how to (correctly) make stickers for granddaughters’ cups and tumblers and was getting a debilitating case of analysis paralysis -kid you not.
Because of you, I feel ready to attack this project.
Thank you, thank you!
Oh my gosh- this totally makes my day! Feel free to contact me if you seize up while in the process. This happens to me all the time. I’ll talk you down. ❤️ Thanks for your comment! I really do love it! -Jen
Hi Jennifer, I read your articles. I printed a sticker on glossy paper, tried the scotch matte tape and my cricut still won’t cut out my design. It’s just a circle. Do you have any suggestions or tricks?
Hi Karen,
Well darn! I guess I would layer it again. You could also try taking your machine to an area that is lit differently and see if the sensor can read the box better. You could also use a black marker to go over the black lines, but really that only seems to work if your ink is running out and the lines aren’t super dark. Some people have gone ahead and put the scotch tape right over the sensor on their machine. Those are all the ideas I have because the scotch tape thing usually works for me. I’ll take a look online and see if there are any other tips or tricks.
-Jen
Ever had any issues with the laminator leaving little “bubbles” where it didn’t quite adhere? Have you tried running them back through? My first two sheets (I used the Joyeza Vinyl Sticker Paper) ended up with bubbles on both sheets. I am considering running them back through. Could it be that I didn’t wait long enough for them to dry before putting them through the laminator? I LOVE how fast and easy this was – but concerned that I’ve possibly gotten off to a bad start! LOVE LOVE LOVE your articles – ALWAYS very helpful!
Hi Sherry! Sorry I missed this question! I was just typing that I had never gotten bubbles when I think I remember that actually happening one time. I don’t recall why though, so I did just do a little digging and found an article that said bubbles happen if the ink isn’t dry and the temperature on the laminator is too high. So you were right! It suggested you make sure it is on the 3 ml if that’s an option because that will be a lower temp than the 5 ml.
Hope this helps and good call on the troubleshooting!
Jen
Hello, I stumbled across this article looking for a way to help with my weird specific situation. I got a waterbottle as a pressent from when I was in our school’s musical, but they put stickers on it already. I can tell they aren’t waterproof because I lightly ran water over them to test them and the ink slightly ran already. I really don’t want to ruin any of them because they’re all refences to the 2 productions I was in for senior year and I’m a helpless sentimental. Is there any way I can save the custom stickers or are they destined to run into ruin?
Hi Clarissa! Great question- if you place a clear vinyl laminate sheet over the sticker it should protect it. You can get Avery self-adhesive laminating sheets and they would work great.
Thank you so much, I’ve had this bottle for over a year now and I’ll finally be able to use it without worrying about completely ruining the sentiment behind it. Thank you🧡
My pleasure! My son is in his last year of high school and has done theater. So I’m totally sympathetic to how much time and memories you must have and how important that token is! Let me know if I can help at all, or if you have any more questions about it.
Jen
Thank you for your help! I let my stickers dry overnight and then tried the heat lamination again and it was better. Still lost one sticker on each of the two sheets – but better than the first time. I am going to experiment with some other printable sticker vinyl and see if that makes a difference too. I really like the summary you used on this article – super helpful. Have a great day!
Hello! I’m having an issue with my stickers not sticking to my water bottle. I used the printable vinyl you suggested along with the Avery laminating sheets. They are super thick this way also and after being cut on my Cricut the edges seem super sharp. Any advice?
I couldn’t get the spray, but had a laminator and pouches, I let the laminator warm up for about 10mins past the ready light and did two sheets back to back on 3mm setting. I cut the edges off and the fronts looked good. When we started cutting them with scissors, the laminate started peeling off, but usually were still stuck a little on the bottom or sides, which after trying to peel the rest of the plastic off, just ending up tearing the front of the sticker off. Tried again with another machine and even ran one through twice, but same results. Might have been the 3 mil pouches or the two Scotch machines just weren’t hot enough.
Hi Jeff! I ran into this as well, and after digging in FB groups, I found the sticker paper I used with the Scotch brand was the issue. They didn’t play well together. It worked just fine when I switched to the Zicoto brand with the laminate. I’ll go back and make sure I call that out in the post. I mean it could have been the not hot enough thing, but it was the paper when I had the issue. Hope this helps! – Jen
Hi! I may just be missing the obvious but I can’t find where you name a printable vinyl recommendation? I would love to know what you recommend! Thank you!
Hi Kate!
I like both Zicoto and Joyeza, but I know a lot of sticker makers will only use Zicoto. Especially if they are using the heat laminate method for waterproofing. That method doesn’t seem to work well with some other brands of vinyl.
Hope this helps!
Jen
I am using printable vinyl and a single sheet laminating sheet for my stickers. When I get to the cutting, it only cuts the laminating layer, not the sticker. I chose the printable vinyl material I’m using the heavy/more pressure setting. Is there a different material I should choose to ensure it goes through both layers? OR…should I print and cut the printable vinyl then laminate the sheet and cut again?
Hi Amy,
So, unfortunately, there’s no easy answer here, and you’ll have to do a little testing and then create a custom material setting. To do that I’ll usually start by looking up the material settings for the closest thing. To do this, go to the 3 lines in the upper right corner of your Cricut screen, then go to Manage Custom Materials. This will give you a list of the Custom Material Settings for your machine. For kiss-cut stickers, I’ll often use the Premium Vinyl Setting that’s a pressure setting of 107 with a single pass. Since we know that’s not enough, you can create a custom material and either increase the pressure, or you can turn on the multiple pass option. So for instance, you might want to test it at 140 and 2 passes. Then, just make sure you’ve named it something obvious like Kiss-cut PV w/ Lam.
I hope this helps!
-Jen
Hey there Jen,
What method or combination of parts of methods, would be best to sticker a motorcycle helmet?
Thank you in advance!
Kelli
Hey Kelli! You would want printable vinyl that is designed to hold up for exterior use. Then I would use a self adhesive laminating sheet that has some uv protection. I’ll look around and email you if I find something good. Thanks for this great question!
Hi! I have a quick question, I’m not sure if you are still answering this thread but I use Scotch Pouches (with Scotch Laminate Machine) and Evergreen Goods Waterproof Inkjet Glossy White Vinyl as the sticker paper. Everything is fine until I put them on certain things, for instance, a water bottle (tumbler) and it doesn’t adhere well to it like it starts to peel up. Could the issue be the type of sticker paper I am using? Thank you in advance if you do reply!
Oh my gosh. I can’t believe I missed this. So it should work since you’re using Printable vinyl, I have heard that it works best with the Zicoto printable vinyl though so that’s what I use and recommend. Hope this helps!
Jen
I’m so excited to try the thermal laminator process! Thank you so much for showing us how! Do you have a video on YouTube with these directions? Thanks!
Hi Valerie! Unfortunately I didn’t make a video on making laminate stickers. It’s a great idea though! Thank you!
What type of thermal laminator are you using? I have a 10 year old scotch brand laminator. I take it you thermal laminate and then send sticker sheets through cricut to be cut.