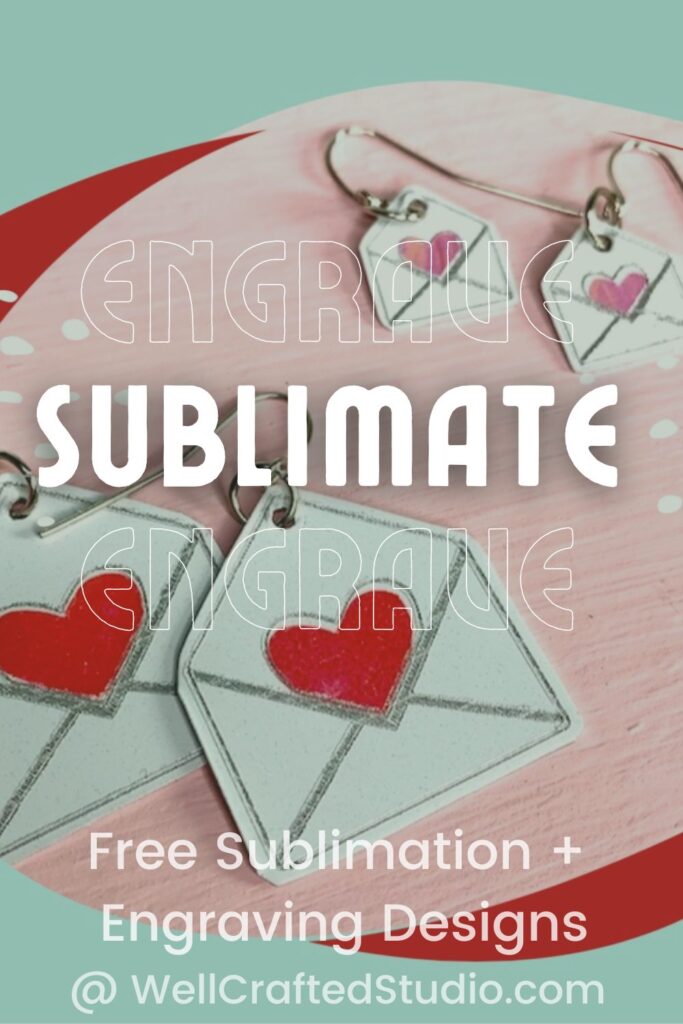
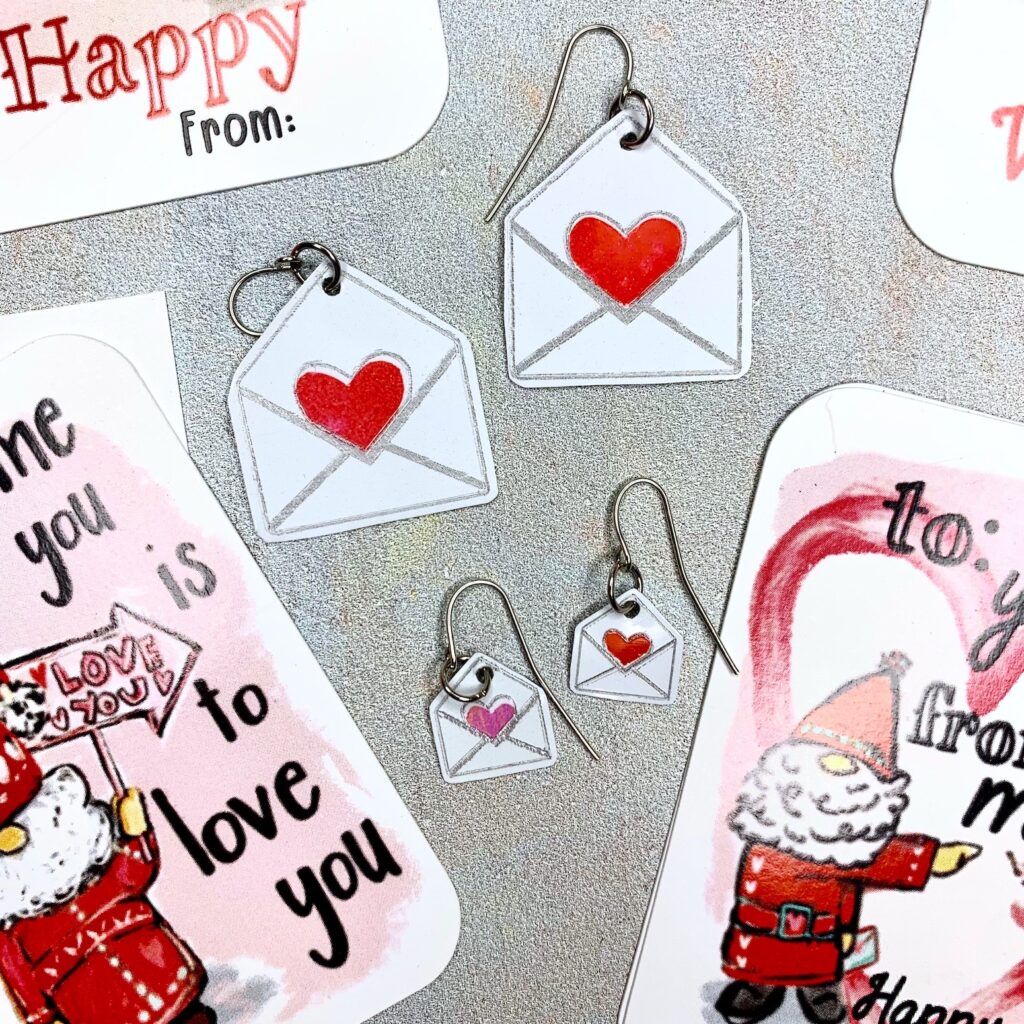
These little earrings are SO FUN and so easy. AND they’re the perfect little gift for your Valentine or Galentine this year. Or maybe just for you! To make these suitable for engraving, I added the linefill that gives you a more visible engraving. In this tutorial, I’ll also show you how to use Infusible Ink on white sublimation business cards, cut the shape out with metal jewelry shears, and add the earring wires. You will fall in love with engraving when you try to engrave Infusible Ink V-day Earrings with Cricut. I’m so excited to show you how simple and easy this is!
These earrings are based on a design by my craft blogging bestie, Amy Romeu (of AmyRomeu.com) that she features in her Vday Earring Workshop**.
Amy is the QUEEN of making earrings with a Cricut. AND if you’re interested in her workshop she has a $5 off coupon code JUST for participants of my 3-week FB Engraving Challenge! I’ll have more on this in my FB group and you can get the code there.
Get the Free Engraving Design!
If you’d like to download this FREE Love Letter Engraved Infusible Ink Earrings Design you find it in my Free Library! This is a password-protected page that has hundreds of free designs that you can download and use to create with.
Need the password? Just sign up for my email list, and you’ll get the password emailed directly to you!
Rather Watch How to Engrave Infusible Ink V-day Earrings with Cricut?
Catch the Facebook Live Tutorial Replay on YouTube!

Tutorial: How to Engrave Infusible Ink V-day Earrings with Cricut
**This post contains affiliate links, and I will be compensated if you make a purchase after clicking on my links.
Tools and Materials
- White Aluminum Sublimation Business Card
- Cricut Maker, or Cricut Maker 3 with Engraving Tool
- Purple Strong Grip Mat
- Blue Painter’s Tape
- Infusible Ink Transfer Sheet (in pink Marble or red color) w/ small piece of the unwaxed paper that comes rolled up with the transfer sheet.
- Cricut Easy Press Mini, Easy Press 2, or Easy Press
- Easy Press Mat or Ironing Blanket
- Piece of cardstock to protect the Easy Press Mat from the Infusible Ink
- Metal Jewelry Shears
- Earring Hooks (this earring making kit has jump rings, hooks, and more)
- Jump Rings
- Jewelry Pliers, two pairs (this is a good inexpensive set of tools, and this is the super nice set that I have used and love.)
Directions
Step One: Download the Free Design
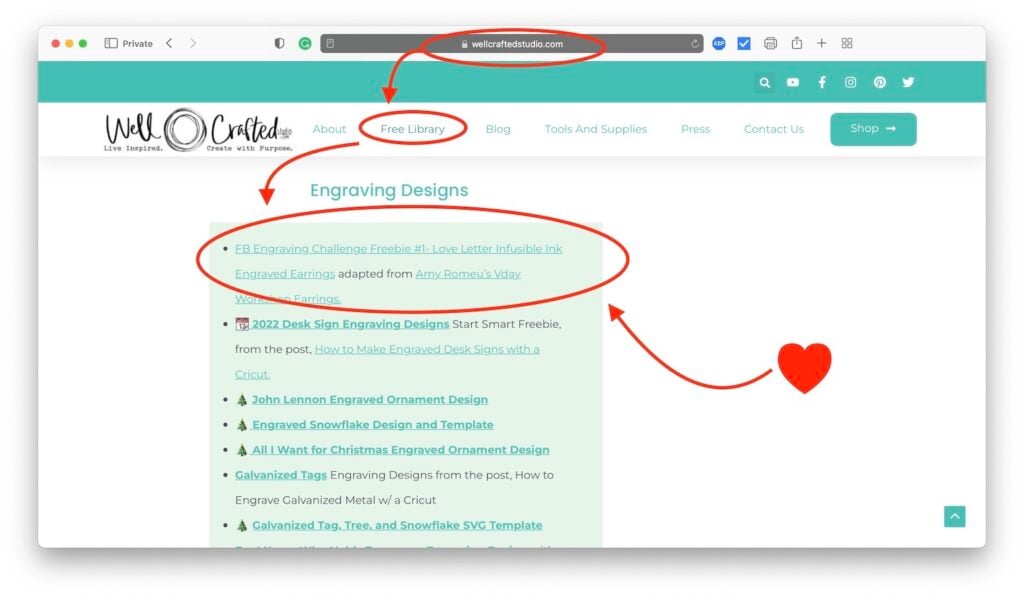
To download the free design, go to the Free Library and click on the Love Letter Earring Design to download the design.
Step Two: Upload the Design Into Cricut Design Space
In Cricut Design Space, click New Project to open a new canvas. Then, at the bottom of the left-side toolbar click the Upload icon.
Click Upload Image, and then Browse. Click on your file to select and then hit the Open at the bottom of the screen to Upload into Design Space.
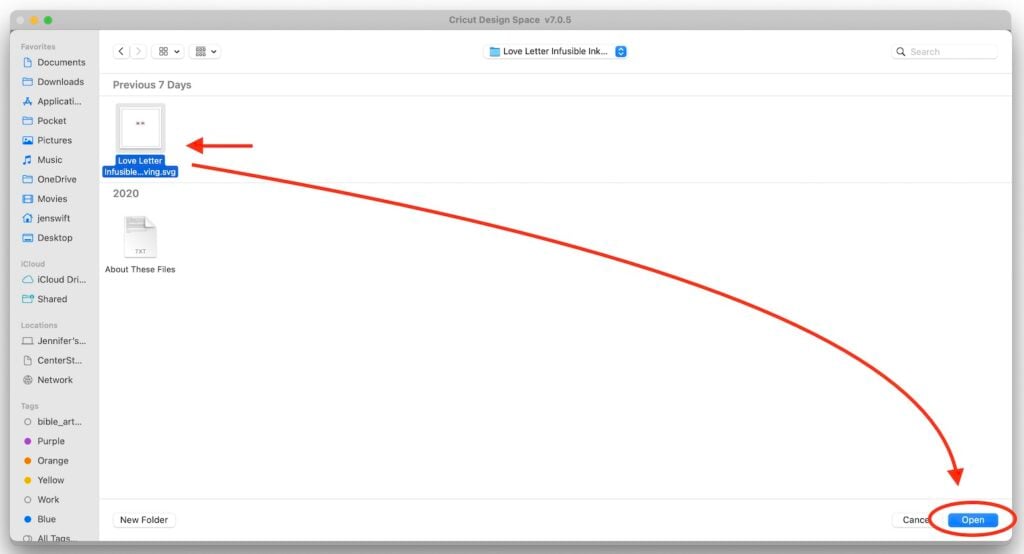
Save your design as a Cut Image and then hit the Upload button at the bottom right of your screen.
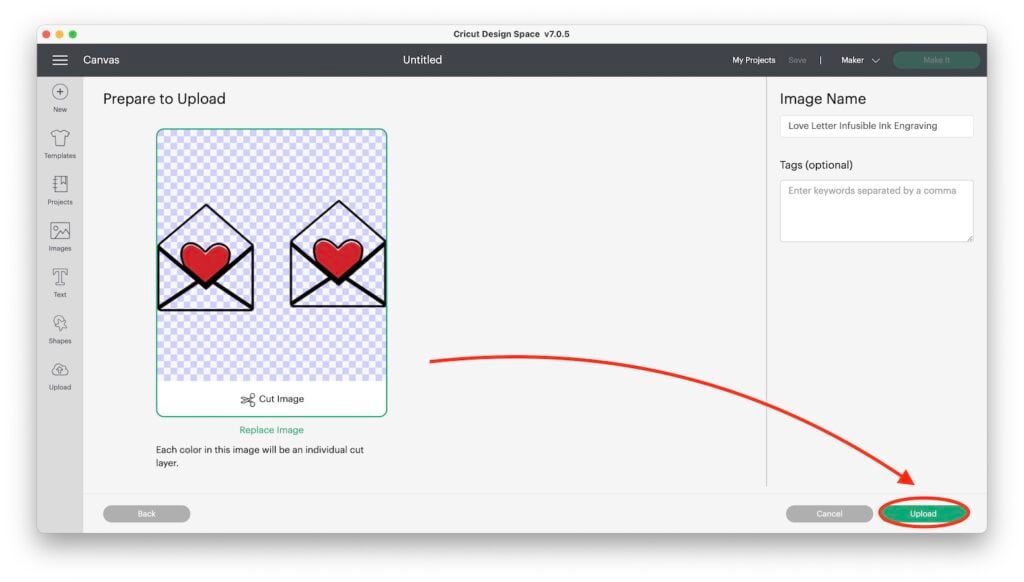
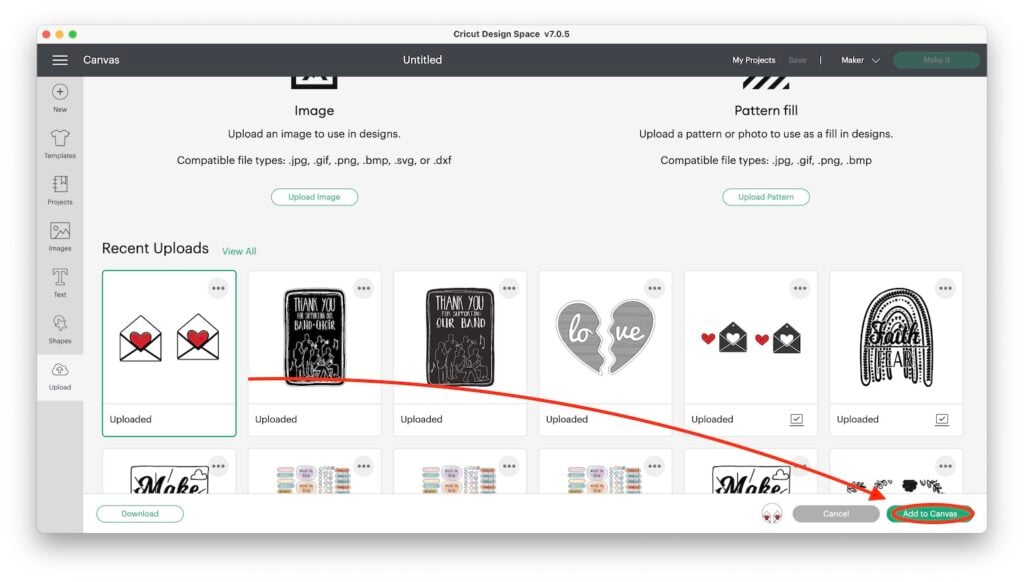
Back in the Uploaded Images Gallery click on the design to select it and then Add to Canvas. This opens it on your canvas!
Step Three: Select All the Layers and Size the Design
Now that you’ve uploaded your design, it’s time to size it. Make sure all the layers are still all selected (they will appear grey in the Layers Panel). Or you can hit the Select All in the top toolbar.
Next, there are two ways to size your image. One is the Size tool (with height and width) in the top toolbar, the other is to click on the canvas off to the side of the designs and then hold and drag across the design.
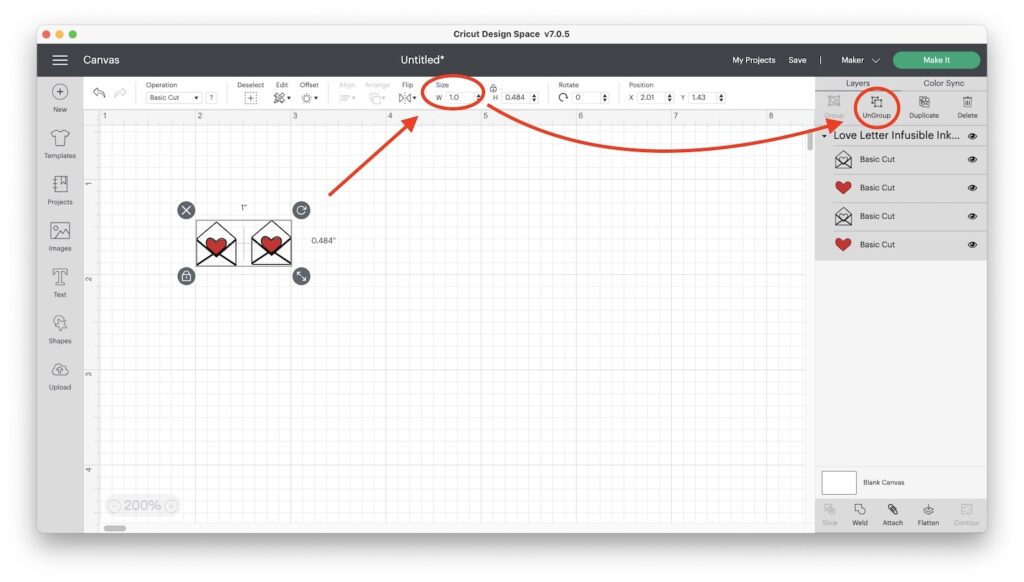
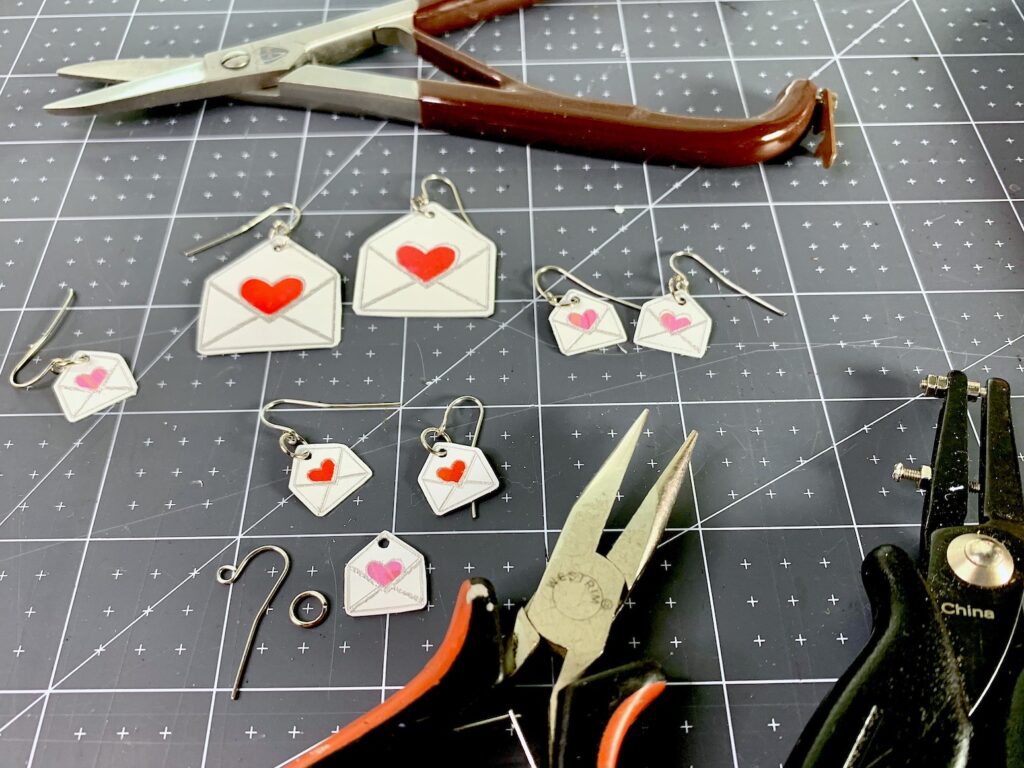
To size the design, I kept the size they imported in at for my first pair.
For a second pair, I changed the combined width to 1″ for the small earrings (making each of the about .46″ wide. You can see both sizes of completed earrings in the pic at the bottom of this page.
Step Four: Ungroup and then Group the Layers (optional)
Next, after you’ve sized the earrings, it’s time to UnGroup all the Layers, so we can re-roup them as hearts or envelopes. With the layers still selected, just hit the UnGroup at the top of the Layers Panel.
Tip: To group layers quickly, first click on one of the layers you’d like to select. Again, this greys that layer to show it’s been selected. Then, holding down the shift key on your desktop, click on the next layer you’d like to select. This shortcut allows you to group just the layers you’d like to.
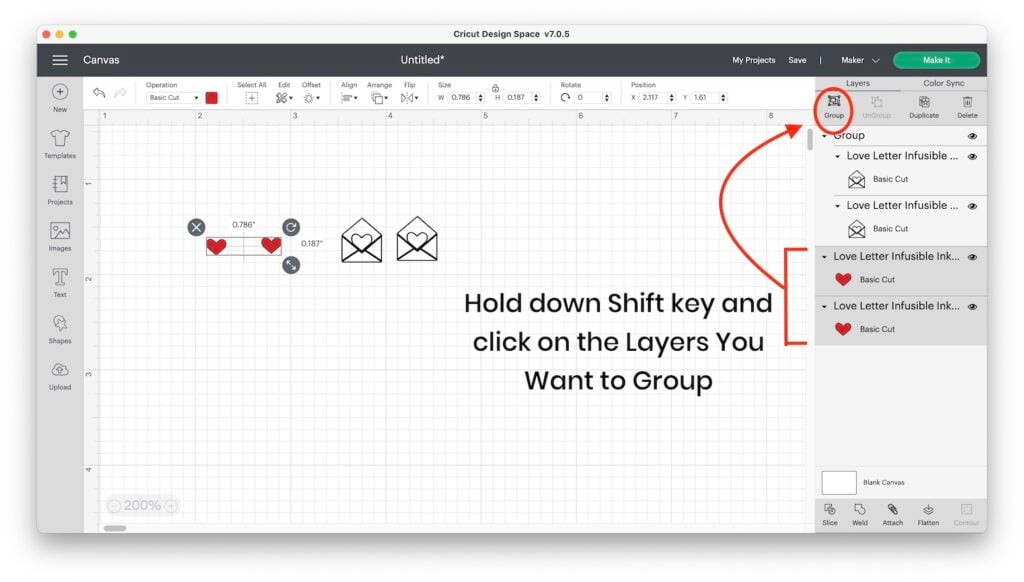
This is an optional thing to do because it’s basically ONLY connecting them on this canvas, and just makes keeping them together easier.
Why Group? In this project, we want to keep the exact distance between the hearts and the envelopes to make our final assembly easier. Grouping is a tool that makes that easier.
HOWEVER, Grouping does NOT carry over to the Mat Preview Page. To do that you need to Attach.
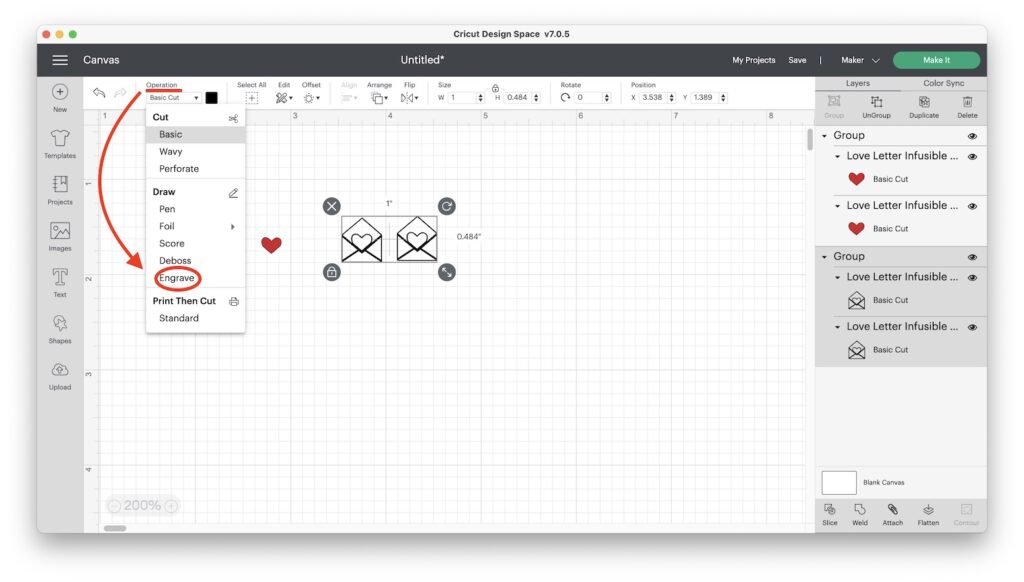
Step Five: Change Operation to Engrave
Once you’ve grouped the hearts and envelopes separately, be sure to change the Operation for the envelopes to Engrave. The hearts should remain as cut images.
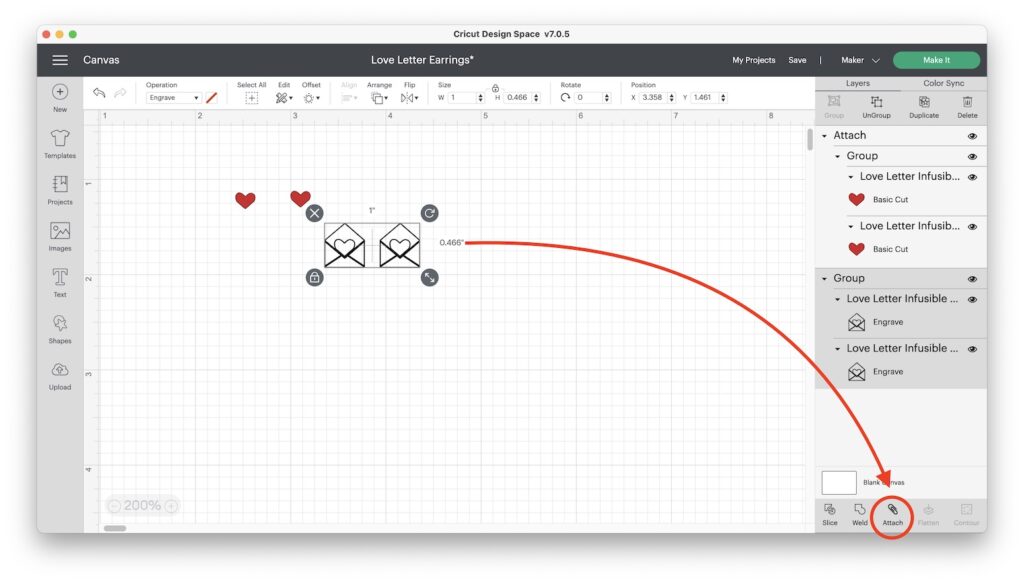
Step Six: Attach the Layers
Next, select the hearts and click Attach. Do the same with the envelopes.
Step Seven: Save Your Project and Make It
In the top toolbar, on the right hit the Save button and name your project. You can also add it to a collection at this time. Click Save.

Then, click on the green Make it button in the upper left corner of your screen.
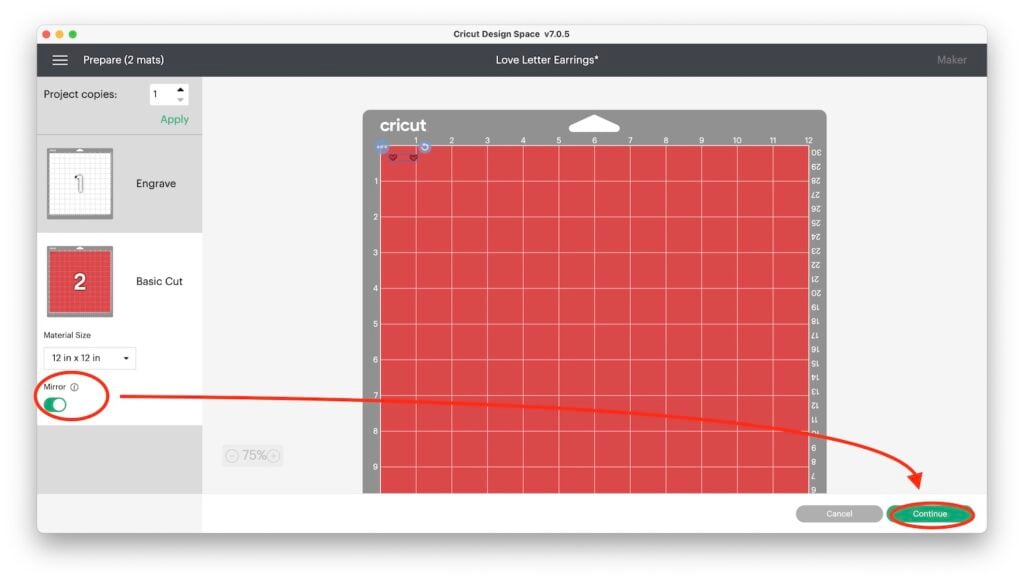
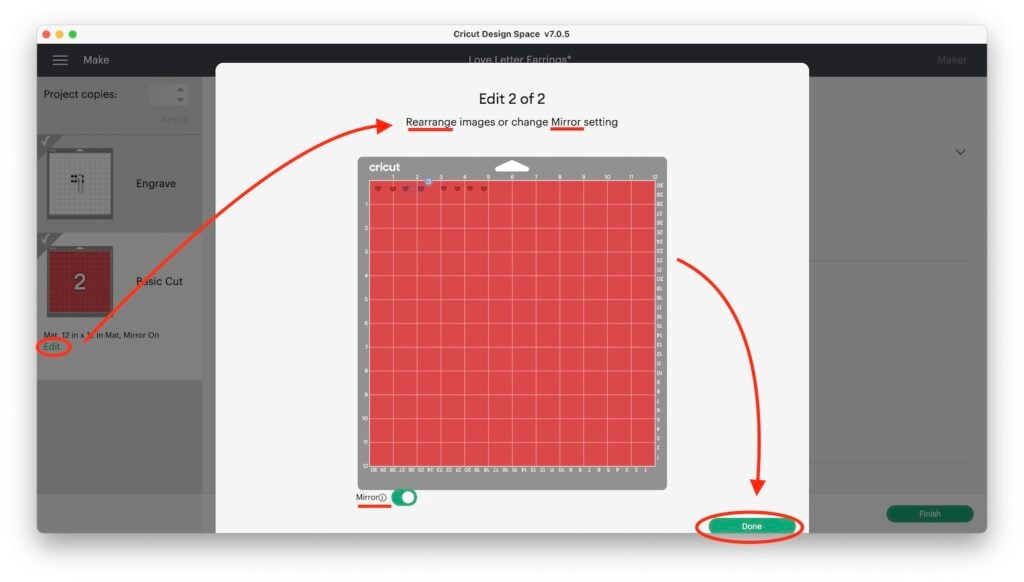
Step Eight: Make Adjustments on the Mat Preview Page
Mirror the Hearts-
On the Mat Preview Page, click on the mat with the hearts and in the sidebar be sure to toggle on Mirror.
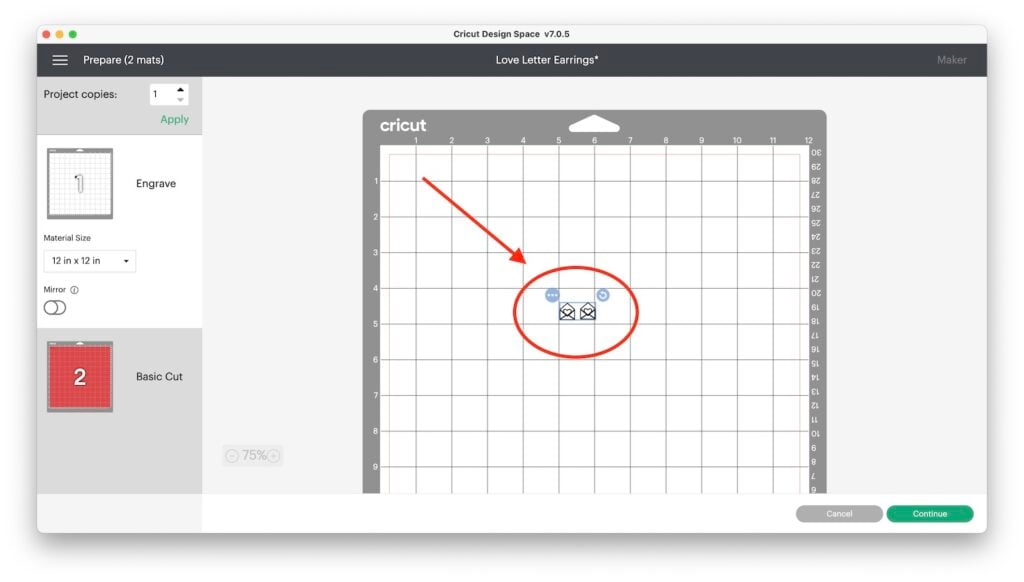
Move the Envelopes to the Center of the Mat-
On the mat with the engraving designs click on the envelopes and drag them to the middle of the mat.
Step Nine: Prep Your Mat to Engrave
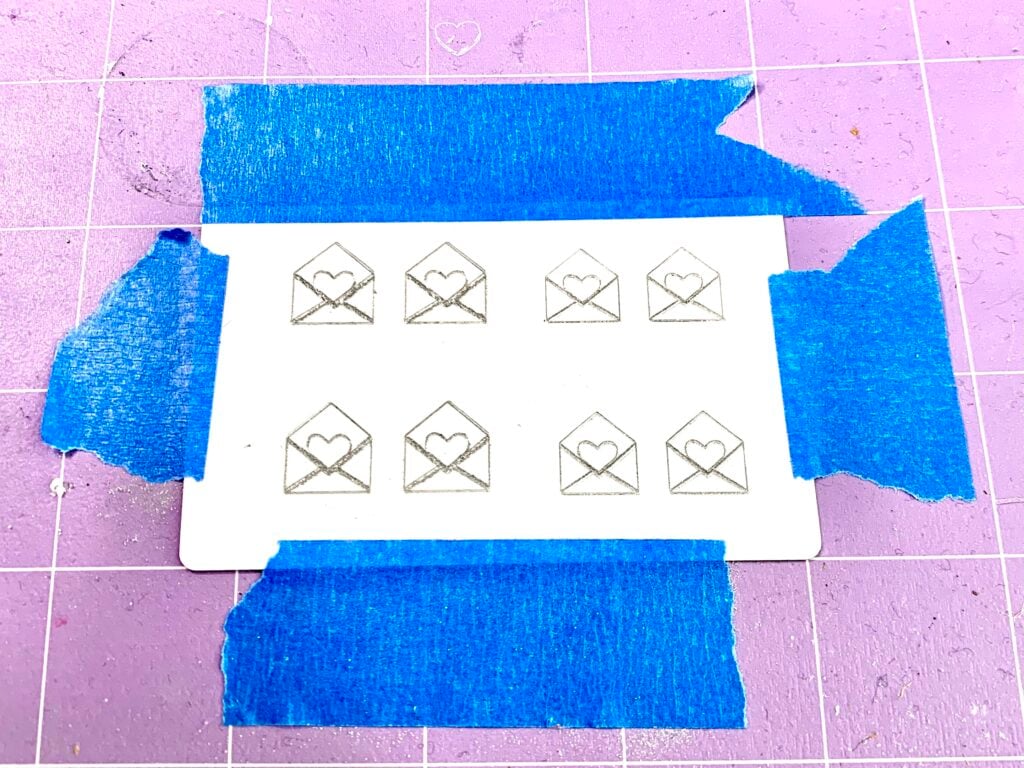
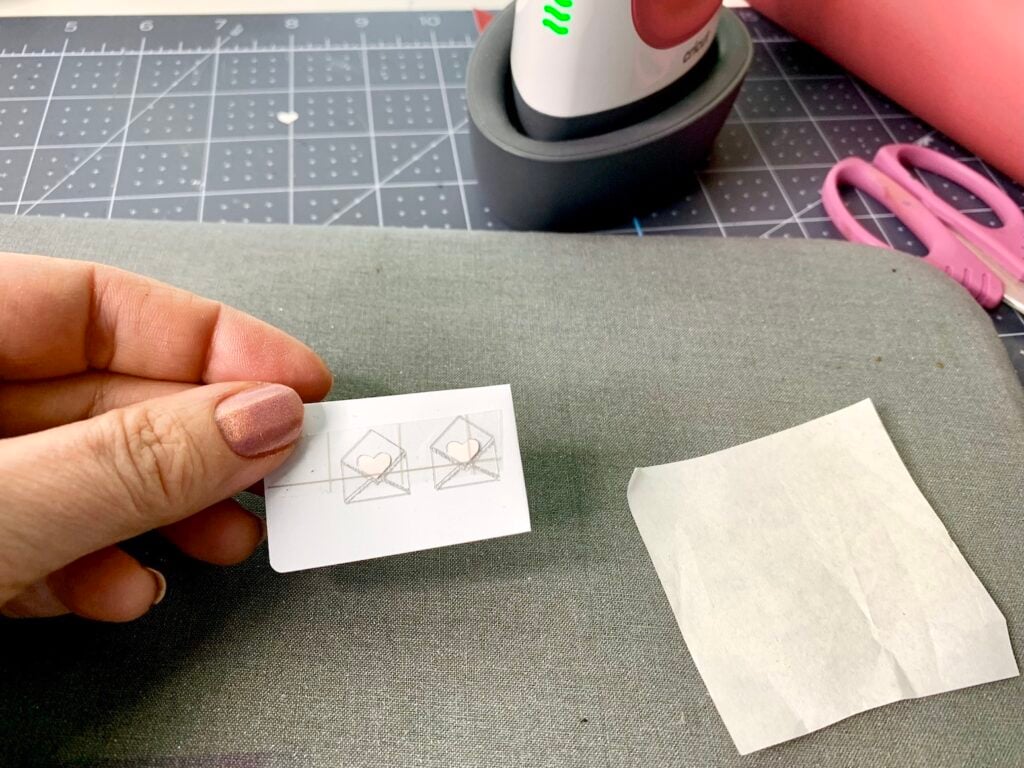
First, place the white aluminum sublimation business card in the center of your mat.
Then, to make sure the card is firmly stuck to a purple strong grip mat press down on it evenly. And to make it super secure, use blue painter’s tape to tape down the edges.
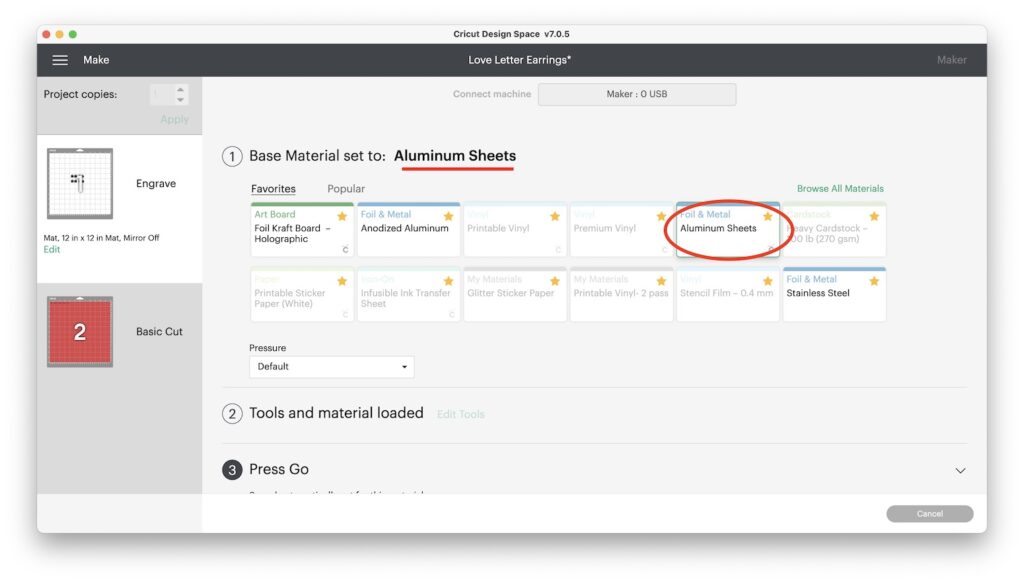
Step Ten: Choose Your Material Setting and Insert the Engraving Tool
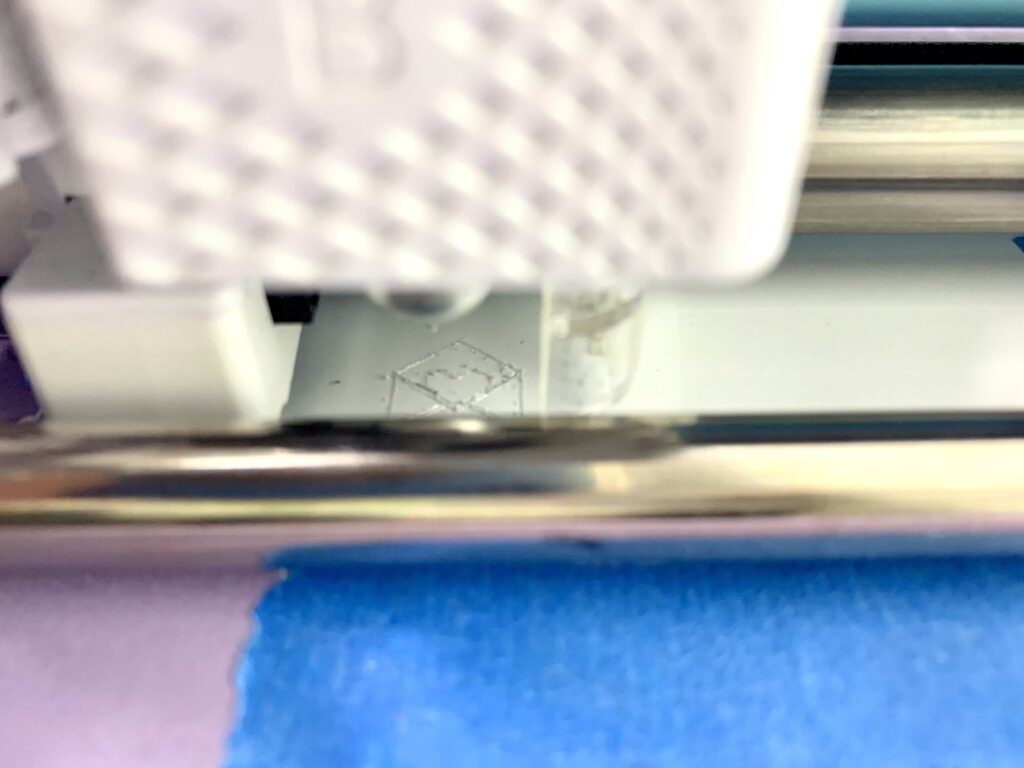
Choose Aluminum Sheets as your Material Setting and then make sure you have inserted your Cricut Engraving Tool into your Maker. To do this, open the clamp on carriage b and align the brass gear on your tool with the gear on your Maker. Then, close and latch the clamp.
Step Eleven: Engrave!
Now it’s time to Load your mat using the Load/Unload (arrow button) on your Cricut Maker. Then, when prompted hit the “Go” button that looks like a Cricut “C”.
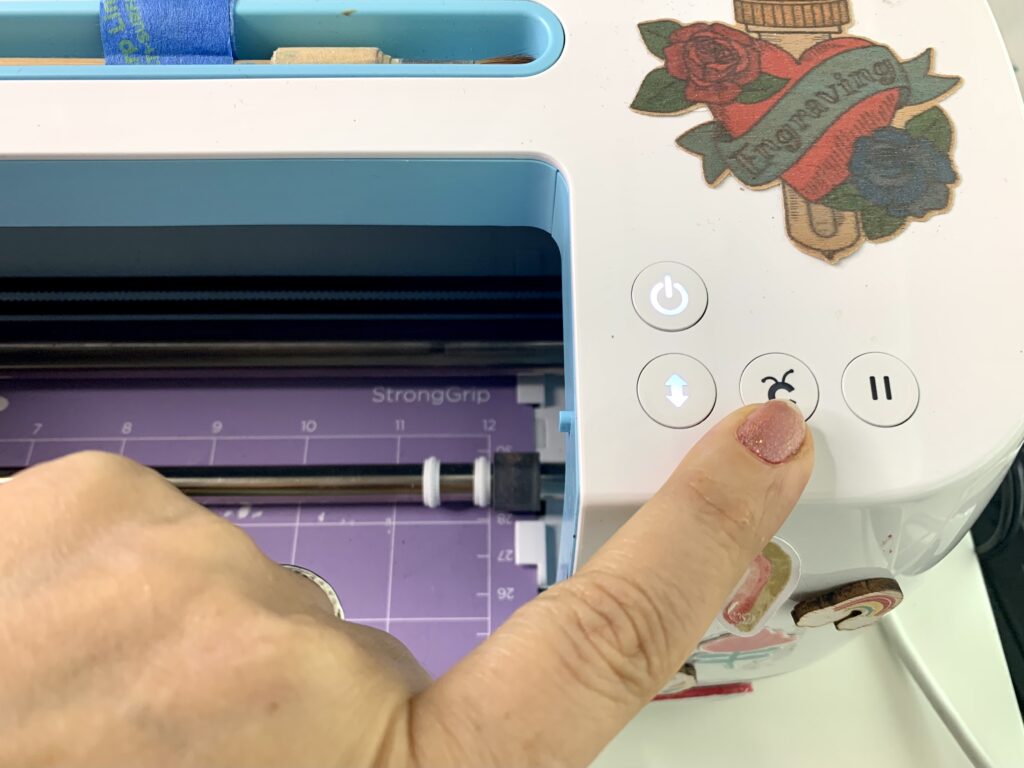
When it’s finished engraving (about 30 min. per earring), Unload your mat by pressing the Load/Unload button again.
Then, peel off and use the sticky side of the blue painter’s tape to pick up the bits of engraving debris from your metal. Next, remove the metal business card from your mat. Yay!!!
Note: For this design, I chose not to darken the engraving because it shows up perfectly fine against the white of the metal (and I like the glittery look of the engraving fill). Also, you can use a darkener if you’d like. I explain different options in my post, Best Tools and Supplies for Engraving with Your Cricut Maker.
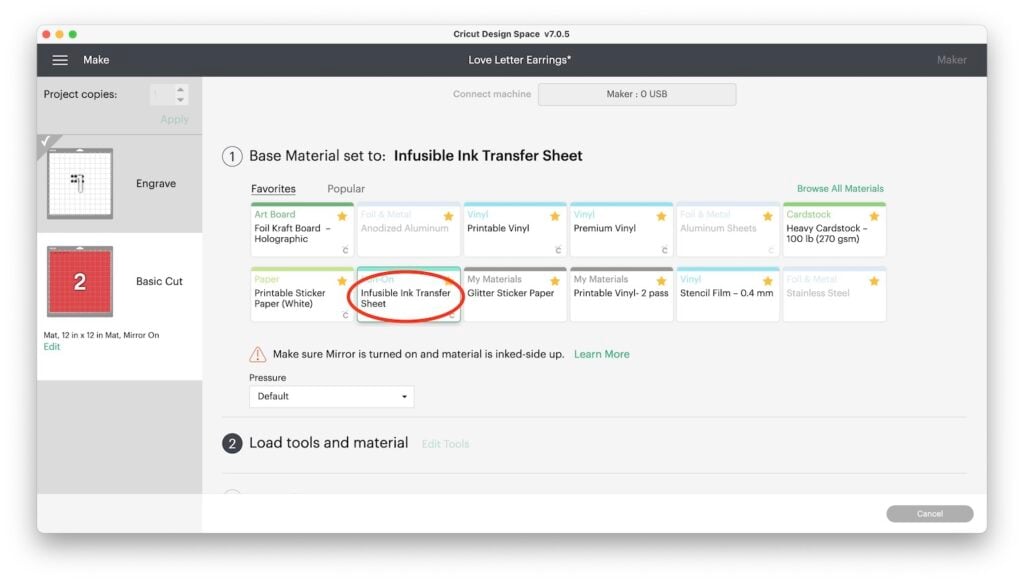
Step Twelve: Prep Your Mat to Cut the Infusible Ink Transfer Sheets
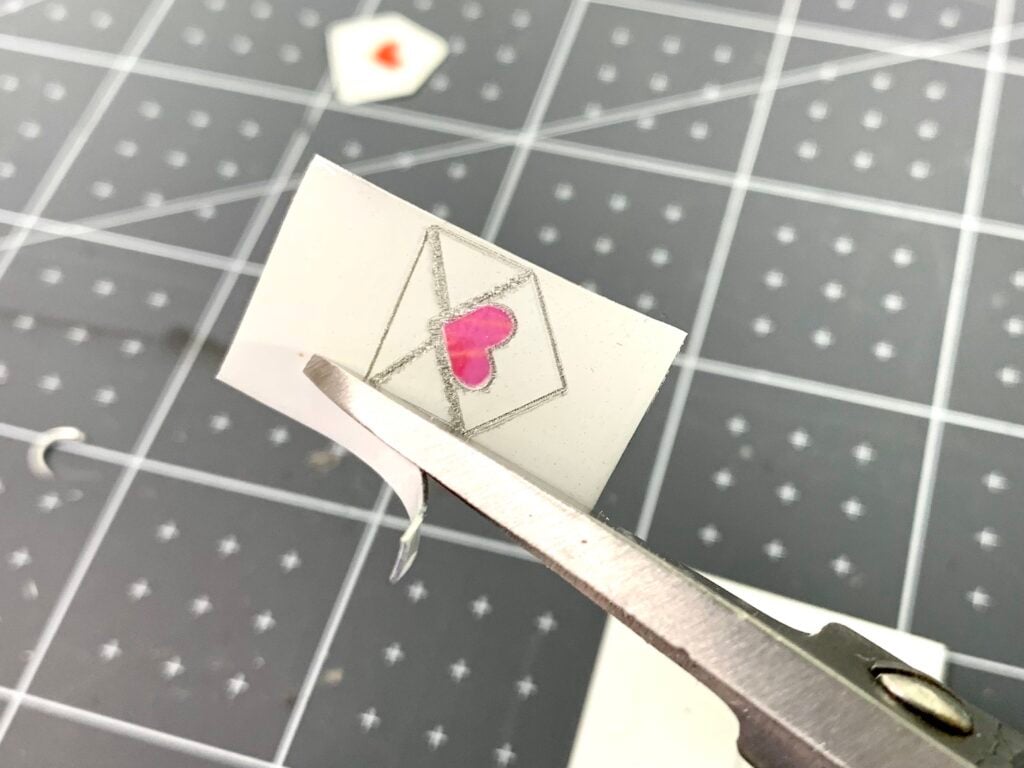
Next, it’s time to prep your mat to cut the little Infusible Ink hearts. Cut a piece of the Infusible Ink Transfer Sheet that is the size of your hearts, and be sure to choose a part of the design that will show up well at this small size.
I used the Marble Infusible Ink Transfer Sheet (pink) and a basic red.
Note: For this project, I recommend you keep the clear transfer sheet on the back of the paper carrier sheet. This is going to help us keep our alignment and make the hearts easier to position on the engraved envelopes.
Now, place this small piece on the mat so it aligns with the position shown on your Mat Preview. (If you can’t recall where you had it, then you can click on that mat on the left-hand side of your screen).
Tip: If you forget to mirror your design you can do that while engraving by clicking on the second mat and using the Edit option. You can also move your designs using this option too.
Step Thirteen: Choose Your Material Setting and Insert the Fine Cut Blade
Now, it’s time to choose Infusible Ink Transfer Sheet as your Material Setting. And then make sure you switch out the Engraving Tool for the Fine Cut Blade.
Step Fourteen: Cut the Infusible Ink Hearts
Load Your Mat using the Load/Unload button on the Maker again, and then when prompted, hit the blinking Cricut Go button. Cutting the hearts takes seconds.
Then, unload the Mat and remove the Infusible Ink transfer sheet.
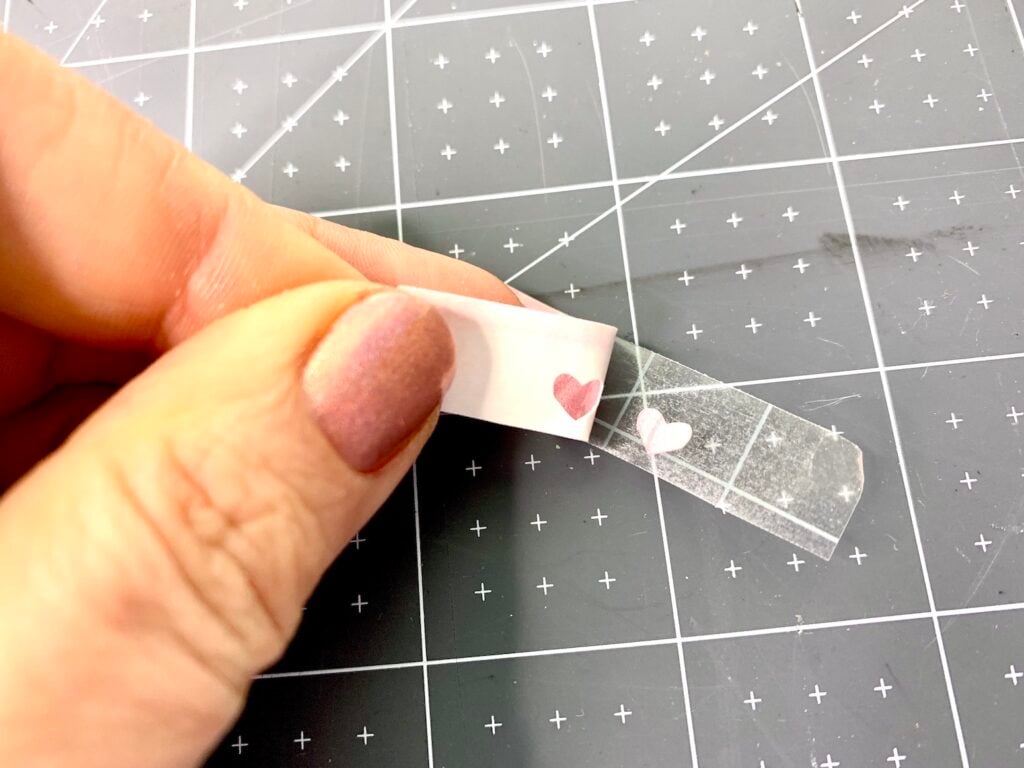
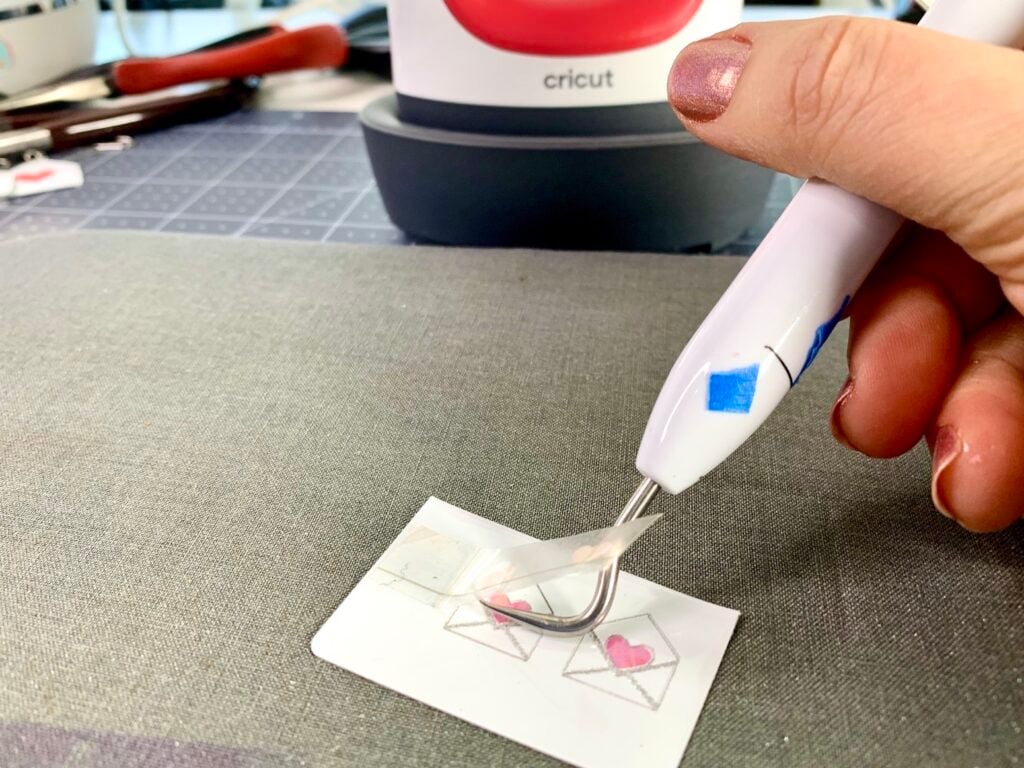
Step Fifteen: Weed the Hearts
Because Infusible Ink sheets can be hard to weed, Cricut recommends that you “crack” the sheet by twisting it slightly, or rolling it until you hear a cracking sound.
However, with a piece this small you may not hear that “crack”.
So if you start to weed the hearts and they haven’t cut all the way through, try twisting it a little more. Then, you can use a weeding tool to pry the extra paper off the transfer tape backing, leaving only the hearts that are still perfectly spaced.
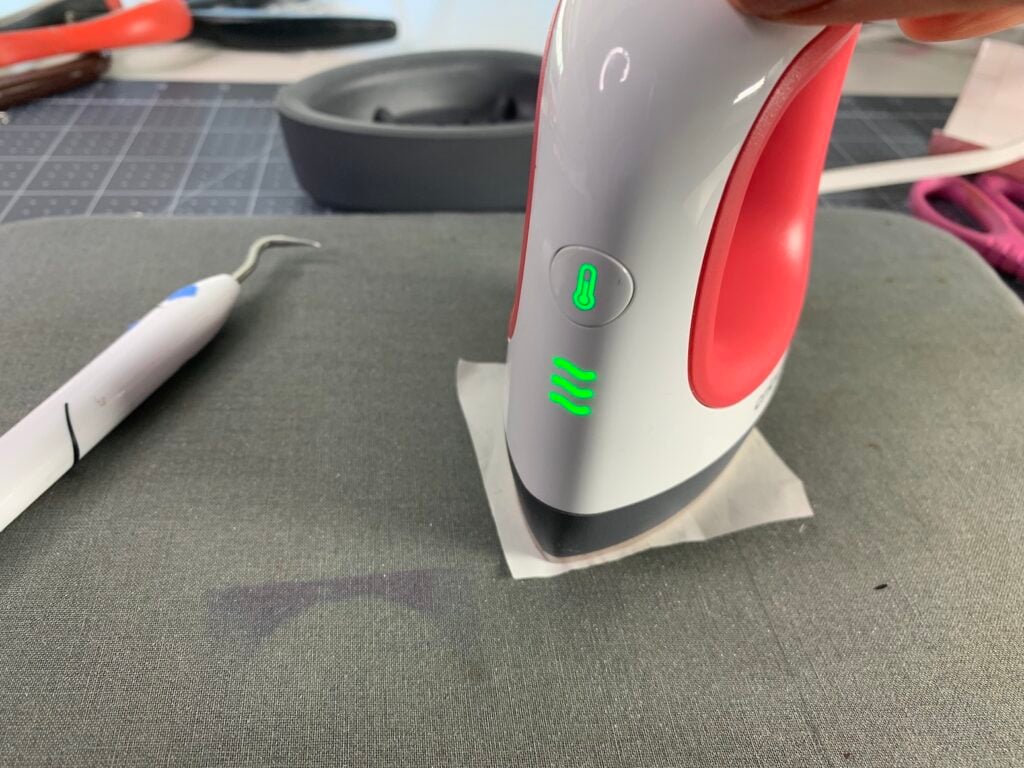
Step Sixteen: Use the Easy Press Mini to Sublimate Infusible Ink on Metal
First, pre-heat your Easy Press Mini to the highest heat by clicking the temp button 3 times.
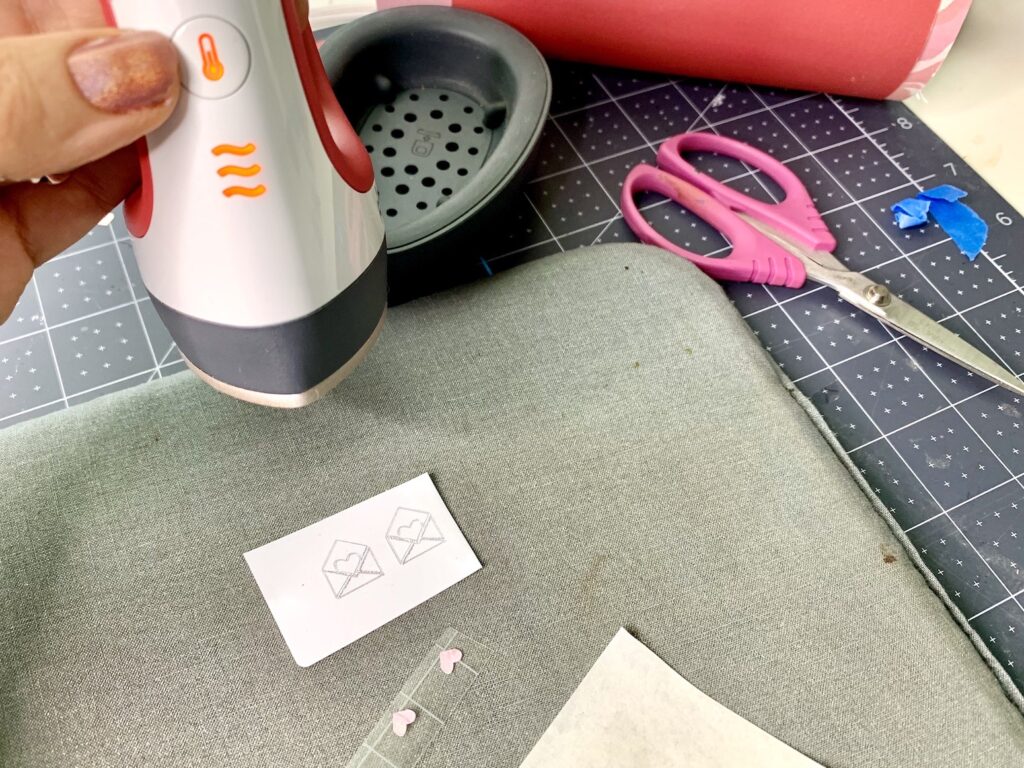
When the Easy Press is at the right temperature it will turn green and you’re ready to press!
Secondly, to press place your metal engraving design face-up on an Easy Press Mat or an ironing blanket (or even a towel).
Lastly, align the Infusible Ink hearts to their engraved images on the metal upside down. (So the tape side is up and the dyed side of the transfer sheet is pressed against the metal).
Put a small piece of the unwaxed butcher paper on top of the transfer sheet. Then set the Easy Press Mini on top of this stack. But, don’t move the Easy Press Mini around- just set it on top and leave it for about 30 seconds.
Then, carefully remove the transfer sheet from the metal. You can do this while it’s hot if you’re careful, or use heat-resistant gloves. However, you can just wait until the metal cools.
Congrats! You’ve used Infusible Ink- which means you just sublimated metal!
Note: If you’re using a different heat source than the Easy Press Mini it’s handy to consult the Cricut Heat Guide.
Step Seventeen: Use the Metal Shears to Cut Around the Engraved Envelopes
This is the super fun part- cutting the metal! If you’re using metal jewelry shears there are a couple of pointers for doing this part.
- Place the Design to the Right Side of the Blades. Usually, this is the opposite of what you would usually do, but it protects your engraved element by curling the extra metal away from your design.
- Make Straight Cuts. To remove the extra metal from your design, try to make as many straight cuts as you can.
- Use the Shears to Gauge the Perfect Border All the Way Around– You can use the shears by lining up the blade edge to the edge of the design so you get a uniform width of border all the way around.
- Nibble the Curves. Then, to round your corners, use the nibble technique of making small, almost imperceptible cuts to create a curve.
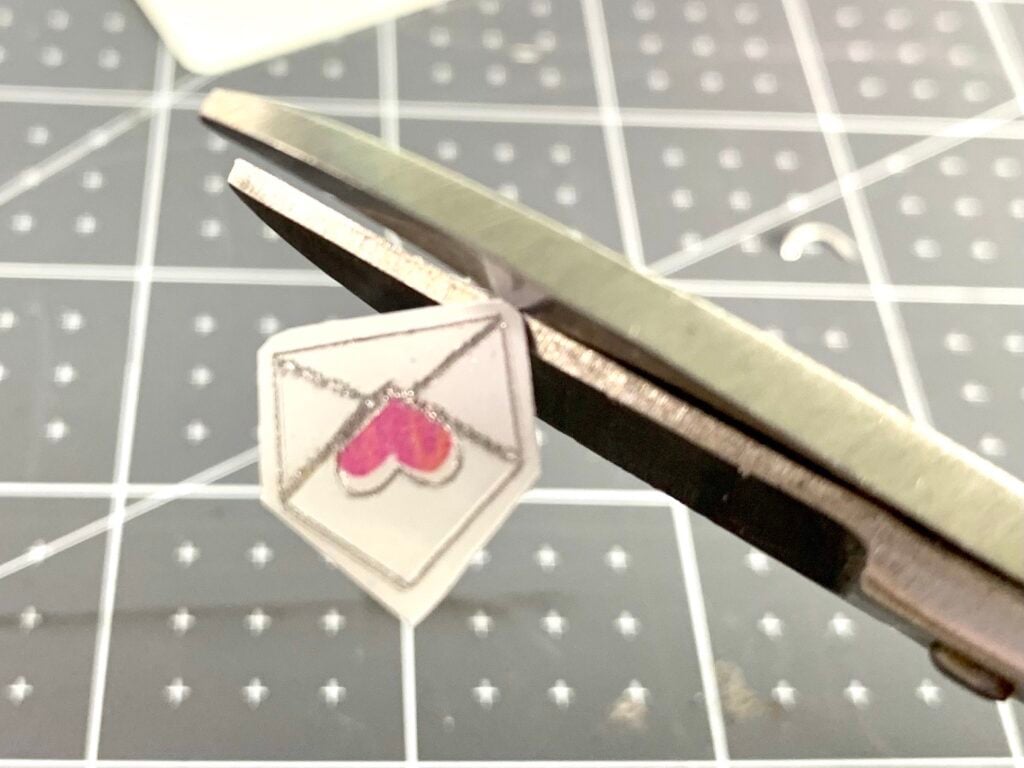
Tip: If you have a guillotine cutter you can make the straight cuts with that!
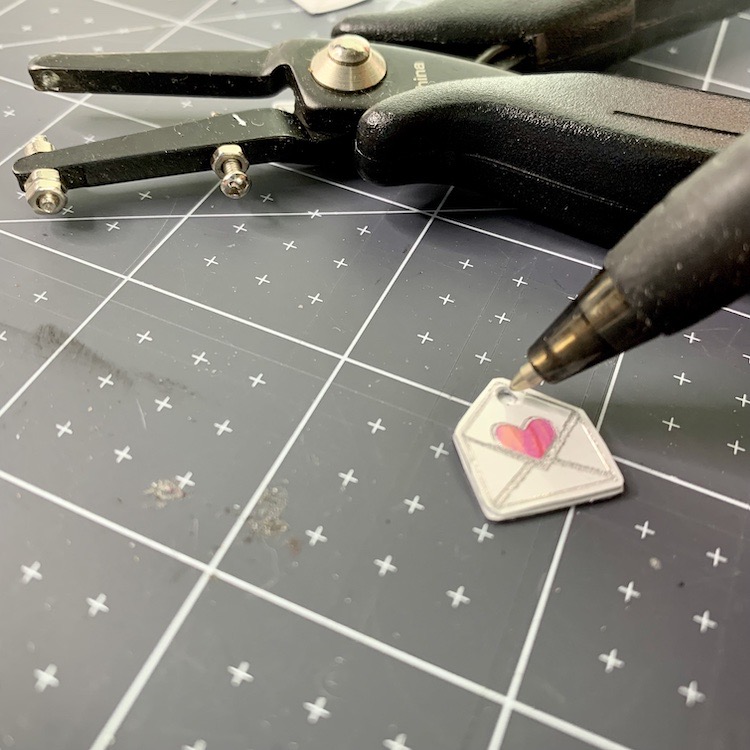
Step Eighteen: Make Holes at the Top of Your Envelopes
Next, use the Hole Punch Pliers to make small holes in the center top of your earrings.
Hole Punch Tip #1: To easily flatten the bent metal sticking up at the back of the punched hole flip the earring over and punch through the hole from the back.
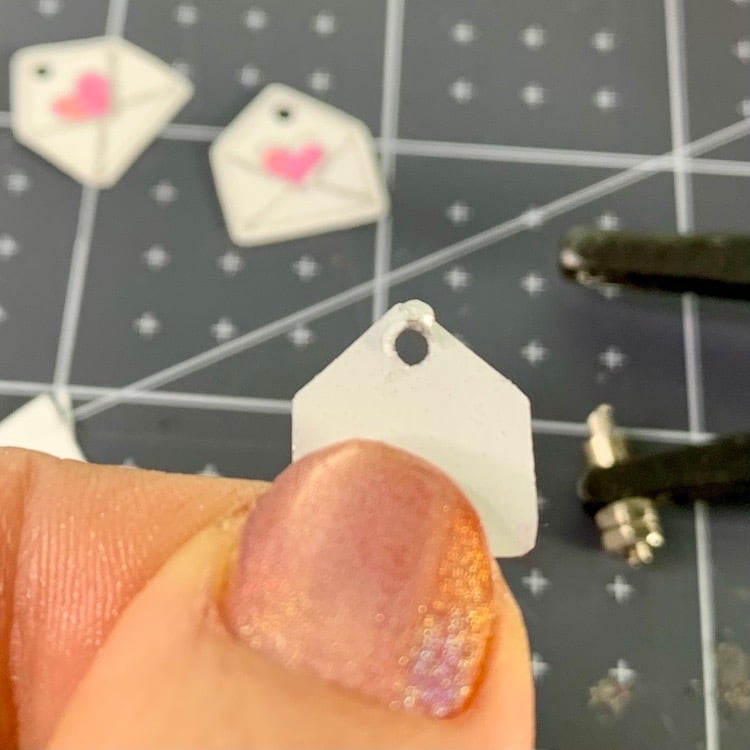
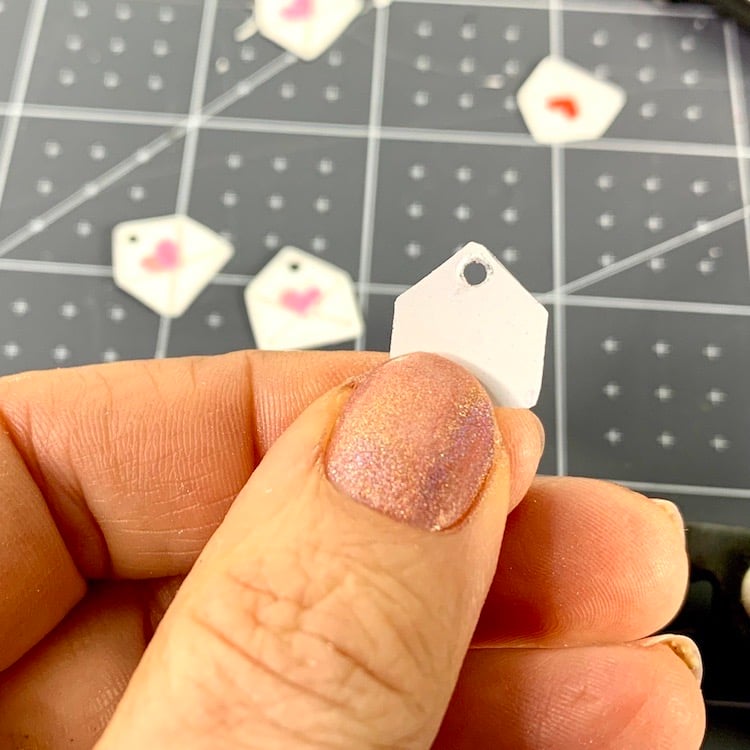
Hole Punch Tip #2: To make a matching hole in the other earring in your pair, you can stack them and then use a pen to mark the placement of your second hole.
Step Nineteen: Open Jump Rings and Bend the Eye of the Earring Hook
There is a trick to getting a jump ring that is structurally strong and won’t break.
First, you want to keep the round shape and not bend it into an oval. Second, you want to make as little movement as possible when you open it.
And then close it with a click. To do this, use two pliers and grip the jump ring evenly on each center cut in the ring.
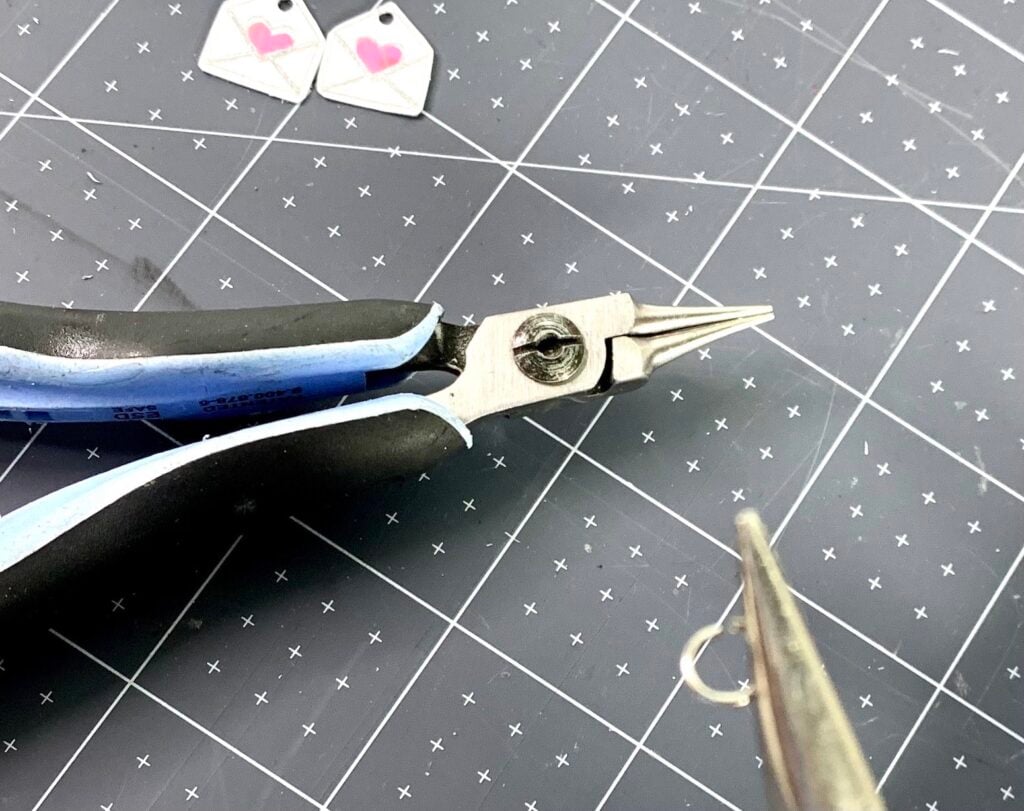
Next, use your wrist to turn one side of the jump ring away from you a small amount. This opens the jump ring without compromising the shape of the circle, or the structural integrity of the ring.
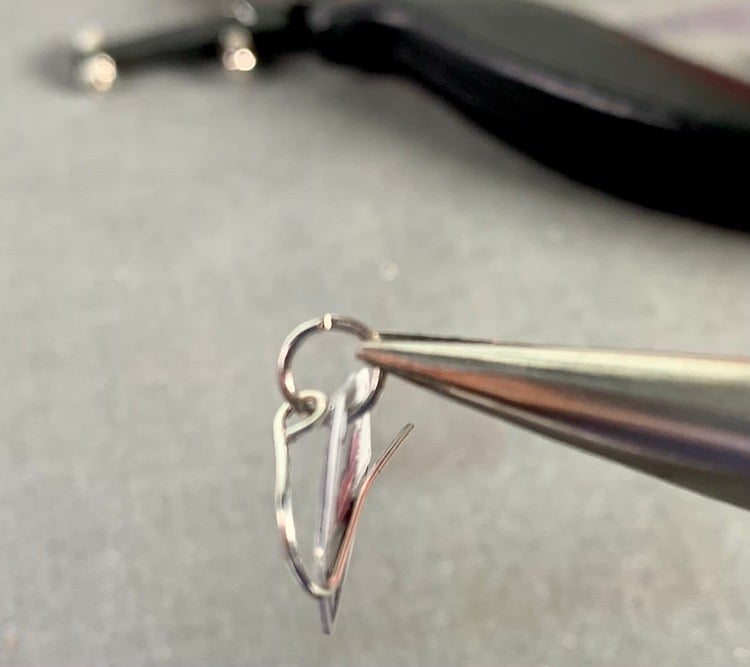
To make it so that your envelopes will hang with the front-facing and visible, use the little trick below.
With your pliers in one hand and holding the earring wire in your other hand, grip the eye of the earring hook and rotate it 45 degrees.
Step Twenty: Assemble the Earrings!
Now, you simply slip your earring onto the jump ring and do the same with the earring hook.
To finish, you’ll close the jump ring using the same method as above except you’ll be turning your wrist towards you.
And if you kept the shape of the link there should be no space between the two sides of the jump ring.
Of course, sometimes that doesn’t happen and you can decide if you want to do a new jump ring or just try to wiggle it closer.
#Life Goals: If you go past the cut just a tiny bit and then twist your wrist back you may hear the ring lock into place with an audible click.
Congratulations! You Can Now Engrave Infusible Ink Earrings with Cricut!
I’m so proud of you for trying something new! Remember, if you have any trouble with these you can watch the FB Live tutorial on my Well Crafted Studio Facebook Page. Or you can watch the same video on YouTube at the top of this post.
What’s Next for Your Engraving Metals Adventure?
If this was your first time engraving, or you’re a pro at it, you can take this a step further with other tutorials on my blog or YouTube channel. Here are a few posts/ videos that may interest you!
- Quick Start Guide to Engraving with a Cricut
- How to Engrave Infusible Ink on Cricut Aluminum with Your Cricut Maker
- How to Make Your Own Engraving Designs Using Procreate
- Sublimation Made Simple for Cricut Crafters
Buy the Book on Engraving Metals with Your Cricut Maker
For more jewelry techniques and project tutorials, you can also buy my book, Engraving Metals with Your Cricut Maker!
This book solves the problems and expands the possibilities of engraving with your Cricut Maker. It also comes with free-filled engraving designs for each of the 7 projects featured in the book.
Shhh… And just a tip, but when you subscribe to my Well Crafted Studio email you’ll receive a special limited-time discounted offer on the book!
Love this? Share How to Engrave Infusible Ink V-day Earrings with Cricut!
If you found this tutorial helpful, or just don’t want to lose it- you can save it or share it with the links below.
And if you have questions about any of the steps in this tutorial be sure to ask me in the comment section below or contact me on social media. I love to help!
Thanks for Reading,

Want to bookmark this tutorial on how to engrave infusible ink V-day earrings? Share it to Pinterest!