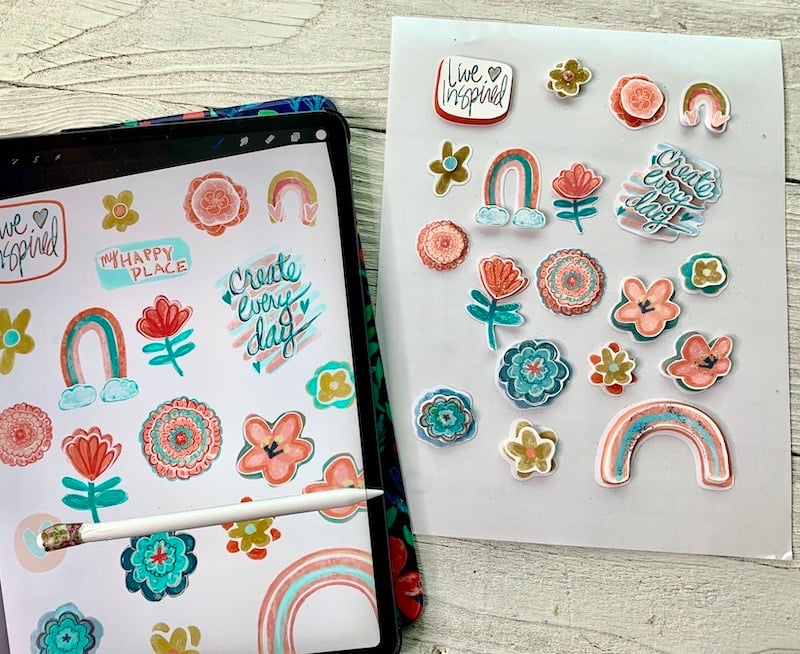
Ever searching for new and cool sticker projects, today’s DIY is how to make stickers that really stand out. (Get it?) Although they take stickers to another level, (sorry couldn’t help that pun either) they’re actually pretty simple to make. I spent an afternoon drawing an entire sheet of stickers (that you can pick up free in my Creative Resource Library) but for the tutorial and video below I’ll just demo how to make a couple of designs to show you how it works. This project, how to make layered stickers on Procreate with Cricut, demos both the design and the making of the stickers– my first post/video to walk you through the entire process at once.
You’ll also learn how to…
- Create layers
- Make a Color Palette for your stickers
- Group layers
- Add borders to your designs
- Export as layers and upload into Cricut Design Space
- Print then Cut the stickers with a Cricut
- Assemble the stickers with dual side foam dots
New to Procreate or Cricut?
Procreate is a drawing app that is currently only available on iOS devices. But if you have an iPad Procreate is seriously the BEST ten dollars you will ever spend. Instead of knowing pro graphic design software, you can create your own designs in Procreate in just minutes. And if you’re unfamiliar with Cricut cutting machines, it’s a cutting machine that does SO MUCH MORE than just cuts. It also engraves, cuts fabric and wood, among other things, and of course, it makes our Procreate designs into pro looking stickers.
Watch the YouTube Tutorial!
How to Make Layered Stickers on Procreate with Cricut
Tools and Materials
- My FREE Procreate Sticker Border Brush (optional) and in my Creative Resource Library.
- Procreate Color Palette for this Layered Sticker Project (optional)- Also in the Free Library.
- Procreate App (you can find it in the App Store)
- iPad– I use the 12.9 iPad Pro but Procreate works with other models of iPads as well.
- Apple Pencil or stylus (optional)
- Computer, smartphone, or tablet
- Cricut Design Space
- Standard Cutting Mat (green)
- A home inkjet printer (I use the Canon Crafter’s Printer and like that, it has a rear feed option, so it never jams with my cardstock projects)
- Cutting machine like a Cricut Maker or the Cricut Explore Air 2
- Cricut Sticker Paper (not the printable vinyl)- I usually recommend other sticker papers but the Cricut Sticker Paper is cardstock weight and is a solid base for the stickers.
- Medium to Heavy Cardstock
- Foam Dots (dual-adhesive) in different sizes
- Other embellishments (optional) like Glitter Mod Podge or Gold Glitter Mod Podge
- Paperlike Screen Protector * for your iPad (optional– but I really like mine.
*This is less of a screen protector and more like a textured sticker for the screen of your iPad that has a slight tooth. This tooth adds a little friction so that your pencil doesn’t fly across the screen and it feels more like using a real pencil. As a bonus, it lets me hold my pencil more loosely and because of this my hand fatigues less, and my strokes are looser and more natural.
Directions
Step One: Create a Canvas in Procreate
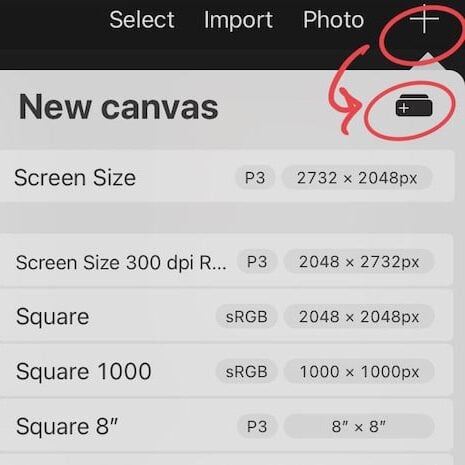
Open the Procreate app on your iPad and tap on the plus + sign in the upper right corner of the Gallery page. This drops down a menu that has all kinds canvas sizes that are available.
To create a custom canvas for stickers tap the + action at the top of the menu.
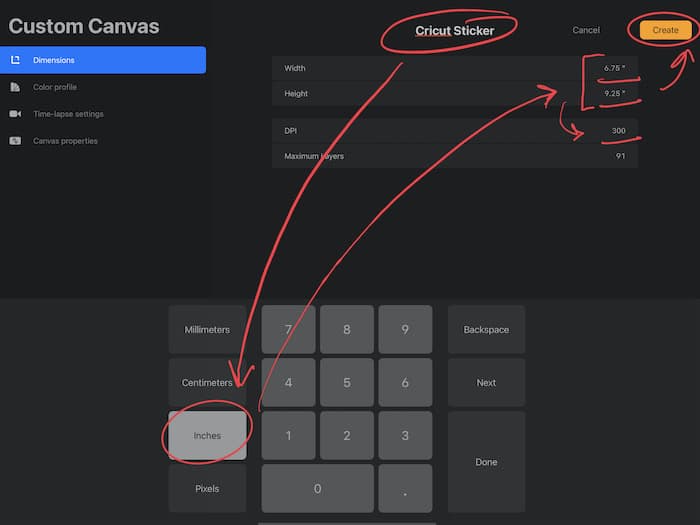
Mine is sized at 6.75″ x 9.25″ 300 dpi (RGB) because that’s the largest that Cricut will allow you to print then cut. Name it Stickers and touch done. This will immediately open up a new canvas on your screen.
Step Two: Create a Color Palette
By doing this first you’ll save yourself time later AND it will make your stickers look more professional and cohesive. I’ll have my color palette available as a download in my Free Creative Resource Library. Or you can create your own with the instructions below!
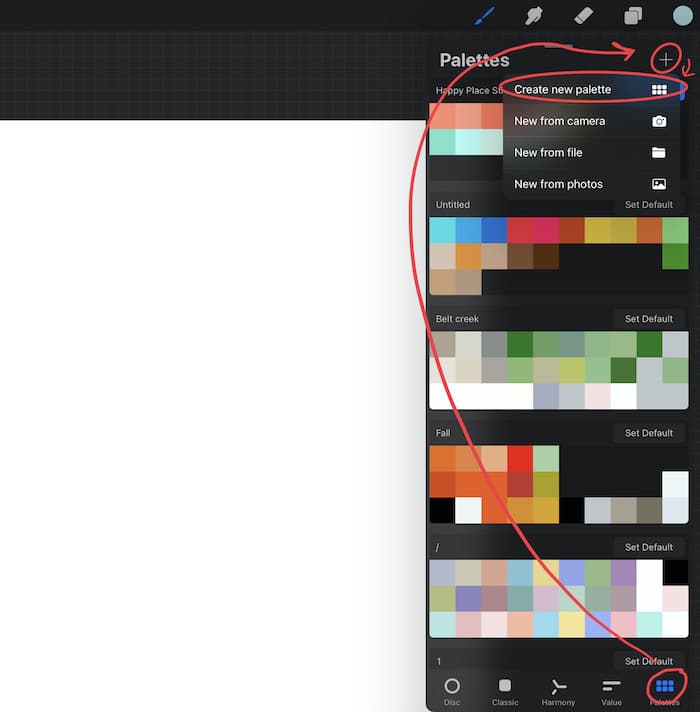
Tap on the circle in the top right corner and you’ll get the color studio. Tap the + sign and choose Create a new palette. Name your palette and save it as the default so it’s accessible as you work.
From the color disc choose a hue by moving the circle around the outer ring and the value by tapping in the inner circle of the disc. Then touch a blank square on your blank palette and your color swatch will appear.
Step Three: Make a Drawing with Two Layers
The first step is drawing your stickers. To select a brush, tap on the brush symbol near the center of the screen. Personally, I like using a 6B pencil to start the sketch and then add color with gouache or watercolor brush.
However, you can choose any brush that you would like to use. To adjust the size of your brush you can play around with the sliding size adjustment on the left-hand side of the screen. I sketch pretty large then size it down after it’s complete.
What are Layers?
Layers are one of the most magical things about Procreate. Basically, think of each layer as a piece of paper in a stack. You can move one on top of another, or create a new layer beneath another. By keeping your work on different layers you can play around with choices without making them permanent. You can upload a photo, trace it to create a sketch layer, ink it out, and then paint it on different layers. All done? Simply delete the photo and the sketch. I love the freedom working in Layers gives me to play with design choices in a non-destructive way. You can also merge layers, duplicate layers, create clipping masks, and more with this feature. Layers also help you stay organized!
To find the Layers panel on Procreate you’ll tap the two overlapping blue boxes at the top and right of the screen. Work on Layer 1 and then add a second layer by touching the + icon.
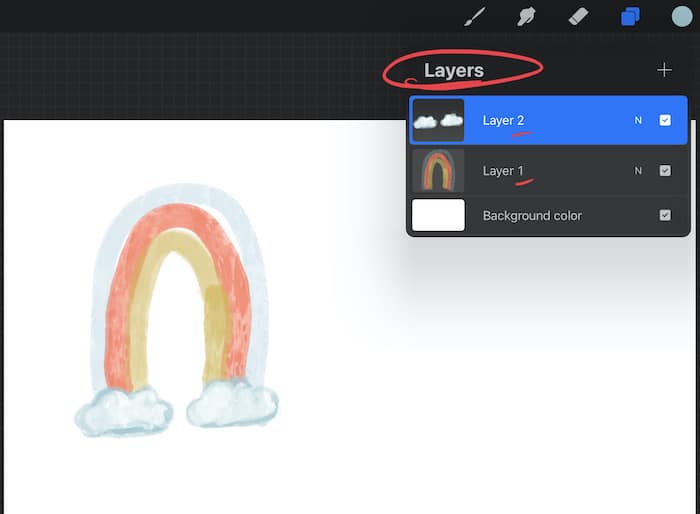
Because we’re going to be doing TWO LAYERS you essentially want to split your design into two pieces. For my rainbow design with the clouds, I planned to have the clouds sitting on top of the rainbow. So the rainbow is my bottom layer and the clouds are on a top layer.
Step Four: Add White Border Outlines to BOTH Layers
There are two main methods for adding white border backgrounds to your sticker designs.
- Creating a layer beneath your design and then hand drawing a solid white shape behind your design.
I created a special Sticker Border Brush that you can get as a Free Download in my Free Creative Resource Library. I designed the brush so that it is a hard edge brush that’s been streamlined for a crisp border and requires less clean-up of background.
- The Super-fast way Gaussian Blur and the automatic select tool.
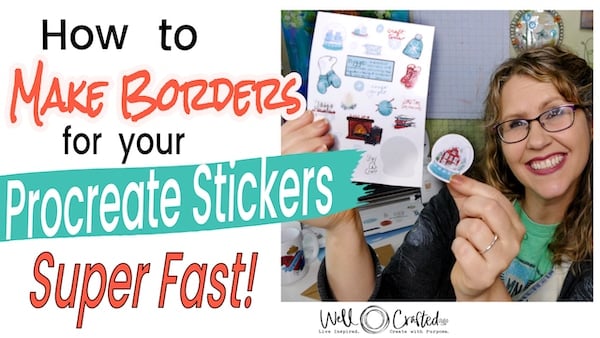
I have a post and YouTube video on how to do this! It’s easier when you can see it. So rather than fit this into the post here I’d love to have you check it out in detail in that tutorial.
Tip for Cleaning Up the Background of Your Image After You Use a Blur
If you’re using this new method for creating stickers you’ll want to make sure you remove any spare pixels from the gaussian blur. To do this use the automatic selection tool to select the background of your layer, then with a 3 finger swipe down, choose the Cut and Paste option (which creates a new layer). Delete this new layer. To see this in action visit my post on How to Make Borders for Stickers- Super Fast in Procreate.
Step Five: Duplicate Your Canvas in the Gallery 2x
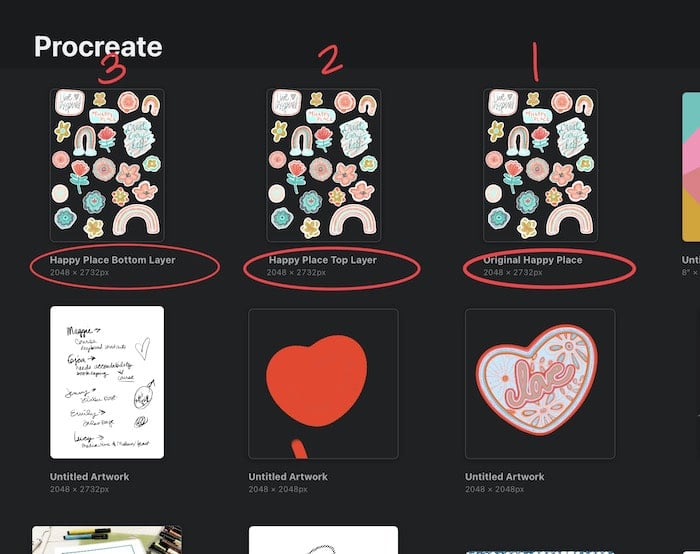
Back in the main Procreate Gallery swipe left on the canvas you want to duplicate and do it twice. Rename each canvas so that one says Original ___, another says Top Layer___, and the third says Bottom Layer___.
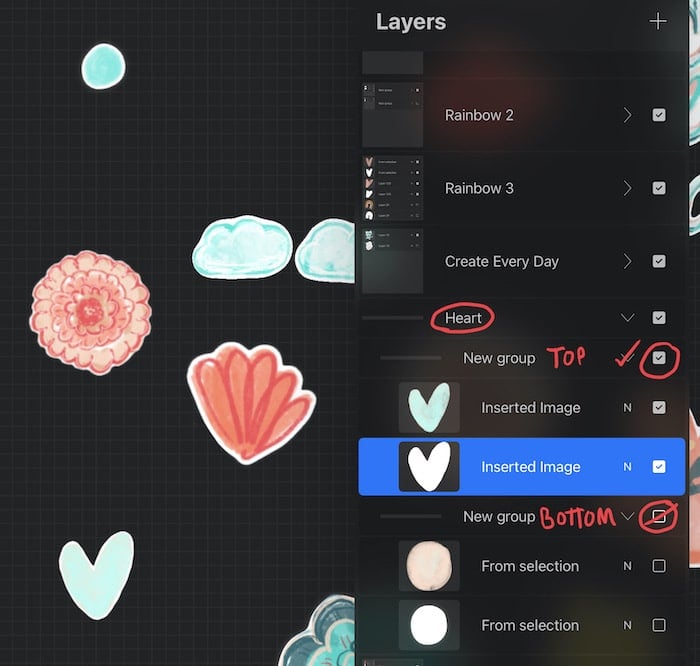
Step Six: Prep Each Layer
Open up the Top Layer canvas and go through and either turn off all the bottom layers or go ahead and delete them. Repeat for the Bottom Layer canvas but turn off all the top layers of your images.
Step Seven: Save as a PNG and Export Your Sticker Designs
Before you export make sure that the check box next to the Background Layer is unchecked. This gives you a transparent background when you Export. This saves a TON of time as you upload your design into Cricut Design Space because you won’t have to clean up or remove the background then.
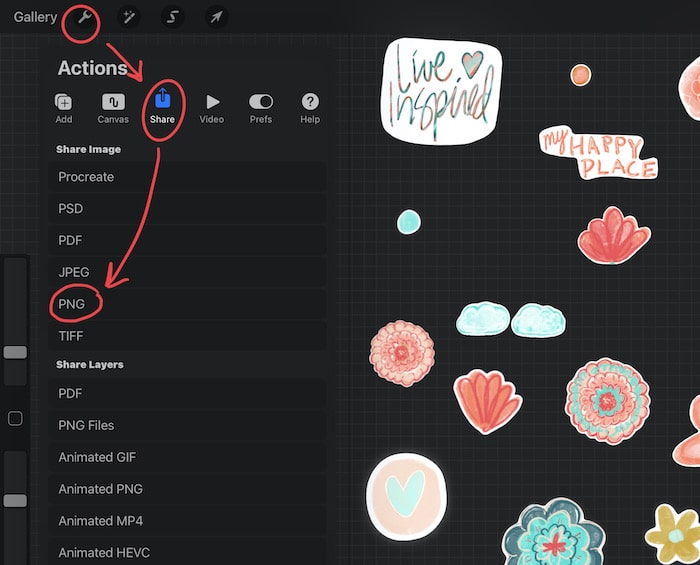
In each canvas, at the top toolbar, click on the wrench icon. This opens up your Preferences Menu. Choose the Share icon, and from the drop-down menu, choose PNG to export the entire canvas.
Save to your Photo Gallery, Files, Dropbox, or Airdrop directly to your desktop computer. I like to save a copy in my Photo Gallery and then airdrop from there.
Step Eight: Upload your Designs into Cricut Design Space
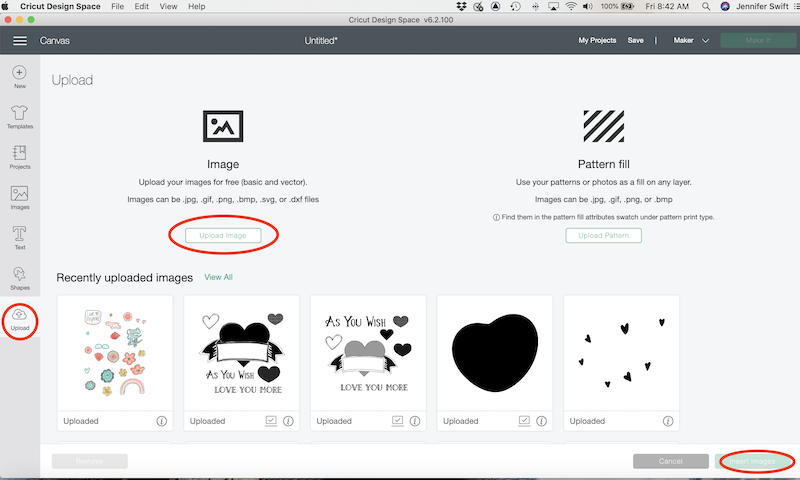
Open Cricut Design Space on your desktop (or mobile) and create a New Canvas. At the bottom of the left-side toolbar, click on the Upload icon. This takes you to the Uploaded Images page. Click on the Upload Image and then either Drag or Drop or use the Browse to select your PNG’s to upload.
On the Image Processing Page choose Complex, skip the clean up (because you have a transparent background)
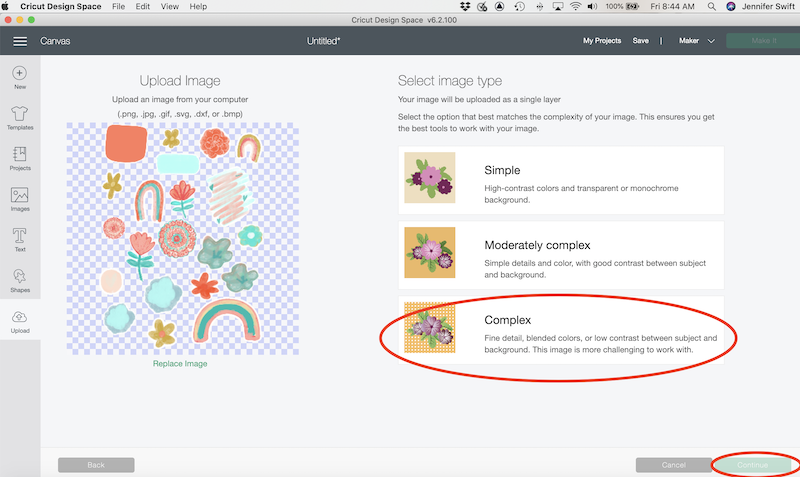
Then Save as a Print then Cut image. It will take a few seconds to finish loading, but then your PNG image will appear in your Uploaded Images.
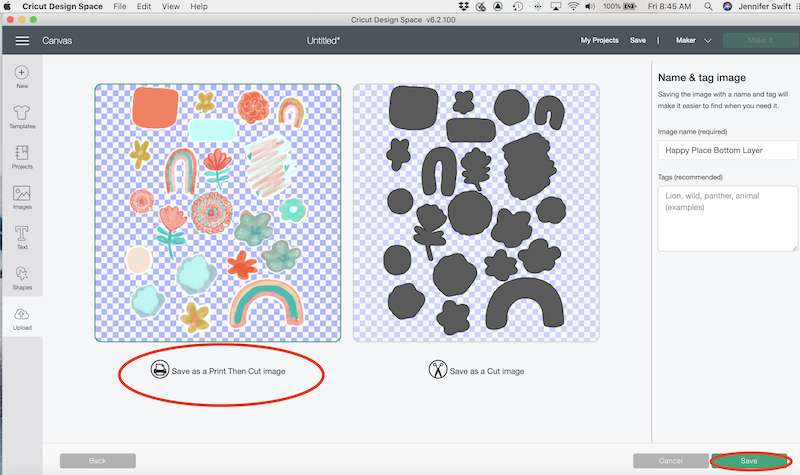
Repeat with the second layer of your stickers.
Step Nine: Insert Your Designs and Size them
Click on both of your sticker layers to select and then hit the Insert Image button in the lower right corner. This will open up both designs in your new canvas. With both still Selected, go to the top toolbar, and in the Size section change the width of your images to 6.75.”
Because you have the constraints lock on this will automatically change the height of the image to keep the proportions correct. Check to make sure that your images are sized to match.
You may have to use the Arrange in the top toolbar to send your bottom layer to the back if it is not. This overlap is just to help you see if both layers are the correct size in relation to each other.
Note: Cricut Design Space will only allow you to make your print then cut images 6.75″ w. and 9.25″ high.
Step Ten: Print the Bottom Layer of the Stickers
In your Layers Panel for your Design Space canvas click off the visibility eye next to the Top Layer. Save your project, and then hit Make It.
Continue from the Image Prep page (it has the mat image representation) and then on the Material Settings Page, you’ll want to choose Print. This opens up the Cricut print box.
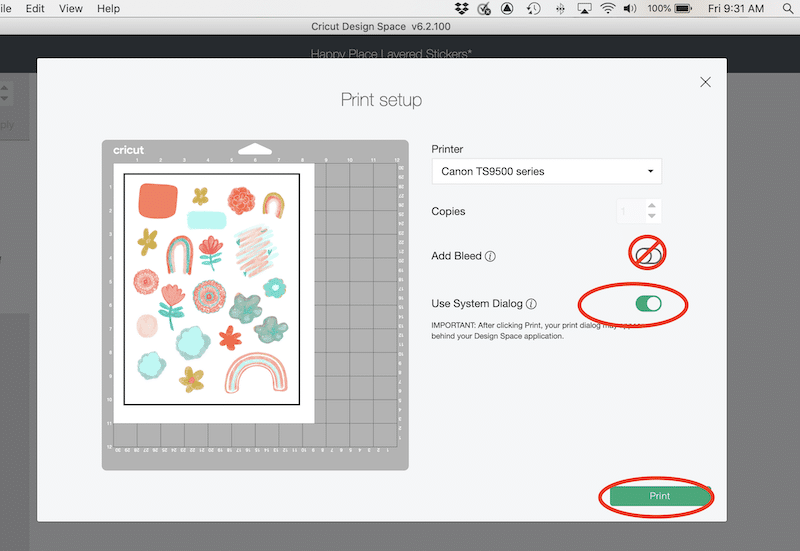
TOGGLE OFF THE BLEED and then toggle ON the System Dialog.
Hit Print. It will start spinning, once it does minimize your window (or move it) to find the System Dialog box for your printer.
Note: I like to use the rear-feed option on my Canon Pixma inkjet printer, especially if I’m printing on something that’s a little harder/stiffer, like my heavy-duty cardstock. Cricut Sticker paper is cardstock, and is the only sticker paper I found that is cardstock weight.
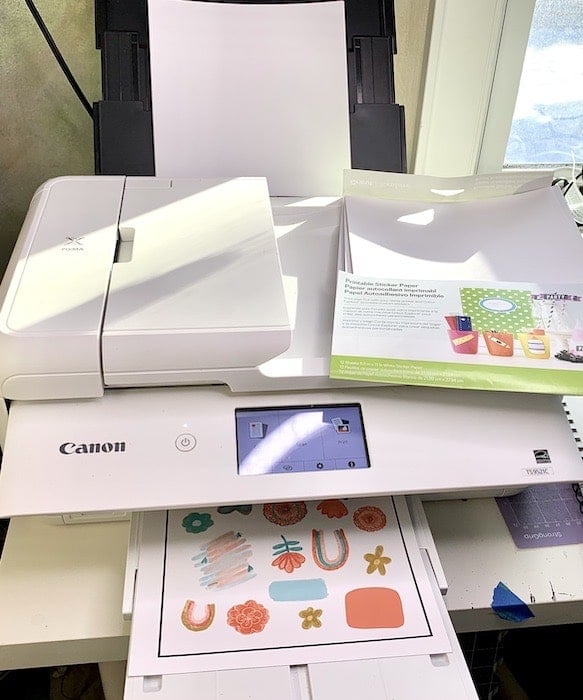
Load your Cricut Sticker Paper into your printer and then hit Print again. This will send it to your printer, and you are almost to the point where you can sit back and watch the magic happen.
Note: If you are using the mobile version of Cricut Design Space you’ll want to check out my tutorial for Print then Cut Stickers with an iPad to see how to print then cut with an iPad.
Step Eleven: Cut the Bottom Layer with Your Cricut
Once you’ve printed your image, continue to follow the prompts on your Material Settings page. On a light blue (light grip) or standard cutting mat place your printed sticker paper in the upper left corner.
Press down on the Cricut Sticker Paper to adhere the paper to the mat, and Select Printable Sticker Paper from the Material choices. Then, check to be sure you have the fine tip blade in your machine, and then press the blinking Go on your Cricut!
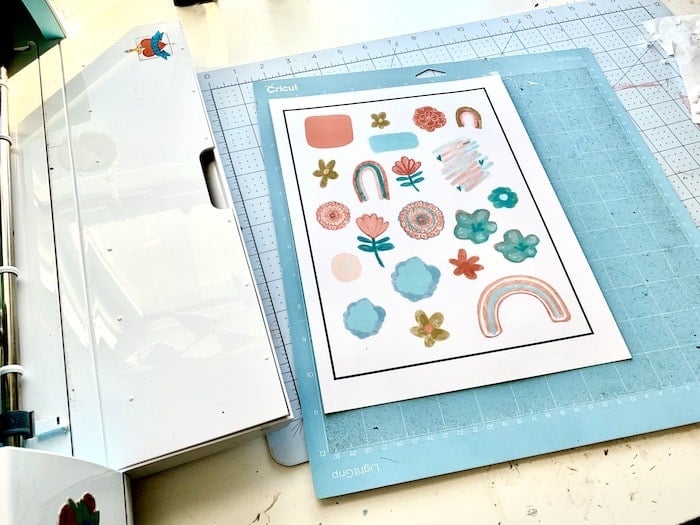
Unload when finished. And hit Finish on your screen. Then carefully peel up the top layer, leaving behind the sticker designs.
Step Twelve: Repeat the Print then Cut for the Second Layer of Your Stickers
After you hit Finish on your screen you’ll be brought back to your canvas. This time click OFF the eye on the Bottom Layer and click ON the Top Layer. Repeat the Print Then Cut process for this Layer. BUT use regular card stock (not sticker paper).
I chose the Heavy Cardstock option for my 100 lb. variety, and then changed the default to More.
Before you Unload be sure to check the stickers to make sure you have a clean cut. Again, if it is not cut through you can go ahead and hit the C button to repeat the cut.
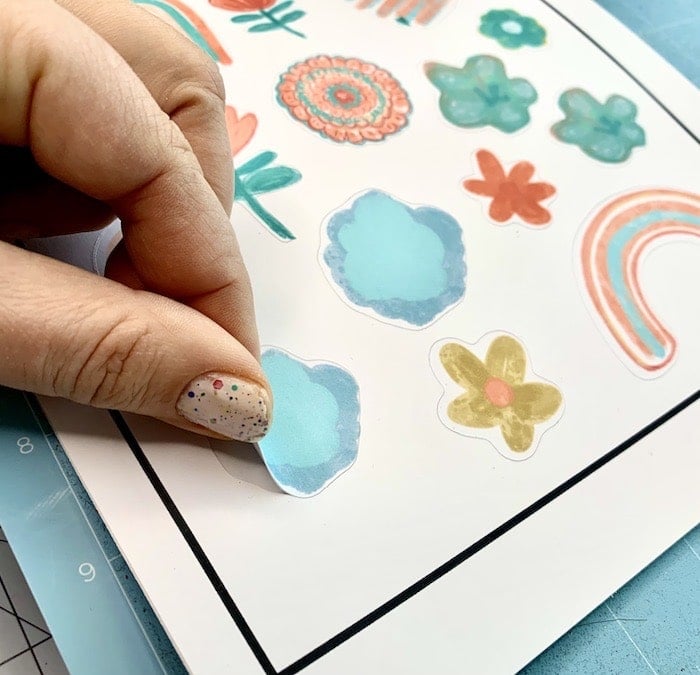
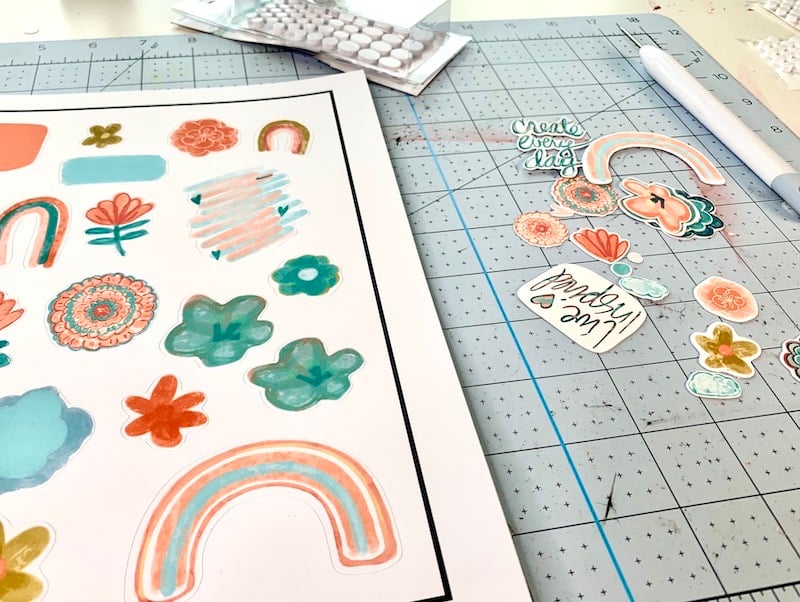
Then go ahead and Unload and flip your mat UPSIDE down and gently remove your cut images. This helps prevent the cut out’s from curling.
Step Thirteen: Assemble the Stickers!
Now is the SUPER fun part. Using double-sided adhesive foam dots, assemble the layers of each sticker. It is SO fun to see these stickers stand out from the page.
Step Fourteen: Embellish the Stickers (optional)
Although, these really don’t need any embellishments (they’re totally cute on their own) if you’re a glitter girl you can definitely add a little sparkle to these layered stickers. I played around with adding little colored gems, Stickles, glitter, and glitter Mod Podge as well as extreme glitter Mod Podge. This firmly puts these homemade stickers over-the-top vs. regular stickers.
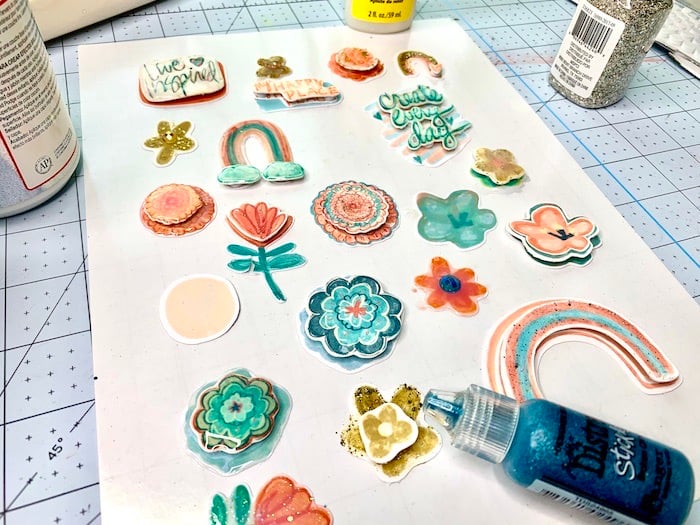
And You’re DONE! You’ve Successfully Made Layered Stickers on Procreate with Cricut!
If you LOVED making these stickers be sure to check out my other sticker tutorials on this blog or on my YouTube channel. One of my most popular is How to Trace Photos in Procreate to Make Stickers with a Cricut. This is a GREAT hack if you feel like you can’t draw and that fear is holding you back from trying something new.
Watch the YouTube Video for How to Make Layered Stickers on Procreate with Cricut
See how it’s done with this step-by-step video tutorial that takes you from drawing the image on Procreate to cutting them with a Cricut. Follow along for crafting success!
Love this? Share it!
If you found this post helpful it would mean the world if you took two seconds to share it, or to pin any of the images on this page to Pinterest or other social media platforms.
Thanks for reading this post on making 3D Layered Stickers on Proceate with Cricut!
