
If you aren’t working from home yourself, you probably know someone who is. Remote work or online school, many of us are setting up our home offices right now. Liven up your space with these custom engraved (and a little snarky) desk signs that you can make with a Cricut. This tutorial will walk you through what to spray the metal with, how to cut and bend the metal, and how to engrave it. Once you see how easy creating these engraved desk signs with a Cricut Maker is, I KNOW you’ll want to make one for every at-home worker or student, you know!
here from Start Smart?
Don’t forget to grab the freebies from the Free Library!. There are 18 FREE engraving designs, a few of which I created for the tutorial below but never shared.
At the time, I went crazy and made over 13 designs. Then, I didn’t think you needed more than just 3 of them to do the project so I only added those three to the Free Library.
But now, a year later, I’ve decided to throw them all into the zip file with the 7 new designs that I just created. For a grand total of 18 desk sign engraving designs!
What’s so cool about these designs is that they all have a fill added. Which means they are much easier to see once you’ve engraved them.
The following post goes through the process of making these with metal, while the samples I created for Start Smart are engraved from an acrylic nameplate desk sign blank that I found on Amazon.

How to Make Engraved Desk Signs with a Cricut Maker
Tools and Materials
- Desk Signs Digital Designs from the Creative Resource Library
- Aluminum Step Flashing, 8″ h roll I source this at Home Depot but have linked to Amazon. (note: don’t get galvanized)
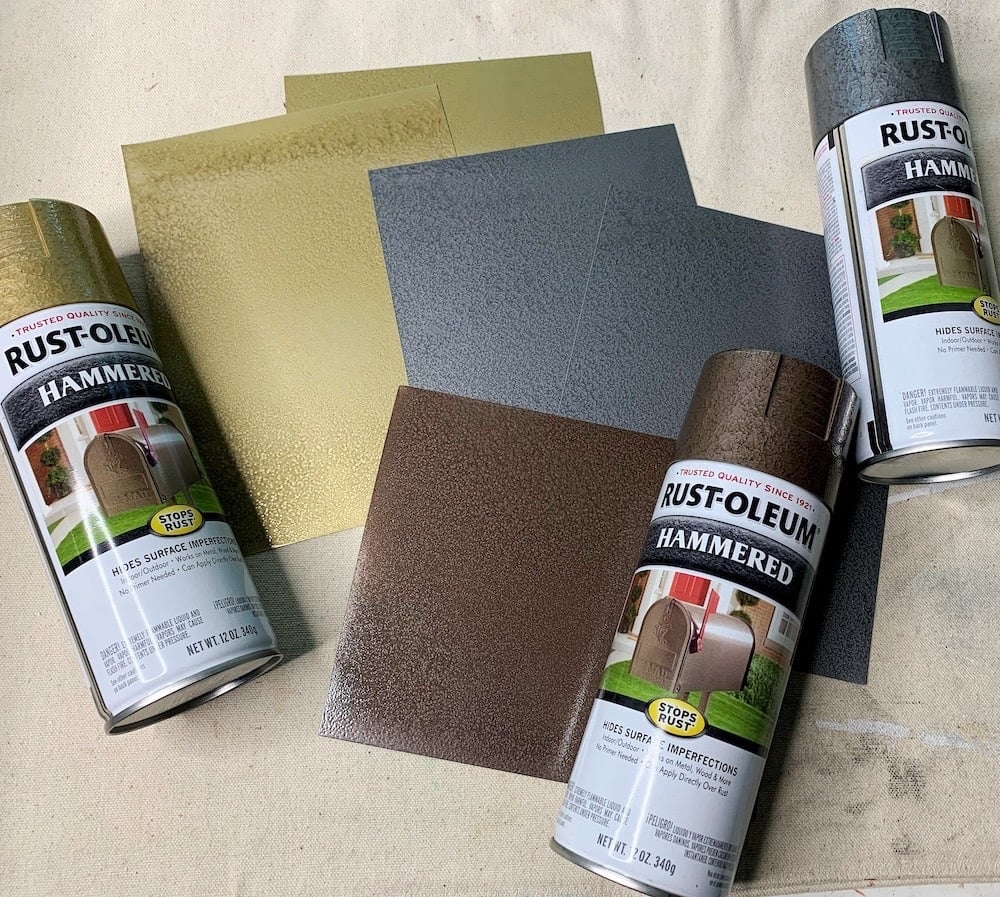
- Rustoleum Hammered Metal Spray in Steel, Copper, or Gold
- Isopropyl Alcohol, with swabs
- Guillotine Cutter (8.5”) Guillotine Cutter (12”), or Jewelers Shears
- Bone folder with a ruler and self-healing mat (optional)
- Sliding Name Plate Holder (optional)
These are affiliate links, which just means that if you purchase through one of these links I may get a small commission. Thank you for your support!
Directions
30 minutes + Time Paint Spends Drying 30 minutes
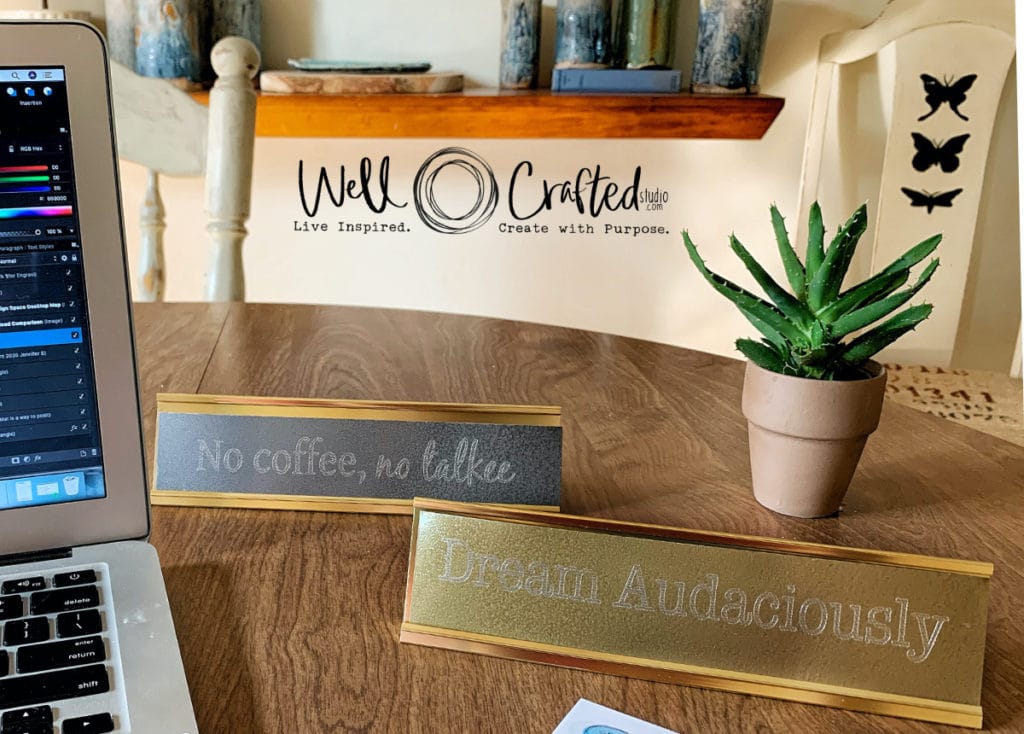
Make them quirky, snarky, or inspirational- when you engrave your own custom office signs for your desk you get to decide what they say!
- Step One: Spray Paint the Aluminum
Before you paint- Cut pieces of aluminum 8″ in width off the roll of flashing, we’ll trim them down again in the next step. (If you’re using the pre-cut 5 x 7″ sheets then you don’t need to cut them at all.)
To Paint: First, clean the surface of the metal flashing. If you can feel a coating of oil, you’ll want to wash the flashing with some dish soap and water. Otherwise, you can skip that step and just use some isopropyl alcohol on a cotton ball to swab the metal.
Next, in a well-ventilated area, spray the metal sheets. Make sure you shake the can before you use it as the hammered texture won’t show up as much if you don’t.
Let dry approx. 12-24 hours. You can test this with a fingernail. If the paint scrapes off easily, then it needs more time to bond to the metal. This time will vary depending on the application and the humidity. The paint will bond entirely in about 48 hours and won’t engrave well. So between 12 and 36 hours seems to be the sweet spot. But you’ll want to experiment.
- Step One: Cut the Aluminum Flashing
Use the guillotine cutter or a jeweler’s shears to cut several pieces of the aluminum flashing to 8″ w. x 2.5″ h. (It’s one piece per desk sign but it makes sense to prep several at once.)
NOTE: If you are are using a nameplate holder then cut pieces 8″ w. x 2″ h.
- Create a Simple Shape Template in Design Space
In Cricut Design Space, open up a new canvas. Create a rectangle that is 8″ w. 1.5″h. To do this, insert a square shape from the side toolbar, unlock the constraints, and change the size. Then change the Line Type to Draw.

- Add your Design and Size to Fit
Upload your design to your canvas, or add text from the side toolbar—size to fit your template. Duplicate the design and on one change the Line Type to Engrave and the other to Draw. Select the two draw images and Align> Center, then Attach. Then change the color to red. Save the project and then hit Make it.
- Prep to Engrave
Place your aluminum painted side up on a purple, strong grip mat. Tape around the edges with a low tack tape, like painter’s tape. Be aware that this will not remove the paint from the metal if it’s adequately bonded. Use the gridlines to position your metal.
After your mat is ready, go back to Design Space and the Mat Preview Page. Position your template to match your metal sheet’s position on the mat. Move the engraving design over your template so that you can’t see the red beneath. On the three dots in the corner of the template choose hide selected. Then continue.
- Engrave your Design
The next step is to select your materials. Choose Stainless Steel as your material setting and change the default to MORE.
Note: If you don’t see stainless steel as an option, go back a page and make sure you hid the template and that your design’s line type is set to engrave and not cut.
Insert the engraving tool into your Cricut Maker. Load your mat and press Go.
Note: If the engraving is chippy looking, then you probably didn’t give your spray paint enough time to bond.
- Finish the Engraving
Once the engraving is done, check the engraving. If it looks good, unload the mat. If it doesn’t, you can go ahead and press go a second time to repeat the engraving.
When you unload the engravings they’re covered with debris, so use the sticky tape you remove to clean it off. I also use a paintbrush to clean off the engraving tip between engraving projects. - Bend the Metal
To get a nice bend, you’ll want to score the metal a little. I found that a bone folder does the job nicely. Flip your metal, so the engraving side is down, and then use a ruler to create a score line where you want to bend the metal. You need to press hard and go over the same spot over and over again. This helps you get a tighter bend. Then gently, but firmly bend the metal. You will want to bend it more then you need it to be for sitting up, and then bend it back a little.
A nice trick for bending a straight line is to use a small handbrake like the one in the photo below. This just helps you keep the pressure even as you bend, you are still
Note: Be aware that if you bend the metal all the way back, then you will probably break the metal. If this happens, never fear! To redeem your sign, you can bend another piece and glue your engraved piece to the front as a fix. Use E6000 and clamp them together to bond.


And You’re Done! Snarky or inspirational, you get to choose the message when you’re the one making it!
Adding your own style and your own personality to your home office makes it more enjoyable to be there. The beauty of engraving your own signs is that YOU can create the message YOU feel YOU need. Although, these make great gifts too!
Curious about Engraving with a Cricut Maker?

Excited to jump in? Sweet! Nervous? I have the book that will teach you over 34 techniques, including 4 ways to position your engravings perfectly. It also gives different ways for getting a deeper engraving as well as a higher contrast. I have 7 tutorials that walk you through all kinds of ideas so that you can create jewelry, and gifts you’ll love to give others. Sign up for my emails and get a special offer on this book!
For More Inspiration
And if you need a little more inspiration to get you excited about working from home, Country Living has their post, 45 Best Home Office Ideas- Home Office Decor Photos. I love how simply some of these are set up but how stylish they are as well.
Love this? Share it!
If you found this post helpful; please like, comment or subscribe below. This really does help me and I appreciate your support. And if you have questions, about this tutorial, about spray painting the metal, or about the freebies, please feel free to contact me and ask!
Thanks for Reading,

Want to Remember WHERE You Saw this Great Post on Engraving Desk Signs with a Cricut Maker? Pin the Image Below!


As usual smart smart lady .So crafty. Love this.