Yes, it’s a Gnome Craft, but what makes this tutorial unique is that it shows you how to engrave and cut out an ornament with a Cricut. This means that you’re using your Cricut to cut aluminum flashing! If you’d asked me a week ago if this was possible, I’d have told you no. In the last week, however, a member of my Engraving Metals Facebook Group, April Rhodes, proved we could do it. Now she and a few others have tried it, so I thought it would be fun to try it with this Gnome Week project. The result? Well, if you’ve wondered if you could make cut out engraved ornaments with your Cricut- you can!
So Many Gnomes!
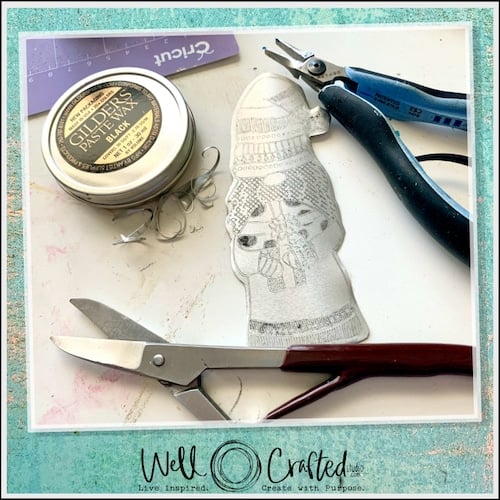
This is a pretty simple craft and doesn’t take much for materials. And I’ve two Gnome designs that I tested, one is this Jolly Gnome that’s free in my Free Resource Library, and the other is this Gnome with Gifts that’s for sale in my Shop.
I’m also featuring another Gnome project from 6 DIY Christmas Gnomes Collaboration that I did for Gnome Week. Today I want to show you a set of Gnome earrings that are too cute for words. And if dangling Gnome jewelry isn’t for you, then they can easily become ornaments. I’ll have more at the bottom of this post!
Get an Engraving a Day for the Rest of November

In the last week and a half, I’ve been sharing a free engraving design every day. All of them have patterns added and are pretty popular with those who have been following along. Just click on my Shop link and look in the Engraving Designs- you’ll see one marked SALE that’s free for the day.
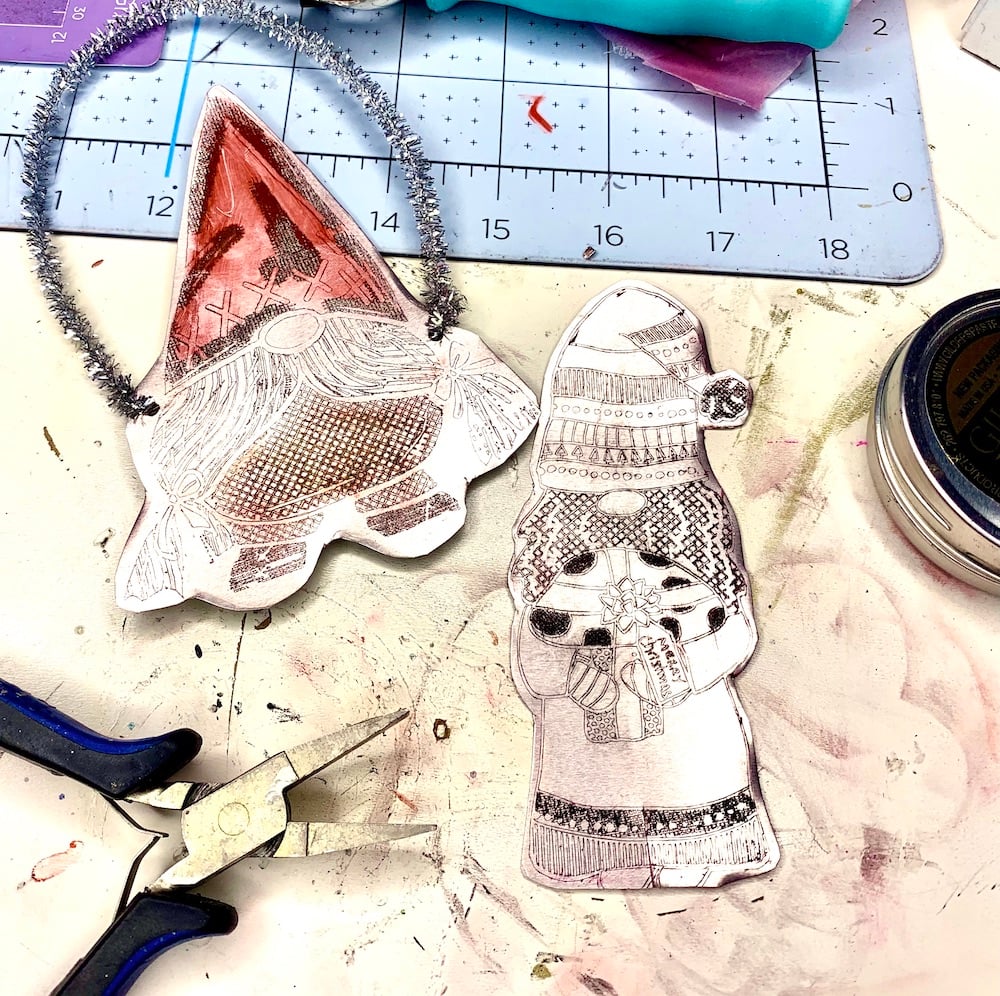
How to Make Cut Out Engraved Ornaments with a Cricut
Tools and Materials
- Cricut Maker with Cricut Design Space for Desktop
- Cricut Engraving Tool (w/ housing) *OR the Engraving Tip (w/o housing)
- Strong Grip Mat (purple mat)
- Painter’s Tape
- Aluminum Flashing 50′ roll (or 5″ x 7″ sheets)
- Gilder’s Paste (black and/ or red use with a cloth, can possibly sub shoe polish*)
- To Cut- Fine Point Blade, Engraving Tool*, or Jeweler’s Shears
- Gentle Sanding Block (nail buffing block, Vintaj Relief Block, or ImpressArt Buffing Block)
- Crop-a-Dile * OR Mighty Hole Punch
- String, Twine, Ribbon, or Wire to create a Hanger
(* I haven’t tested this yet)
These are affiliate links. This just means you don’t pay more, but I get a small commission from the company for sending you their way. Thank you for your support!
Directions
Step One: Upload your Engraving Design and Insert into the Canvas
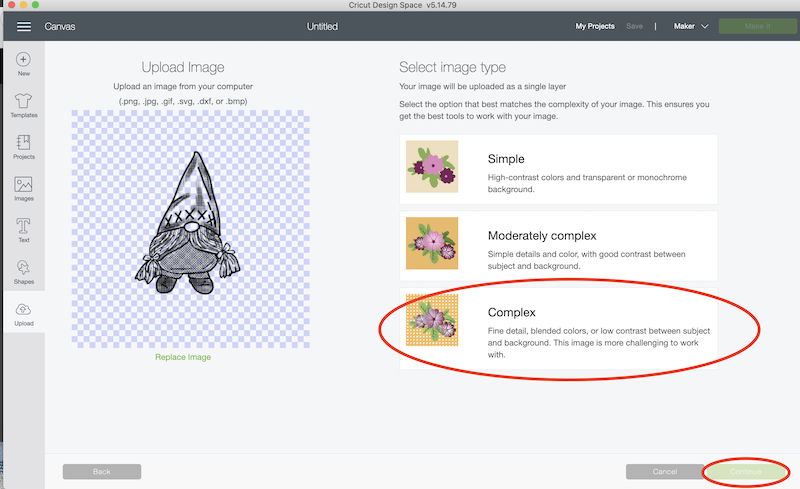
In the zip file for this project that you download from my Free Designs Library, you’ll find a .PNG for a Snow Globe. Upload the Jolly Gnome Engraving Design into Cricut Design Space, and process it as an image file. Upload as Complex.
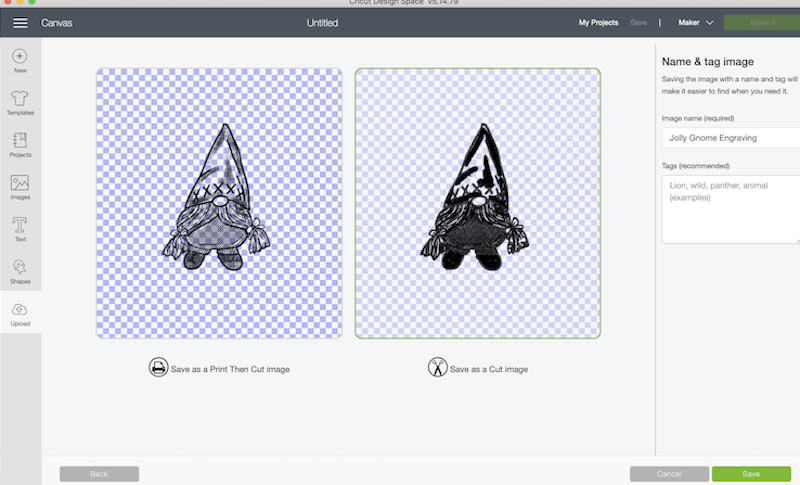
Save as a Cut Image. Repeat for the Jolly Gnome Shape. On the Uploaded Images page, click on each to Select and then click on the Insert Images in the lower right corner.
Step Two: Size your Designs and Change the Line Types
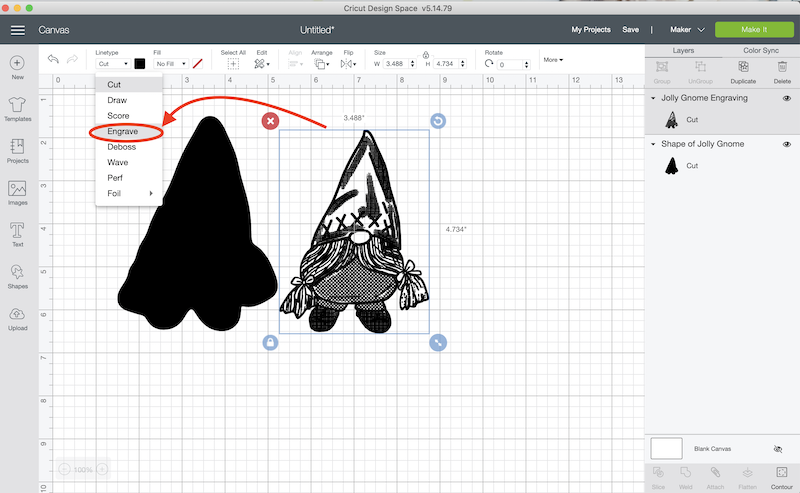
This is up to you but for my Jolly Gnome, I sized the image at approx. 5″ height. It was maybe a little big though. I think I’ll do 3″ high next time so it’s more in proportion to the size I engraved my Gnome Bearing Gifts engraving design. After you’ve sized it as you want it, make sure you change the Operation of the design to Engrave.
Step Three: Duplicate the Cutting Shape (optional)
With the Gnome Shape selected click the Duplicate option at the top of the Layers Panel. Duplicate 10 times. Select all, Align Center, and then Attach. Then select the attached layer and Duplicate 4 more times for a total of 40 passes. Although this seems like a lot it does go fairly quickly. *
11/21/2020 NOTE: I haven’t tested it yet- but if you’d rather use the Engraving Tool to do the cutting then you can use the Stainless Steel and More option for the shape Line Type.
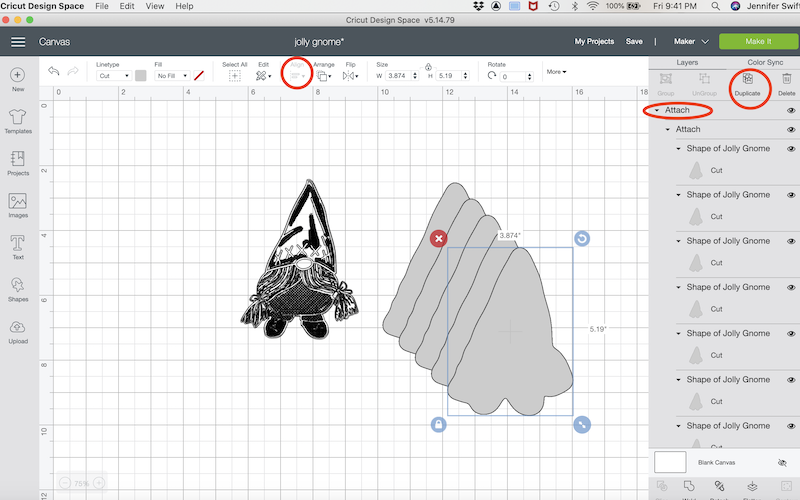
Note: For this number of passes the blade still won’t go all the way through the aluminum. But it’s cut it enough that we can break it apart easily when it’s done.
Step Four: Prep the Mat
Take your painted aluminum sheets and place them on your purple Strong Grip Mat as shown on the Mat Preview Page. I like to have mine in the middle of the mat and move the design on the Mat Preview to engrave in the center of the mat. This gives me plenty of room to tape down the edge of my metal sheets with painter’s tape.
Step Five: Prep the Mat Preview Page
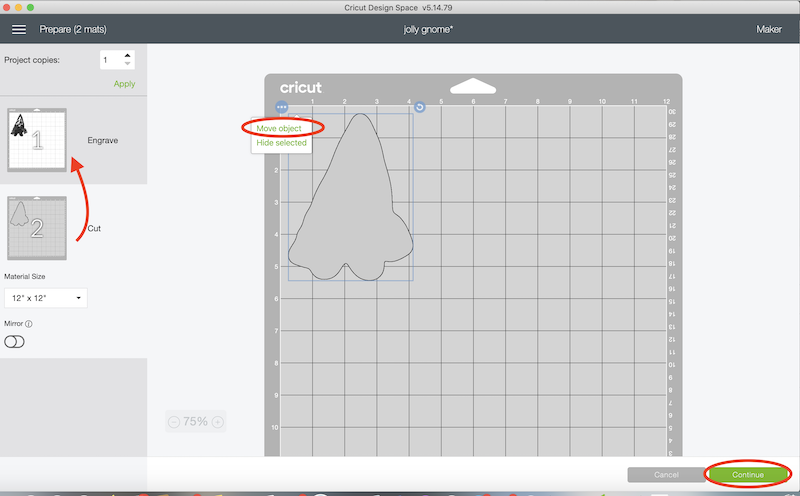
Click on the second mat and select the design. In the upper left corner is 3 dots, click on this and select the Move Object option. Move the design to your first mat so both images are on the same mat. Stack both designs on top of each other. Align your images on screen to match your aluminum’s placement on your mat. Double check this! Then, click Continue.
Step Six: Select Your Materials and Go!
On this page you’ll be asked to choose a Material Setting. Because we want to cut and engrave I chose the Foil Holographic Kraft Board option. This material has one of the highest pressure settings and it allows us to select the two actions we want to do, cut and engrave.
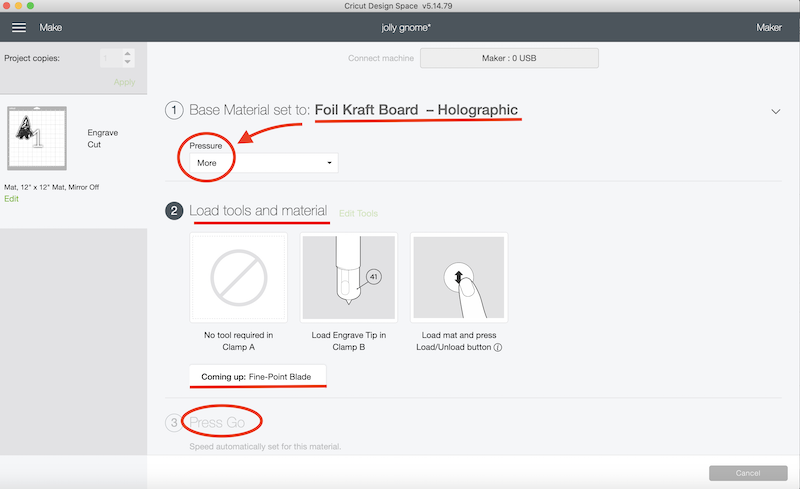
Load your mat into the Cricut, and press Go! It will prompt you to remove the engraving tool after it’s done engraving and insert the fine point blade. After the 40 cuts have been made you can probably remove it from the mat. Although, if you want to do more passes you can, as long as you didn’t unload the mat! Just press the Go button again.
Step Seven: Break Off the Extra Metal OR Cut Around the Shape with a Jeweler’s Shears
After the Cricut is done cutting, unload the mat and remove the metal sheet from the mat. Apply pressure around the cut area and bend it back and forth to break it. You’ll get a really nice line.
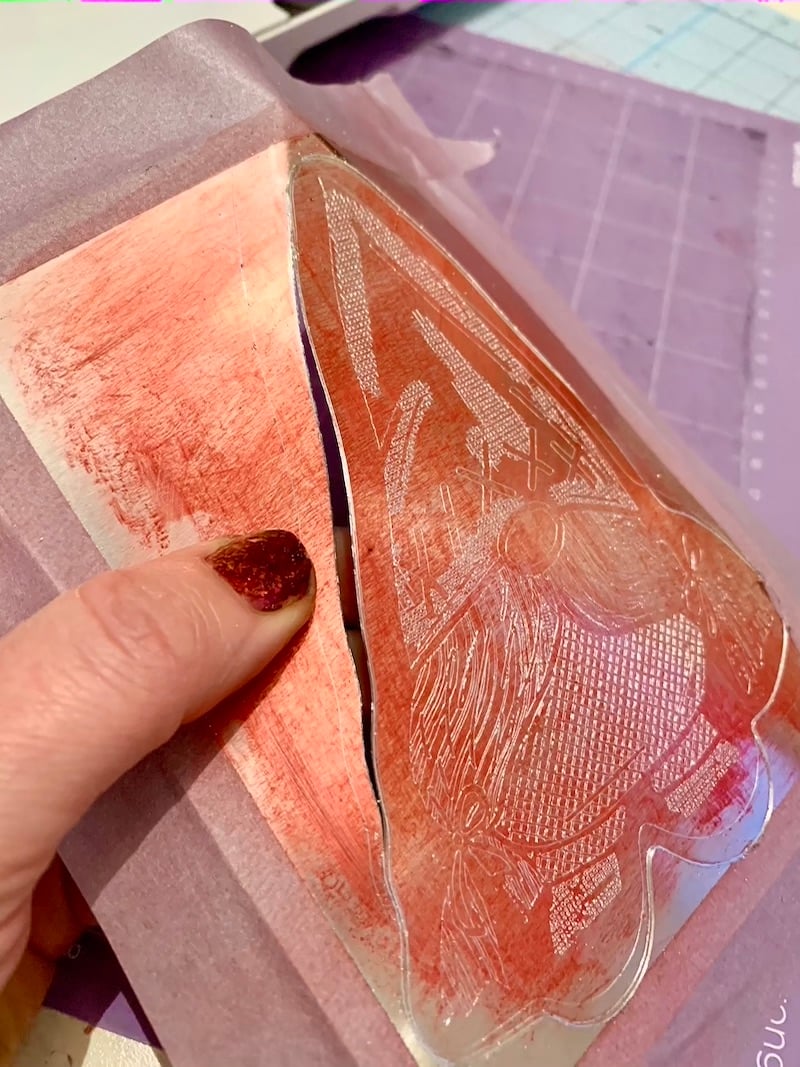
HOWEVER, in my opinion, unless you’re trying to get a perfect circle or oval OR the image has lots of ins’ and out’s then it’s just as easy to use the Jeweler’s Shears.
Although, there is something magical about having the metal break in a perfect curve.
Step Eight: Apply Gilder’s Paste
Use a lint-free cloth and wipe the black gilder’s paste over your engraving to darken it. Wipe away excess and let dry a bit.
Note: There are many different ways to darken your engraving. I really like the gilder’s paste right now but several people recommend shoe polish as an inexpensive alternative.
Step Nine: Punch Holes and Add Wire or Twine to Hang
Using a hole punch of some sort, or a drill, make a hole or holes to hang your ornament. Thread through twine, ribbon, or wire and then hang it on your Christmas Tree!
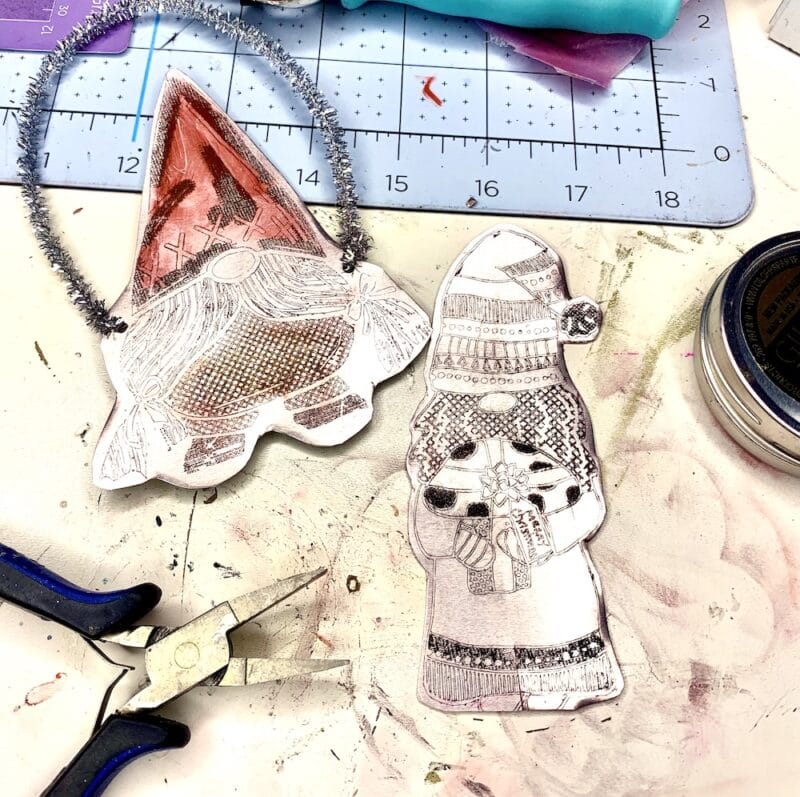
And You’re Done! YOU Can Make Engraved Cut Ornaments with a Cricut LIKE A BOSS!
More Gnomes? Oh YES!
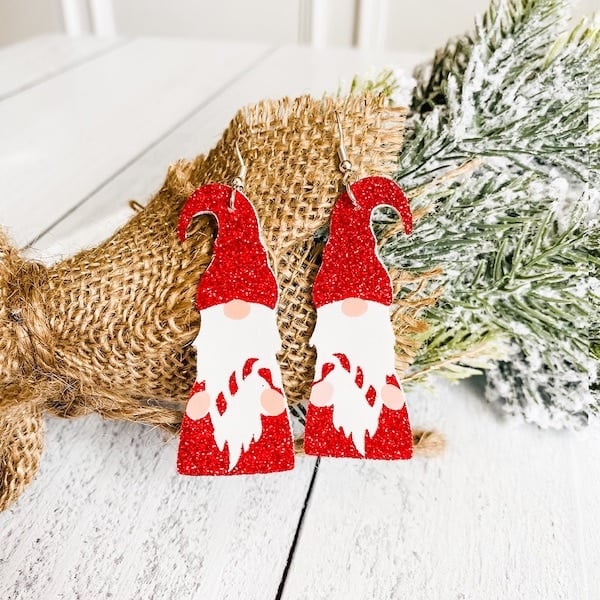
If you like my Gnome designs you’ll probably revel in the cuteness that is this ADORABLE Gnome earring set. The design is a Sweet Freebie for Gnome Week at AmyRomeu.com. AND you may notice if you swing by her site that she’s also hosting a giveaway during her 10 Days of Christmas Faux Leather Projects. That’s RIGHT NOW! If you don’t have a Cricut Maker yet this could be your chance!
AND OF COURSE- You can find all my other GNOME WEEK projects from both this year and last, right here on my blog!
Love this Post on Engraved Ornaments with a Cricut? Share it!
If you found this tutorial helpful then I would LOVE to have you share this post on social media. And if you’re over at Facebook anyways, you should totally try out my Engraving Metals with a Cricut Facebook Group! It’s been a ton of fun so far- just because there are so many people that are engraving for the very first time and love it.
Thanks for reading!


This gave me an idea to use for my garden. I use old CD’s to make hanging items to frighten away the pesky birds and such from my garden but now I am going to use these! I can make them a little bigger I think and, if necessary, make jointed ones and attach them together with wire. Thank you so much Jenn.